Showing posts with label zenfone. Show all posts
Showing posts with label zenfone. Show all posts
Tuesday, May 30, 2017
How to Root Zenfone 5 in 3 24 40 87 WW TW Lollipop Firmware
How to Root Zenfone 5 in 3 24 40 87 WW TW Lollipop Firmware
Tutorial - How to Root Asus Zenfone 5 in Latest 3.24.40.87 WW - TW Lollipop Firmware. In previews post we talk about How to Update Zenfone 5 in 3.24.40.87 WW/ TW firmware. Now We are sharing How to Root with step by step guide. This method tested on my Zenfone 5 WW SKU firmware.
Pre - Requirement
![Root Zenfone 5 in 3.24.40.87 [WW - TW] Lollipop Firmware](https://blogger.googleusercontent.com/img/b/R29vZ2xl/AVvXsEgoASMokQGAUSjLnPWlPJ1RsM6cLLyPow8cCG8Z6PknbQROCH6rVbr2h-AnfQa9ZEhfpgkwDXii0c1xoK8lZ_vLp7ZE9ZyyV0jyWJjw3HSr8wlAKZAdgsMLDLgQxqjNpzWjxfY7VAhp3us/s400/How+to+Root+Zenfone+5+in+3.24.40.87+%255BWW+-+TW%255D+Lollipop+Firmware.png "How to Root Zenfone 5 in 3.24.40.87 [WW - TW] Lollipop Firmware")
Pre - Requirement
- Zenfone Root Files
- Windows PC
- Intel USB Universal Drivers
How to Root Zenfone 5
Step 1. Download Zenfone Root file from end of post.
Step 2. Extract downloaded file on your PC.
Step 3. Now Enable USB debugging feature on your device from Settings > Developer option. If Developer option not available in your settings you can enable it from Settings > About > Software Information and click 7 to 8 times Build number for enable developer option.
Step 4. Now Connect your Zenfone with your PC using data cable.
Step 5. Open Zenfone Root folder that you extracted on your PC, and double click on Root file.
Step 6. After Click on root file it will open commend windows on your screen. Now press any key to continue and Wait to finish it. Dont disconnect your Zenfone data cable in root process.
Download here
USB Drivers - http://intel.ly/1JWOVrg
Zenfone Root - http://bit.ly/1TNh7Rs
Congratulation, After reboot you have a root access power. With root power you can access more application and system files. With this method you also can root Zenfone 4, Zenfone 6 and Zenfone 2 Kitkat and Lollipop supported. You can also check out How to Install Multi-user Mode on Asus Zenfone 5 and Zenfone 6.
Go to link download

Sunday, May 28, 2017
How To Install Official TeamEOS 5 1 1 Lollipop on Zenfone 2
How To Install Official TeamEOS 5 1 1 Lollipop on Zenfone 2
Tutorial - How To Install [Official] TeamEOS 5.1.1 Lollipop on Zenfone 2 ZE551ML (Z00A)/ ZE550ML (Z008) with step by step guide. TeamEOS should work like a charm for you if you follow the procedure correctly. But Do it with your own Risk Im not responsible of any damaged. But dont worry Ive tested this rom. Note : - Backup your data before perform this tutorial. How To Install [CM 12.1] CyanogenMod Lollipop on Zenfone 2.
![[Official] TeamEOS 5.1.1 Lollipop on Zenfone 2](https://blogger.googleusercontent.com/img/b/R29vZ2xl/AVvXsEiwFPmvkLtQFkoXQx1BWaufm8I-OTBySQOLT_Ez3CYTDh5Z6NwHY8cLzQQAxEG_N8ysRQ0ID1K3mMwlkvCNVV4jjfX1D-Y6f88we3C0YuDBRD3F0MCxD5yxs21hIICEhF9Yrjjd_4qgOcQ/s640/%255BOfficial%255D+TeamEOS+5.1.1+Lollipop+on+Zenfone+2.png "How To Install [Official] TeamEOS 5.1.1 Lollipop on Zenfone 2")
[ROM] TeamEOS Features for Zenfone 2
Step 2. Make sure youre running a proper working custom recovery. If you are not install custom recovery on your phone. Please first install it by your self.
Step 3. Download and Copy Gapps and TeamEOS ROM to your SDCard.
Step 4. Boot into Recovery.
Step 5. Perform a FULL factory wipe and wipe/system and dalvik cache as a precaution.
Step 6. Flash TeamEOS.
Step 7. Flash Gapps zip from SDCard.
Step 8. Reboot, First boot may take up to 10 minutes.
In this Tutorial We shared Install [Official] TeamEOS 5.1.1 Lollipop on Zenfone 2 ZE551ML (Z00A)/ ZE550ML (Z008) with step by step tutorial. When You install Custom Rom and try to root your device your warranty void automatically. We are not responsible for bricked devices, dead SD cards, do some research if you have any concerns about features included in this ROM before flashing it.
[ROM] TeamEOS Features for Zenfone 2
- NX Gesture Navigation Bar
- Re-sizable Navigation Bar
- Ambient Display
- EOS Wallpaper Showcase
- Custom Quick Toggles/Tiles
- Soft-key Long-Press and Double-Tap Actions
- Screen Recording
- Network Indicator (WiP)
- Dynamic Volume Steps
- CM12 Theme Engine
- Volume keys switch depending on rotation. So the volume up key is always either on the top or to the right of volume down. (Toggle-able)
- Default Volume Control Stream (Ring or Media)
- Advanced power menu with reboot options.
- Pre-Optimized OATs for better ART performance
- MUCH MORE...
How To Install TeamEOS on Zenfone 2
Step 1. Make sure you are rooted.Step 2. Make sure youre running a proper working custom recovery. If you are not install custom recovery on your phone. Please first install it by your self.
Step 3. Download and Copy Gapps and TeamEOS ROM to your SDCard.
Step 4. Boot into Recovery.
Step 5. Perform a FULL factory wipe and wipe/system and dalvik cache as a precaution.
Step 6. Flash TeamEOS.
Step 7. Flash Gapps zip from SDCard.
Step 8. Reboot, First boot may take up to 10 minutes.
Download here
GApps - http://bit.ly/1hDZwMp
ASUS Zenfone 2 Z00A/ZE551ML - http://bit.ly/1TZRH5N
ASUS Zenfone 2 Z008/ZE550ML - http://bit.ly/1hDZGDL
In this Tutorial We shared Install [Official] TeamEOS 5.1.1 Lollipop on Zenfone 2 ZE551ML (Z00A)/ ZE550ML (Z008) with step by step tutorial. When You install Custom Rom and try to root your device your warranty void automatically. We are not responsible for bricked devices, dead SD cards, do some research if you have any concerns about features included in this ROM before flashing it.
Go to link download
Saturday, May 27, 2017
How to Unbrick Asus Zenfone 4 FIX USB LOGO
How to Unbrick Asus Zenfone 4 FIX USB LOGO
Tutorial - How To Unbrick Asus Zenfone 4 using PC. Most of the Zenfone Users brick their zenfone 4 devices while updating firmware or flashing custom rom. When You Device Brick, the device may be stuck at usb logo or may fall in boot loop. How To Install CM 12.1 CyanogenMod Lollipop on Asus Zenfone 4.
Pre-Requirement
Pre-Requirement
- Install Android USB Drivers
- ADB Flash Tool (Download from - (http://bit.ly/1WRCxOS))
- Download recovery.img (version should be earlier or same version of your current firmware version) (Download from End of Post)
- Download Full firmware from Asus Official Device Support page. (Note that the downloaded firmware version should be earlier than your devices current version). (Download from End of Post).
How to UNBRICK Asus Zenfone 4
Step 1. Install Intel USB drivers on your pc.
Step 2. Make sure your phone is fully charged. (Charge it even if it is bricked).
Step 3. Press and hold power + volume up button to enter fastboot mode. Now connect your phone to pc.
Step 4. Extract the ADB Fastboot Tool.
Step 5. Place the recovery.img and Full Firmware in ADB folder.
Step 6. In ADB folder, hold shift then right click and choose "Open command window here".
Step 7. In the command window type the following commands one by one,
fastboot devices (To check whether the phone is connected to pc)
fastboot flash recovery recoveryfilename.img (Enter the recovery file name exactly)
Step 8. Now choose "Recovery" in fastboot mode.
Step 9. When Android logo appears, press and hold volume up + volume down for few seconds to enter recovery mode.
Step 10. In recovery mode, choose "Update from ADB".
Step 11. Now in command window type the following command
adb sideload firmwarename.zip (Enter the downloaded firmware name exactly)
Step 12. Now wait for the flashing process to complete.
Step 13. In recovery mode, wipe cache and data and finally reboot.
Download here
Firmware- http://bit.ly/1WRCPoT
Recovery img- http://bit.ly/1KckWMc
You have successfully unbricked your Asus Zenfone 4 device.
Go to link download
Thursday, May 25, 2017
How to Root Asus Zenfone Selfie ZD551KL without Using PC
How to Root Asus Zenfone Selfie ZD551KL without Using PC
Tutorial - How to Root Asus Zenfone Selfie ZD551KL without using your computer PC. Now We find a alternative method to root your zenfone selfie with one click using ding-dong Root App. This method is not tested by Techno Planners and do it, at your own risk. Also Check out How to Install Android 6.0 Marshmallow on Zenfone.
Requirement
Requirement
- Zenfone Selfie ZD551KL
- DingDong Apk (Download from end of post)
How to Root Asus Zenfone Selfie
Step 1. Download DingDong Apk from below link.
Step 2. Install it on your Device.
Step 3. Open it and Press the button to root.
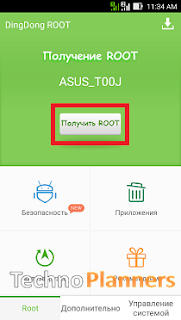
Download here
http://bit.ly/1NQ7KKI
Congratulation i hope it will work for your device, If it not working please share it with us. We will fix it ASAP. You can also check out How to Connect PC Link using Wifi Connection on Asus Zenfone.
Go to link download
Wednesday, May 24, 2017
How To Install Pixel Master Camera on CM 12 1 Rom Zenfone 5
How To Install Pixel Master Camera on CM 12 1 Rom Zenfone 5
Tutorial - How To Install Pixel Master Camera Application for CM 12.1 Rom. We can install default Asus Pixelmaster Camera App using TWRP Recovery Tool.

Pre-Requesting
Step 2. Copy downloaded file in SD-Card.
Step 3. Now Reboot your mobile into TWRP recovery.
Step 4. In TWRP recovery select "Install" and choose That downloaded file.
Step 5. After selecting, Swipe the slider to right side to continue installation.
Step 6. After Successful installation your mobile will restart automatically.
Done. Please Note: - You will not get any ZenUI updating from Play store. To update Pixel Master and Asus Galley you need to download Apk file and install as normal app. If you not using CyanogenMod on Zenfone you can also check out How To Install [CM 12.1] CyanogenMod Lollipop 5.1.1 on Zenfone 5.
Pre-Requesting
- TWRP Recovery Installed (Check Out How To Install flash TWRP).
- Pre Installed CM12.1 Rom
- Pixel Master patch file (Download From Below Link)
How to Install Pixel Master Camera on CM12.1
Step 1. Download Pixel Master patch from below Link.Step 2. Copy downloaded file in SD-Card.
Step 3. Now Reboot your mobile into TWRP recovery.
Step 4. In TWRP recovery select "Install" and choose That downloaded file.
Step 5. After selecting, Swipe the slider to right side to continue installation.
Step 6. After Successful installation your mobile will restart automatically.
Download here
https://db.tt/hJUxJ8xO
Done. Please Note: - You will not get any ZenUI updating from Play store. To update Pixel Master and Asus Galley you need to download Apk file and install as normal app. If you not using CyanogenMod on Zenfone you can also check out How To Install [CM 12.1] CyanogenMod Lollipop 5.1.1 on Zenfone 5.
Go to link download
Tuesday, May 23, 2017
Resurrection Remix Lollipop for Zenfone 5 v5 5 9 Build 7 0
Resurrection Remix Lollipop for Zenfone 5 v5 5 9 Build 7 0
Tutorial - How to install Resurrection ROM on Asus Zenfone 5 [v5.5.9 Build 7.0]. You can download this rom from end of the post. This is the most stable version if we compare to previous build, but there is two bug FM and GPS are not Working. In preview post We talk about Install CM12.1 on Zenfone 5 Very Stable.
Pre-Requirement
Step 2. Power off your device. Press and hold Vol UP + Power till see the ASUS Logo.
Step 3. Now extract ADB on your PC and copy the downloaded new-twrp image file in ADB folder.
Step 4. Open ADB folder and Press and hold Shift button and Right Click on mouse then choose open CMD WINDOW HERE.
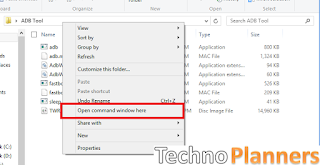
Step 5. Now Write below CMD to flash TWRP Recovery on Device
Step 6. After Successfully flash recovery image on device. Select Reboot option from droidboot.
Step 7. After reboot Now Copy RR Rom, GApps and Xposed files to external SD card. Dont use internal storage.
Step 8. Open TWRP recovery via bootloader (Use Step 2 to open the device in the bootloader). Then select recovery option using volume and power key.
Step 9. Now Select WIPE option, then Type Yes to format the internal storage.
Step 10. Go Back and Select Install then tap on Select storage (Micro SD-Card).
Step 11. Now Select RR Rom to flash, then Select Gaaps and last one select Xposed file.
Step 12. After flash all files now select wipe caches then Reboot device.
Congratulation, Now you can use Resurrection ROM on your Asus Zenfone 5. Share this post with your friends and family.
Pre-Requirement
- Resurrection ROM Zip file
- Xposed framework (for fix device storage issue)
- GApps Zip file
- Bootloader Unlocked (Also Check out How To Unlock Bootloader on Asus Zenfone 5)
- ADB Tool
- TWRP Recovery Installed (Download All Requirements files from End of post)
How to Install Resurrection ROM on Zenfone 5
Step 1. Download All requirements files from end of the post and after unlocking bootloader now flash twrp recovery on the device.Step 2. Power off your device. Press and hold Vol UP + Power till see the ASUS Logo.
Step 3. Now extract ADB on your PC and copy the downloaded new-twrp image file in ADB folder.
Step 4. Open ADB folder and Press and hold Shift button and Right Click on mouse then choose open CMD WINDOW HERE.
Step 5. Now Write below CMD to flash TWRP Recovery on Device
- fastboot flash recovery new-twrp.img
Step 6. After Successfully flash recovery image on device. Select Reboot option from droidboot.
Step 7. After reboot Now Copy RR Rom, GApps and Xposed files to external SD card. Dont use internal storage.
Step 8. Open TWRP recovery via bootloader (Use Step 2 to open the device in the bootloader). Then select recovery option using volume and power key.
Step 9. Now Select WIPE option, then Type Yes to format the internal storage.
Step 10. Go Back and Select Install then tap on Select storage (Micro SD-Card).
Step 11. Now Select RR Rom to flash, then Select Gaaps and last one select Xposed file.
Step 12. After flash all files now select wipe caches then Reboot device.
Download here
ADB Tool - http://bit.ly/1ILHUGh
TWRP img - http://bit.ly/1Ma4Ajo
Xposed - http://bit.ly/1XOY0Ll
GApps - http://bit.ly/1XOYwZL
RR ROM - http://bit.ly/1XOYGQV
Congratulation, Now you can use Resurrection ROM on your Asus Zenfone 5. Share this post with your friends and family.
Go to link download
Monday, May 22, 2017
ZenMotion Zenfone 5 Add double tap to wake sleep mod T00J T00F
ZenMotion Zenfone 5 Add double tap to wake sleep mod T00J T00F
We already share this tutorial in preview post but some user unable to add zen-motion features. This is updated ASUS Zenfone Tutorial about How to Install ZenMotion on Zenfone 5 and Zenfone 6. This method works with lollipop firmware and tested with 3.23.40.52 and 3.24.40.78 Firmware. Do it with own risk I am not responsible for any damage. Recently we share CyanogenMod 13.1 Android 6.0 Zenfone 5 and Zenfone 6.
Whats ZenMotion
This feature comes with most advance mobile phones like Zenfone Zoom or Zenfone 2. With this you can suspend your screen by double tap on the screen and this method also work for Wake Up your screen.
Download ADB driver pack from end of post. Now connect your device and Run ADB drive on your pc and click on Install button. Wait it to finished it. Once it done, Go to next Step.
Zenfone
Congratulation, You have done all steps easily. Now you can use Zen-motion on your Zenfone 5 and Zenfone 6. If you like this tutorial, please share it on your social media page. It helps us to grow.
Whats ZenMotion
This feature comes with most advance mobile phones like Zenfone Zoom or Zenfone 2. With this you can suspend your screen by double tap on the screen and this method also work for Wake Up your screen.
Requirement files
- ZenMotion Tool
- Windows PC
- Root Zenfone
- ADB Driver
Download ADB driver pack from end of post. Now connect your device and Run ADB drive on your pc and click on Install button. Wait it to finished it. Once it done, Go to next Step.
Rooted You Device
Before Add Double Tap to Wake/ Sleep feature on your device. First You have to root your device. From Zen-Motion-Tool folder Click on Root Zenfone .bat file and wait it to finished it.Zenfone
How to Install ZenMotion
- Enable USB debugging mode on your device from Settings > about > Build number. Hit 7 times on build number to enable developer mode. Once it shows developers mode enabled. Now Go back to settings > Developers Options > Check USB Debugging mode.
- Connect Zenfone with PC using data cable.
- Open ZenMotion folder, then again open ZenMotion folder, then open permission folder now copy both file and paste in your device internal storage.
- Now Double Click on Install ZenMotion bat file.
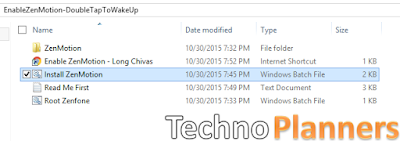
- SuperSU Prompt Appear on your zenfone and click Grant.
- Now It will ask for Press any key to continue hit any key and Wait until done.
- After Complete, Go To Settings > ZenMotion > First disable it then Enable it.
Fix Touch Screen on Zenfone
After Reboot, if you touch screen not work. Turn off your device and reboot in droidboot mode using Volume Up + Power Button. Once your device opens in droidboot. By using Volume and power button, select Reboot options. Now your touch screen work properly. If this method does not work for you. Please drop your comment we will reply As soon As Possible.How to Remove
If you want to remove this Zenmotion feature from your Zenfone for any reasons. You can read about how to Uninstall ZenMotion feature on Zenfone.Download here
ZenMotion Tool - http://bit.ly/1oDWjk2
Congratulation, You have done all steps easily. Now you can use Zen-motion on your Zenfone 5 and Zenfone 6. If you like this tutorial, please share it on your social media page. It helps us to grow.
Go to link download
Sunday, May 21, 2017
Install CM12 1 on Zenfone 5 Android 5 1 1 Very Stable
Install CM12 1 on Zenfone 5 Android 5 1 1 Very Stable
Tutorial - How to Install Android 5.1.1 CM12.1 on Asus Zenfone 5 Very Stable version. Here you can download CM12.1 and find a guide how to install it on your device. There are lots of changes in ROM like to improve batter backup, performance, touch, sensor, audio is more loud if we compared to stock ROM. Now you can use the device in horizontal mode and the last one is the camera. There is an available dual camera application available one is Cynogenmod camera and the second is Asus Stock Camera app.
Pre Requirement
Step 2. Power off your device. Press and hold Vol UP + Power till see the ASUS Logo.
Step 3. Now extract ADB on your PC and copy the downloaded new-twrp image file in ADB folder.
Step 4. Open ADB folder and Press and hold Shift button and Right Click on mouse then choose open CMD WINDOW HERE.
![CM12.1 on Zenfone 5 Android 5.1.1 [Very Stable]](https://blogger.googleusercontent.com/img/b/R29vZ2xl/AVvXsEhKU2XhcQItEZxtSuPbQ5WqtupiSGrKoRBAFI4futmqUpUSLHYIlGrfFdmMjAMCBk0q57nd-nvc3ZEuEb_64Jd___Hh6LviWOnNQmyLrrtCi64amwu-O_ULZ6bwXpxBzeHkJT7FGpnlAsc/s320/Install+CM12.1+on+Zenfone+5+Android+5.1.1++%255BVery+Stable%255D.png "Install CM12.1 on Zenfone 5 Android 5.1.1 [Very Stable]")
Step 5. Now Write below CMD to flash TWRP Recovery on Device
Step 7. Now Copy CM12.1 ROM zip file in device internal storage.
Step 8. Open TWRP recovery via bootloader (Use Step 2 to open the device in the bootloader). Then select recovery option using volume and power key.
Step 9. Select Wipe Option then check Dalvik Cache, Cache and Data then Swipe to Wipe.
Step 10. Now Go back and select Install > Scroll down and select ROM zip > Swipe to flash.
Step 11. Again Go back and Select Wipe then Swipe to Factory Reset.
Step 12. Now Reboot System.
Congratulation, Now You can use the CM12.1 ROM on Asus Zenfone. Note first boot can be take 10 minutes if it will not start re-apply steps from step 8. You can also check out How to Install Stock Rom on Asus Zenfone 5. Share this tutorial with your friends and family.
Pre Requirement
- TWRP Recovery (Download All files from end of post)
- Device Bootloader Unlocked (Also Check out How To Unlock Bootloader on Asus Zenfone 5)
- ADB Tool
- CM12.1 ROM
How to Install CM12.1 on Asus Zenfone 5
Step 1. After Unlocked bootloader. Now flash TWRP custom recovery on your device.Step 2. Power off your device. Press and hold Vol UP + Power till see the ASUS Logo.
Step 3. Now extract ADB on your PC and copy the downloaded new-twrp image file in ADB folder.
Step 4. Open ADB folder and Press and hold Shift button and Right Click on mouse then choose open CMD WINDOW HERE.
Step 5. Now Write below CMD to flash TWRP Recovery on Device
- fastboot flash recovery new-twrp.img
Step 7. Now Copy CM12.1 ROM zip file in device internal storage.
Step 8. Open TWRP recovery via bootloader (Use Step 2 to open the device in the bootloader). Then select recovery option using volume and power key.
Step 9. Select Wipe Option then check Dalvik Cache, Cache and Data then Swipe to Wipe.
Step 10. Now Go back and select Install > Scroll down and select ROM zip > Swipe to flash.
Step 11. Again Go back and Select Wipe then Swipe to Factory Reset.
Step 12. Now Reboot System.
Download here
ADB Tool - http://bit.ly/1ILHUGh
TWRP img - http://bit.ly/1Ma4Ajo
CM12.1 ROM - http://bit.ly/1jFQtvG
Congratulation, Now You can use the CM12.1 ROM on Asus Zenfone. Note first boot can be take 10 minutes if it will not start re-apply steps from step 8. You can also check out How to Install Stock Rom on Asus Zenfone 5. Share this tutorial with your friends and family.
Go to link download
CM13 ROM Update Android 6 0 on Zenfone 2 without Root
CM13 ROM Update Android 6 0 on Zenfone 2 without Root
Hello Guys, In this text tutorial I will teach you how to update ASUS zenfone 2 in android 6.0 marshmallow. First, I am telling you this is a custom ROM from cynogenmod CM13 for zenfone 2 but in the upcoming months we will get an official update from ASUS. This ROM has android 6.0.x OS and Linux kernel 3.10.x version.
![Android 6.0 on Zenfone 2 [Z00A - Z008] without Root](https://blogger.googleusercontent.com/img/b/R29vZ2xl/AVvXsEg0QUREVCKTlTt_CEAJV9XcpusnuxNWrVoerY0utwMlWmMl4WGK_ucOFY8bf3LDyWycEOAZbAzUrJT5vW-wiMBHv3y_Ymu8z_0aQ9H89-U9FYElDI8368x0lwcQgF-O9suaUgqDqqFPWIY/s320/Update+Android+6.0+on+Zenfone+2+%255BZ00A+-+Z008%255D+without+Root.png "[CM13] Update Android 6.0 on Zenfone 2 [Z00A - Z008] without Root")
First boot can take up-to 10 minutes to make cache files for applications. Once its done, you can confirm Android 6.0.x version install on your system by Going to Settings > About Phone > it must show Android version 6.0.1. You can play Marshmallow eggster game by hitting Android version 5 to 6 times. Thank you for using our tutorial you can also check out How to Flash TWRP Recovery on Asus Zenfone 2 Laser, Please share this tutorial with your friends and family.
Before Updating
First, you have to make a backup of your Application, Personal data, Contact detail, Internal Storage, etc. Because this tutorial will wipe your data and files. You can also make a backup of your stock firmware using CWM/ TWRP custom recovery. In this tutorial I am using TWRP recovery.Requirement
- Android 6.0 ROM for Zenfone 2 (Download all files from end of post)
- GApps for Marshmallow
- Custom Recovery Installed if you dont have any custom recovery, please first flash custom recovery on your device.
Make a full backup
- Power Off your device
- Reboot device in Recovery Mode by using the Power + Volume UP button
- Once the Team Win Recovery Open, Select "Backup"
- Check "Cache, Data and System" option from the list and "swipe to backup" button.
- It will take server minutes to complete and its depend on device data size. Once its done, Boot your device normally and save TWRP folder on your PC/ SD-Card.
Android 6.0 Zenfone 2 Flash Using TWRP Recovery
- Download ROM and GApps Zip file from the end of the post on your computer.
- Then, connect your device with your computer/PC with the help of the USB cord.
- Place both files in your device internal/external storage.
- Disconnect the USB cable and also power off your device.
- Reboot into recovery mode.
- From recovery select “Wipe” then select format data and write yes to confirm wipe.
- Now go back to the main menu and select “Install”.
- First Pick the CM13 Marshmallow zip file and flash it on your ASUS ZenFone 2.
- Once its done, flash Google Apps zip.
- Done, select Wipe Cache and swipe to wipe
- Go back to main menu of recovery select “reboot system now”.
Using CWM Recovery
- Use above steps from 1st step to 5th step.
- Select “Wipe data/ factory reset”“wipe cache partition” and “wipe dalvik cache”, then select “Yes” to confirm.
- Now select “Apply update” from the main menu and select “Choose from internal storage” or choose an external storage if you place the zip file in SD_Card.
- Select CM13 ROM file and it will install without confirmation.
- Once the ROM is installed, flash the GApps file.
- Reboot your device.
Download here
GApps - http://bit.ly/1NBj4y8
Z00A - http://bit.ly/1LZVdtL
Z008 - http://bit.ly/1LZVk8A
First boot can take up-to 10 minutes to make cache files for applications. Once its done, you can confirm Android 6.0.x version install on your system by Going to Settings > About Phone > it must show Android version 6.0.1. You can play Marshmallow eggster game by hitting Android version 5 to 6 times. Thank you for using our tutorial you can also check out How to Flash TWRP Recovery on Asus Zenfone 2 Laser, Please share this tutorial with your friends and family.
Go to link download
Friday, May 19, 2017
ROM Resurrection Remix Nougat 7 0 Asus Zenfone 5 T00J T00F
ROM Resurrection Remix Nougat 7 0 Asus Zenfone 5 T00J T00F
Hey Guys, Recently another developer shared another Nougat ROM for ASUS Zenfone 5 and Zenfone 6. This is more stable and unofficial version of Android 7.0.1 Nougat from minhtri109 and it is based on CM14. This builds create on latest Google Android 7.0.1 source code with Linux 3.10.x kernel. Below you can read working features and bugs. This Resurrection Remix ROM tested with Zenfone 5 T00J/T00F but do it with your own risk and I am not responsible for any damage. If you think there is a bug in this ROM you can check out the Lineage OS on Zenfone 5.
Requirements
Working Features
Whats NOT working
Resurrection Remix Features
There is lots of customization available in the RR like Screen dim timeout mode, Dim alpha, Double tap to sleep on the navbar, Navigation Bar left/Right handed mode Switch for landscape, Navbar slim dim, Button customization on navbar tiles, Animate dim, and the last one is my favorite Enable/ or disable nav bar.
TWRP Recovery
Before Installing the Custom ROM on your device. You have to flash custom recovery TWRP Touch Recovery on your Zenfone. If you are already using Custom Recovery Go to next flash step otherwise, please use this tutorial to flash TWRP Recovery on your Zenfone5/6.
Congratulation, Now you can enjoy the Android 7.0.1 Nougat Update on your Zenfone 5. First boot can take up to 5 - 10 Minutes. So, Please do not power off your device in this stage. Once the boot complete it will ask for WiFi or mobile data connection, Google Account etc. Fill all information if you want to access Play Store/ or Gmail Applications on your device. Before you go, You can also check out Lollipop Marshmallow Nougat Custom ROMs List for Zenfone 5. Please share this post and your reviews/ or bug report with our other visitors.
Requirements
- RR ROM (Download all files from end of post)
- Pico Google Apps for Nougat
Working Features
- WiFi
- Bluetooth
- Camera
- Games
- Play Store
- Internet
- Developer Mode
- Flashlight
Whats NOT working
- FM
- Import contacts from SIM card not work
Resurrection Remix Features
There is lots of customization available in the RR like Screen dim timeout mode, Dim alpha, Double tap to sleep on the navbar, Navigation Bar left/Right handed mode Switch for landscape, Navbar slim dim, Button customization on navbar tiles, Animate dim, and the last one is my favorite Enable/ or disable nav bar.
TWRP Recovery
Before Installing the Custom ROM on your device. You have to flash custom recovery TWRP Touch Recovery on your Zenfone. If you are already using Custom Recovery Go to next flash step otherwise, please use this tutorial to flash TWRP Recovery on your Zenfone5/6.
How to flash Resurrection Remix Nougat Zenfone
- First, You have to download requirements material for the device from the end of the post.
- Download Pico Gapps for Nougat from here and Choose x86 -> Android 7.0 -> Pico.
- Now, From your PC copy ROM and GApps zip files and paste it in your zenfone internal storage using data cable/ or using wireless application for example: Share-it/ Super Beam.
- Unplug your device from PC and Turn off it.
- Reboot into recovery mode by using the Power + Volume Down button.
- Select Wipe > Advance Wipe > check the data, dalvik cache, catch, system and swipe to wipe it.
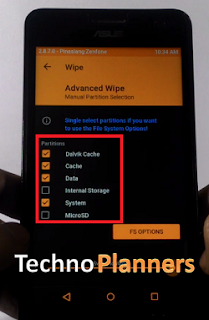
- Tap Install and find the ROM zip file and flash it
- Similarly, flash GApps on your device.
- After flashing, you should format old files from in the TWRP.
- Go back and select Wipe > Advance Wipe > check the data, dalvik cache, data, internal storage (optional).
- Now, finally Reboot your device.
Download here
ROM- http://bit.ly/2jMN9j7
Congratulation, Now you can enjoy the Android 7.0.1 Nougat Update on your Zenfone 5. First boot can take up to 5 - 10 Minutes. So, Please do not power off your device in this stage. Once the boot complete it will ask for WiFi or mobile data connection, Google Account etc. Fill all information if you want to access Play Store/ or Gmail Applications on your device. Before you go, You can also check out Lollipop Marshmallow Nougat Custom ROMs List for Zenfone 5. Please share this post and your reviews/ or bug report with our other visitors.
Go to link download
How to Connect PC Link on Zenfone Latest Update
How to Connect PC Link on Zenfone Latest Update
Tutorial - How you can install and connect PC Link on Asus Zenfone 4, Zenfone 5. Zenfone 6. Zenfone Selfie, Zenfone 2, Zenfone 5 LTE, Zenfone 2 Laser, Zenfone Delux with your computer and laptop.
The Best think about the PC Link Application. You can operate your Zenfone from your PC, Play any android game on your Computer like Asphalt 8, Temple Run and there is lots of features.
Requirement
Step 2. Launch PC Link on both device
Step 3. Connect your Zenfone with pc using a USB Cable and a dialog will shows up if “Enable USB debugging to us PC Link” Select OK
Step 4. Check “USB Debugging” option the select OK

Step 5. Now, On you PC under device name double click on your device.

Congratulations, Now you can use PC Link on Zenfone. If you are running your device on Android 5.0 version you can using PC Link without data cable. You can also check out How to Connect PC Link using Wifi Connection on Asus Zenfone Device.
The Best think about the PC Link Application. You can operate your Zenfone from your PC, Play any android game on your Computer like Asphalt 8, Temple Run and there is lots of features.
Requirement
- PC Link (Download from End of Post)
- You are using PC Link Updated Version
- Windows Operating System
- USB Data Cable
How To Install and Connect PC Link
Step 1. Install PC Link on you PC (Download from Below Link)Step 2. Launch PC Link on both device
Step 3. Connect your Zenfone with pc using a USB Cable and a dialog will shows up if “Enable USB debugging to us PC Link” Select OK
Step 4. Check “USB Debugging” option the select OK
Step 5. Now, On you PC under device name double click on your device.
Download here
http://pclink.asus.com
Congratulations, Now you can use PC Link on Zenfone. If you are running your device on Android 5.0 version you can using PC Link without data cable. You can also check out How to Connect PC Link using Wifi Connection on Asus Zenfone Device.
Go to link download
Possible to Increase Output Volume on Zenfone 5 6
Possible to Increase Output Volume on Zenfone 5 6
Tutorial - How to increase volume sound on Asus Zenfone 5 and Zenfone 6. Now you can increase your Zenfone volume easily. This method tested on Lollipop 3.23.40.60 Update and i dont know it will work for Kitkat firmware or not, but you can test it and share it with our other visitors. Also you have a rooted Zenfone. Also Check out One Click Root for Zenfone 4, 5, 6 and Zenfone 2.
Step 2. Now, Install ES Explorer from Play Store.

Pre-Requesting
- Rooted Zenfone
- ES file Explorer (Download from Play Store)
- Volume Mod file (Download from End of Post)
How to Increase Volume on Asus Zenfone
Step 1. Download Volume Mod file from below link and unzip file using password - (technoplanners.blogspot.com) then copy files in your internal storage.
Step 2. Now, Install ES Explorer from Play Store.
Step 3. Once Installed, Open ES Explorer then tap on upper left corner button and select Tools then Enable Root Explorer and it will prompt to Grant Super SU (Root Permission). Now Hit on Grant Button.
Step 4. Now Go To Device/System/etc/parameter-framework/setting/Audio/ directory and Rename your AudioConfigurableDomains_axxxcg.xml to AudioConfigurableDomains_axxxcg.xml.old .
Step 5. Now Go Internal storage then copy AudioConfigurableDomains_axxxcg.xml files and Paste into Device/System/etc/parameter-framework/setting/Audio/paste here.
Download here
http://bit.ly/1QWJREK
http://bit.ly/1QWJREK
Now Reboot Your Device. Now you will get Highest sound on your Asus Zenfone 5 and Zenfone 6. Also check out How to Fix Boot Loop on Asus Zenfone 5. If you brick your zenfone 5 you can fix it by using Fix Boot Loop Tutorial.
Go to link download
Thursday, May 18, 2017
Zenfone 5 Dirty Unicorn v10 5 Unofficial ROM
Zenfone 5 Dirty Unicorn v10 5 Unofficial ROM
Hello Guys, there is a new Dirty Unicorn ROM for Zenfone 5 from resk87 senior member of XDA Developer. Dirty Unicorn based on Android 6.0.1 Marshmallow with more performance and power. This is not an official update from ASUS Zenfone and maybe there are some bugs and error like at this time Radio Application is not available and Sometime download is stuck. Currently, This Zenfone 5 Dirty Unicorn ROM status on the stable. If you detect any bug or problem with this ROM, please share it with us and our other visitors. And do it with your own risk, Techno Planners is not responsible for any damage
With this method you can flash any zip file on your device without any problem. If you find any bug in this Zenfone 5 Dirty Unicorn ROM or in other MOD files. Please drop your comment below and share it with our other visitors. You can also find new best Custom ROM Zenfone 5 Thank you and have a nice day.
Requirement
- Dirty Unicorn ROM
- GApps nano
- Latest TWRP Recovery
TWRP Recovery
Before upgrading to any custom ROM you have, to flash Custom TWRP Recovery. If you have pre-install recovery you can skip this step otherwise use this tutorial to Install Latest TWRP on your device.Dirty Unicorn Features
- Kernel Custom Features Management
- Trebuchet
- ZenUI Keyboard
- Asus Pixel Master Camera
- Browser
- New ramdisk
- LED sensor fixed
- Adaptive brightness fixed
- dt2w fixed
- Boot Animation Update
- Merge 6.0.1._r62 branch
- AudioFX From CM
- Latest Blob
- Sync Du Source
- Volume mod (need to flash zip)
- 3Minit Battery Mod (need to flash zip)
- SelinuxKernel On dual SIM (need to flash zip)
Guide to make a backup
- Turn off Your Zenfone
- Open TWRP recovery mode by using the Power + Volume Down button.
- Tap on Backup then Slide left to right from Swipe to backup button
- Once the Backup Complete reboot device normally and Copy TWRP folder on your PC/Computer/SD-Card.
How to flash Dirty Unicorn on Zenfone 5
- Download ROM, Gapps from end of post link given.
- Copy ROM, GApps in your device SD-Card.
- Turn Off your device.
- Reboot into Recovery using Power + Volume Down button.
- Tap on Wipe, then check "Dalvik Cache", "Cache"," Data" and "System" then swipe to wipe.
- Go back, Tap on Install and flash ROM zip file, then GApps that you copied in your SD-Card.
- Once its done, Factory Reset your device
- Reboot the device and enjoy it on your Zenfone.
Download here
Kernel- http://bit.do/kernal4du
VolumeMOD- http://bit.do/VOLMz
GAPPS- http://bit.do/nanogapps
ROM- http://bit.do/DU-ZF5
How to Install Speaker Volume MOD
- Download VolumeMOD.zip file from the link.
- Copy it onto your device
- Power off and reboot into recovery
- Tap on Install, select the ZIP and flash it
- Reboot your device
With this method you can flash any zip file on your device without any problem. If you find any bug in this Zenfone 5 Dirty Unicorn ROM or in other MOD files. Please drop your comment below and share it with our other visitors. You can also find new best Custom ROM Zenfone 5 Thank you and have a nice day.
Go to link download
How to Flash TWRP Recovery on Asus Zenfone 2 Laser
How to Flash TWRP Recovery on Asus Zenfone 2 Laser
In preivew post we talk about How to Root ASUS Zenfone 2 Laser. Now In this new tutorial Techno Planners will show you How to Install TWRP Recovery for ASUS ZenFone 2 Laser ZE551KL/Z00T, ZenFone 2 Laser Z600KL/Z00L and ZenFone Selfie ZD551KL.
TWRP Recovery
Team Win Recovery Project is the best custom recovery to install any custom ROM on your device. You can access all button using the touch screen.
Compatible Device Model
Requirement
Install ADB Drivers
From the end of post Download ADB drivers and fastboot.zip file on your PC. Once it downloaded, Connect your device with PC and Install the Drivers.

Fast-boot
Download and extract fastboot zip file on your desktop using WinRAR tool.
Enable USB Debugging mode
Enable USB debugging mode on your device from Settings > about > Build number. Hit 7 times on build number to enable developer mode. Once it shows developers mode enabled. Now Go back to settings > Developers Options > Check USB Debugging mode.

Unlock Bootloader
From below link download Unlock Bootloader Application Apk file on your PC. Copy it onto your device. Install It and Run.

Download TWRP Recovery image file according to your device model. Copy image file in fastboot folder.
Now your device will reboot in recovery mode. That means you have successfully installed TWRP recovery on your Zenfone 2 Laser. Now you can install Custom ROM like [CM13] Android 6.0 marshmallow on your Zenfone 2 Lasers.
TWRP Recovery
Team Win Recovery Project is the best custom recovery to install any custom ROM on your device. You can access all button using the touch screen.
Compatible Device Model
- Zenfone 2 Laser ZE551KL
- Zenfone 2 Laser Z600KL/Z00L
Requirement
Install ADB Drivers
From the end of post Download ADB drivers and fastboot.zip file on your PC. Once it downloaded, Connect your device with PC and Install the Drivers.
Fast-boot
Download and extract fastboot zip file on your desktop using WinRAR tool.
Enable USB Debugging mode
Enable USB debugging mode on your device from Settings > about > Build number. Hit 7 times on build number to enable developer mode. Once it shows developers mode enabled. Now Go back to settings > Developers Options > Check USB Debugging mode.
Unlock Bootloader
From below link download Unlock Bootloader Application Apk file on your PC. Copy it onto your device. Install It and Run.
Download TWRP Recovery image file according to your device model. Copy image file in fastboot folder.
How to flash TWRP on Zenfone 2
- Connect your device with PC using data cable.
- From the fastboot folder. Press Shift(Keyboard) + Right Click (mouse) and Click on Open Windows Commend here.

- Type "adb fastboot reboot-bootloader" without quotes in CMD Window.
- Once your device open in droidboot mode. Type "fastboot flash recovery recovery.img" and press enter.
- Type "fastboot oem reboot -recovery" and hit enter.
- Done.
Download here
ADB - http://bit.ly/1L59rca
Fastboot Tool - http://bit.ly/1L59zZg
Fastboot Tool - http://bit.ly/1L59zZg
UnlockBootloader Apk Z00T - http://bit.ly/1UfC6NQ
UnlockBootloader Apk Z00L - http://bit.ly/1mPY4Jz
Zenfone 2 Laser ZE551KL/ Z00T - http://bit.ly/1QrTjxx
Zenfone 2 Laser Z600KL/ Z00L - http://bit.ly/1QrTk4A
Now your device will reboot in recovery mode. That means you have successfully installed TWRP recovery on your Zenfone 2 Laser. Now you can install Custom ROM like [CM13] Android 6.0 marshmallow on your Zenfone 2 Lasers.
Go to link download
Tuesday, May 16, 2017
ROM Resurrection Remix MM 6 0 for Asus Zenfone 5 T00J T00F
ROM Resurrection Remix MM 6 0 for Asus Zenfone 5 T00J T00F
Hey Guys, Recently another developer shared another Marshmallow ROM for ASUS Zenfone 5. This is stable and official version of Android 6.0.1 Marshmallow from tank0412 and it is based on CM13. This builds create on latest Google Android 6.0.1 source code with Linux 3.10.x kernel. Below you can read working features and bugs. This Resurrection Remix ROM tested with Zenfone 5 T00J/T00F but do it with your own risk and I am not responsible for any damage. If you think there is a bug in this ROM you can check out CyanogenMod 13 ROM
Step 2. Now, From your PC copy ROM and GApps zip files and paste it in your zenfone internal storage using data cable/ or using wireless application for example: Share-it/ Super Beam.
Step 3. Unplug your device from PC and Turn off it.
Step 4. Reboot into recovery mode by using the Power + Volume Down button.
Step 5 Once your phone will reboot into recovery mode, Tap Install and find the ROM zip file and flash it
Step 6 Similarly, flash GApps on your device.
Step 7. After flashing, you should format old files from in the TWRP.
Go back and select Wipe > Advance Wipe > check the data, dalvik cache, data, internal storage (optional).

Step 8. Now, finally Reboot your device.
Congratulation, Now you can enjoy the Android 6.0.1 Marshmallow Update on your Zenfone 5. First boot can take up to 5 - 10 Minutes. So, Please do not power off your device in this stage. Once the boot complete it will ask for WiFi or mobile data connection, Google Account etc. Fill all information if you want to access Play Store/ or Gmail Applications on your device. Before you go, You can also check out Lollipop Marshmallow Custom ROMs List for Zenfone 5. Please share this post and your reviews/ or bug report with our other visitors.
Requirements
- RR ROM (Download all files from end of post)
- Pico Google Apps for Android 6.0
Working Features
- Based on Android 6.0.1
- Based On Cyanogenmod 13
- Camera fixed
- WiFi
- Bluetooth
- Games
- Play Store
- Internet
- Developer Mode
- Double Tap on the navigation bar to Sleep, but I am sure not to double tap to Wake up mode
- Landscape Mode on home screen
- Flash light
- SMS/MMS fixed
- Headphone sound fixed
Whats NOT working
- GPS
- FM Radio
Resurrection Remix Features
There is lots of customization available in the RR like Screen dim timeout mode, Dim alpha, Double tap to sleep on the navbar, Navigation Bar left/Right handed mode Switch for landscape, Navbar slim dim, Button customization on navbar tiles, Animate dim, and the last one is my favorite Enable/ or disable nav bar.TWRP Recovery
Before Installing the Custom ROM on your device. You have to flash custom recovery TWRP Touch Recovery on your Zenfone. If you are already using Custom Recovery Go to next flash step otherwise, please use this tutorial to flash TWRP Recovery on your Zenfone5/6.How to flash Resurrection Remix Zenfone
Step 1: First, You have to download requirements material for the device from the end of the post. for Gapps: Choose x86 -> Android 6.0 -> PicoStep 2. Now, From your PC copy ROM and GApps zip files and paste it in your zenfone internal storage using data cable/ or using wireless application for example: Share-it/ Super Beam.
Step 3. Unplug your device from PC and Turn off it.
Step 4. Reboot into recovery mode by using the Power + Volume Down button.
Step 5 Once your phone will reboot into recovery mode, Tap Install and find the ROM zip file and flash it
Step 6 Similarly, flash GApps on your device.
Step 7. After flashing, you should format old files from in the TWRP.
Go back and select Wipe > Advance Wipe > check the data, dalvik cache, data, internal storage (optional).
Step 8. Now, finally Reboot your device.
Download here
GApps- http://bit.ly/1JOWjUq
ROM- http://bit.ly/1qW6wJV
Congratulation, Now you can enjoy the Android 6.0.1 Marshmallow Update on your Zenfone 5. First boot can take up to 5 - 10 Minutes. So, Please do not power off your device in this stage. Once the boot complete it will ask for WiFi or mobile data connection, Google Account etc. Fill all information if you want to access Play Store/ or Gmail Applications on your device. Before you go, You can also check out Lollipop Marshmallow Custom ROMs List for Zenfone 5. Please share this post and your reviews/ or bug report with our other visitors.
Go to link download
How to Install Android 6 0 Marshmallow on Zenfone 5 Boot Animation
How to Install Android 6 0 Marshmallow on Zenfone 5 Boot Animation
Tutorial - How to install Android 6.0 Marshmallow Boot Animation on Asus Zenfone 4, Zenfone 5, Zenfone 6, Selfie, Zoom, Laser, ZenPad and all Android phone supported. Every Android lover known the Marshmallow release for some device and it very stable and more powerful version if we compare with oldest version. But I like one feature it boot animation. Marshmallow Boot animation is very styles and colorful thats why i install it on my Zenfone 5 and share this tutorial with our lovely users. We also attach a video tutorial, it will more helpful to understand this guide. Also Check out How to Install ZenMotion feature on Zenfone 5 and Zenfone 6 (Wake/Sleep Supported).
Pre-Requirement
Note : Choose the right version of Marshmallow Boot Animation. For Example if you have a screen of resolution 1280x720 pixels, you would choose the 720p version and The Zenfone 5 have 720 pixels and i am providing 720 pixel file that you can download from end of post.
![Install Android 6.0 Marshmallow on Zenfone 5 [Boot Animation]](https://blogger.googleusercontent.com/img/b/R29vZ2xl/AVvXsEguapq2tVb5vsAvIUw9TfDrou9Fzd5_mTzP0nmk34XVr44QBnplqFnK8MU27hhoD7DhE-LylsxDBH4lx7gUnpdxTdnEcvy8zlYU2BKv8YQceTonCMrER4WFFjOfYnEKOydUtXDe0nKqCxY/s320/How+to+Install+Android+6.0+Marshmallow+on+Zenfone+5+%255BBoot+Animation%255D.png "How to Install Android 6.0 Marshmallow on Zenfone 5 [Boot Animation]")
![Install Android 6.0 Marshmallow on Zenfone 5 [Boot Animation]](https://blogger.googleusercontent.com/img/b/R29vZ2xl/AVvXsEjh86_vAsJ1yL-YSlChkzs_8DtzhagECeGA9BRHsWHCdzKw40ZRVASp3Ub_EDNAFhyOMwviixHh-JVcumbE32sr81LKtInuO34tIj0WzfKty519vXnk8_I5K574W8BC4iEvIGhRCpLJm2Y/s320/How+to+Install+Android+6.0+Marshmallow+on+Zenfone+5.png "How to Install Android 6.0 Marshmallow on Zenfone 5 [Boot Animation]")
Pre-Requirement
- Marshmallow Boot Animation file (Download from end of post)
- ES file Explorer (Download from Play Store)
- Rooted Zenfone Also check out One Click Root for Zenfone 4, 5, 6 and Zenfone 2
Note : Choose the right version of Marshmallow Boot Animation. For Example if you have a screen of resolution 1280x720 pixels, you would choose the 720p version and The Zenfone 5 have 720 pixels and i am providing 720 pixel file that you can download from end of post.
How to Install Android 6.0 Marshmallow on Zenfone 5
Step 1. First download Marshmallow Boot animation zip file and copy in your device internal storage.
Step 2. Install ES file Explorer on your device.
Step 3. Open ES Explorer then tap on upper left corner button and select Tools then Enable Root Explorer and it will prompt to Grant Super SU (Root Permission). Hit on Grant Button.
Step 4. Now Go To Device/System/Media directory and Rename your bootanimation to old.bootanimation.zip .
Step 5. Now Go Internal storage then copy BootAnimation.zip file and Paste into Device/System/Media/paste here.
Step 6. Now Reboot Your Device.
Download here
http://bit.ly/1PC2aOX
Congratulation. Now your old and boring Asus boot animation convert into marshmallow boot animation. I hope you love it. Please share it with your friends and family
Go to link download
Saturday, May 13, 2017
Xposed framework for Zenfone Lollipop Stock Rom effortless Guide
Xposed framework for Zenfone Lollipop Stock Rom effortless Guide
Hello Guys, In Previews post we discuss How to Install ZenMotion on Zenfone. Presently We are sharing a crisp Guide about Xposed for Zenfone Lollipop. Thanks to XDA developers Who made this Xposed structure for our x86 based procedures gadget.
Xposed Module
Xposed is an Application that progressions the framework conduct utilizing modules. There are bunches of modules accessible in the Xposed Installer App. Yet, a few modules are not working for our Zenfone.
Tested Modules on Zenfone
Here is some tried and working modules list that works for Zenfone device.
Caution
Before introducing Xposed on your gadget. Please take a backup of your Applications, Contacts, Internal Storage and other data. It can stuck on the bootloop issue. Do it at your own Risk, I am not responsible for any harm.
Requirement
Rooted Zenfone, To begin with, you need to root your gadget before introducing this. If you have a rooted device you can second requirement otherwise check out How To Root Zenfone Lollipop.
Windows Platform
You require a Windows 7, 8, 8.1 or 10 PC. It can just work with Windows Operating System. Along these lines, you cannot utilize Linux or Mac framework.
Enable USB debugging Mode
Enable developer option from Settings > About > Software information > Tap 7 times build number. Once it shows developer mode enable. Go back to Settings > Developer Options > Check Enable USB Debugging Mode option from the list.
Install Intel USB Drivers on your PC
Intel USB drivers associate Android phone to the PC and its get to all framework programming and equipment data from android gadget to PC. Download Intel USB drivers from end of post and introduce the drivers on your Windows PC.
Download Xposed Lollipop
Now Download Xposed Zenfone Lollipop document from end of post link given. When it downloaded on your PC Extract it on your desktop utilizing WinRAR device.
Congratulation, Now you can utilize Xposed Application on your Zenfone. In the event that you discover any bug. It would be ideal if you drop your remark and impart it to our different guests. Do you know you can introduce Zenfone 5 Custom ROM on your Zenfone 6. Here is some Custom ROMs for Zenfone 5.
Xposed Module
Xposed is an Application that progressions the framework conduct utilizing modules. There are bunches of modules accessible in the Xposed Installer App. Yet, a few modules are not working for our Zenfone.
Tested Modules on Zenfone
Here is some tried and working modules list that works for Zenfone device.
- GravityBOX [LP] 5.1.2
- Lolistart 1.1.2
- LPThemer 1.6
- Lucky Patcher 3.6.5
- OMZen Beta 8
Caution
Before introducing Xposed on your gadget. Please take a backup of your Applications, Contacts, Internal Storage and other data. It can stuck on the bootloop issue. Do it at your own Risk, I am not responsible for any harm.
Requirement
Rooted Zenfone, To begin with, you need to root your gadget before introducing this. If you have a rooted device you can second requirement otherwise check out How To Root Zenfone Lollipop.
Windows Platform
You require a Windows 7, 8, 8.1 or 10 PC. It can just work with Windows Operating System. Along these lines, you cannot utilize Linux or Mac framework.
Enable USB debugging Mode
Enable developer option from Settings > About > Software information > Tap 7 times build number. Once it shows developer mode enable. Go back to Settings > Developer Options > Check Enable USB Debugging Mode option from the list.
Install Intel USB Drivers on your PC
Intel USB drivers associate Android phone to the PC and its get to all framework programming and equipment data from android gadget to PC. Download Intel USB drivers from end of post and introduce the drivers on your Windows PC.
Download Xposed Lollipop
Now Download Xposed Zenfone Lollipop document from end of post link given. When it downloaded on your PC Extract it on your desktop utilizing WinRAR device.
How to flash Xposed for Zenfone
- Open Extracted folder that you downloaded from below link.
- Connect your Zenfone with PC using data cable.
- Double Click on InstallXposedInstaller.bat file. Wait, it finished it.

- Grant SuperSU Permission if ask on device.
- Once it finished, Click on the InstallXposedFramework.bat file. Your Phone will reboot automatically in server second.

- It can take 5 to 8 minutes to first boot. If screen stuck at booting for more than 10 mins you are probably bricked.
- Done
How to Install Xposed on Custom Marshmallow ROM
- Download Xposed Apk and framework from Below Link
- Copy both file on your device.
- Install Apk
- Power off and Reboot your device into custom Recovery using Power + Volume down button
- Tap on install, Now find framework file and install it.
- Once it done, Reboot your device and Enjoy
Download here
Intel USB Drivers - http://intel.ly/1BJDf2w
Xposed Zenfone - http://bit.ly/20uoJsE
Xposed Apk - http://bit.ly/1UF6kLC
Framework - http://bit.ly/1UF6lir
Xposed Apk - http://bit.ly/1UF6kLC
Framework - http://bit.ly/1UF6lir
How to Uninstall Xposed from Zenfone
- Download requirement file from the above link.
- Extract it on your desktop using WinRAR tool.
- Connect your Zenfone with PC using data cable.
- Open extracted folder and double click on RemoveXposedFramework,bat file.

- It will reboot automatically in server minutes.
- Done
Congratulation, Now you can utilize Xposed Application on your Zenfone. In the event that you discover any bug. It would be ideal if you drop your remark and impart it to our different guests. Do you know you can introduce Zenfone 5 Custom ROM on your Zenfone 6. Here is some Custom ROMs for Zenfone 5.
Go to link download
Fix Bootloop on any ASUS Zenfone 4 5 6 Selfie Laser etc
Fix Bootloop on any ASUS Zenfone 4 5 6 Selfie Laser etc
Hello Guys In this tutorial i will tell you How to Fix Bootloop on ASUS Zenfone 4, 5, 6 , Selfie, Laser, Zenfone. If your device going in bootloop that means your device can not start or its show ASUS logo and shutdown and reboot again and aging or it is showing boot animation continuously. That is means you have to fix bootloop issue on your zenfone.
If you can not find the firmware for your device. Please comment below and Ill update as soon as possible.
Requirement
- ADB Driver
- Intel Driver
- ADB Fastboot Tool
- Zenfone Stock ROM (Download All Reqirement files from end of the post)
- Windows PC
Install Drivers on your PC
Download Intel driver from end of the post. Once it downloaded on your PC, Install it on your PC like normal software.Install ADB Driver
- Download ADB Drivers from end of the post.
- Connect your zenfone in recovery mode
- Run ADB Driver, and Click on Install button
- Done
How to fix bootloop on Zenfone
- Now Download ADB Fastboot tool and extract it on your PC desktop.
- Copy Stock ROM zip file in extracted adb folder.
- Now Open Stock ROM using winrar and extract boot.img and recovery.img from it.
- Boot your device in droidboot mode. By Press and hold Power off button after vibrate suddenly press Volume Up button.
- Connect your device with PC using ASUS USB Data cable.
- Now open adb folder and press SHIFT + Right Mouse Button and select open command here.
- Now Type below command one by one and hit enter after each line
- After successfully flash both files dont close CMD Window.
- Now select recovery mode then press power button ( if u dont know how to open recovery mode using droidboot mode then Power off your device and Press and hold Power off button after vibrate suddenly press Volume Down button. May be it show no command or show android image, Now Press and hold Volume down and Volume Up button again and again it will show you recovery menu.
- Now select apply update from adb option
- Now type below command and hit enter then hit enter.
fastboot flash recovery recovery.img
fastboot flash boot boot.img
fastboot flash fastboot fastboot.img
adb sideload filename.zip
If you can not find the firmware for your device. Please comment below and Ill update as soon as possible.
Download here
Intel USB Drivers- http://intel.ly/1hCwP2o
ADB Drivers- http://bit.ly/2cUnlTg
ADB TOOL- http://bit.ly/2dGYSjQ
Zenfone 5 Firmware- http://bit.ly/1NIe9wm
Go to link download
Connect Mouse and Keyboard with Asus Zenfone and Android Phone Tutorial
Connect Mouse and Keyboard with Asus Zenfone and Android Phone Tutorial
Tutorial - How to Connect Asus Zenfone with PC computer mouse and keyboard. You also connect any android phone or tablets. After Connect this device you can write WhatsApp messenger or any note using keyboard. You can also play game using mouse and keyboard like Asphalt 8 and GTA San-Andreas. You can also check out How to Install Resurrection ROM on Zenfone 5 .
Pre Requirement
Pre Requirement
- USB OTA Cable
- Wireless mouse and Keyboard Combo
- Android version above Android 3.1
How to Connect Mouse and Keyboard with Phone
Step 1. Connect OTA Cable with your phone.
Step 2. Now Install Batteries in the Bluetooth mouse and keyboard.
Step 3. Connect the USB receiver to the OTA Cable.
Now You can use mouse and keyboard with you phone. You can write message and play games using mouse and keyboard. Share this amazing guide with your friends and family.
Go to link download
Thursday, May 11, 2017
How to Get Android 6 0 Marshmallow Boot Animation on Zenfone Series
How to Get Android 6 0 Marshmallow Boot Animation on Zenfone Series
Tutorial - How To Install Android 6.0 Marshmallow Boot Animation on Asus Zenfone 4, Zenfone 5, Zenfone 5, Zenfone 2, All Android Device and Zenfone supported. Now you can change your boring boot animation with interesting Android M Boot Animation. This method tested on ASUS Zenfone 5. Below, We also provide a video tutorial with step by step guide. How to Root Asus Zenfone 4, 5, 6 without PC.
Requirement

Requirement
- Boot Animation Zip file (Download from End of post)
- Rooted Zenfone
- ES File Explorer
How to Install Android 6.0 M Boot Animation
Step 1. Download Boot Animation zip file from below link and copy it in your internal storage.
Step 2. Now, Install ES Explorer from Play Store.
Step 3. Once Installed, Open ES Explorer then tap on upper left corner button and select Tools then Enable Root Explorer and it will prompt to Grant Super SU (Root Permission). Now Hit on Grant Button.
Step 4. Now Go To Device/System/Media directory and Rename your bootanimation to old.bootanimation.zip .
Step 5. Now Go Internal storage then copy BootAnimation.zip file and Paste into Device/System/Media/paste here.
Download here
http://bit.ly/1h3VzAS
Now Reboot Your Device. Now you will get Android 6.0 M Marshmallow Boot Animation on your Asus Zenfone 4, Zenfone 5, Zenfone 5, Zenfone 2, All Android device and Zenfone supported. How To Update Zenfone 5 to Firmware 3.23.40.60.
Go to link download
Subscribe to:
Posts (Atom)