Showing posts with label on. Show all posts
Showing posts with label on. Show all posts
Sunday, May 28, 2017
How To Install Official TeamEOS 5 1 1 Lollipop on Zenfone 2
How To Install Official TeamEOS 5 1 1 Lollipop on Zenfone 2
Tutorial - How To Install [Official] TeamEOS 5.1.1 Lollipop on Zenfone 2 ZE551ML (Z00A)/ ZE550ML (Z008) with step by step guide. TeamEOS should work like a charm for you if you follow the procedure correctly. But Do it with your own Risk Im not responsible of any damaged. But dont worry Ive tested this rom. Note : - Backup your data before perform this tutorial. How To Install [CM 12.1] CyanogenMod Lollipop on Zenfone 2.

[ROM] TeamEOS Features for Zenfone 2
Step 2. Make sure youre running a proper working custom recovery. If you are not install custom recovery on your phone. Please first install it by your self.
Step 3. Download and Copy Gapps and TeamEOS ROM to your SDCard.
Step 4. Boot into Recovery.
Step 5. Perform a FULL factory wipe and wipe/system and dalvik cache as a precaution.
Step 6. Flash TeamEOS.
Step 7. Flash Gapps zip from SDCard.
Step 8. Reboot, First boot may take up to 10 minutes.
In this Tutorial We shared Install [Official] TeamEOS 5.1.1 Lollipop on Zenfone 2 ZE551ML (Z00A)/ ZE550ML (Z008) with step by step tutorial. When You install Custom Rom and try to root your device your warranty void automatically. We are not responsible for bricked devices, dead SD cards, do some research if you have any concerns about features included in this ROM before flashing it.
[ROM] TeamEOS Features for Zenfone 2
- NX Gesture Navigation Bar
- Re-sizable Navigation Bar
- Ambient Display
- EOS Wallpaper Showcase
- Custom Quick Toggles/Tiles
- Soft-key Long-Press and Double-Tap Actions
- Screen Recording
- Network Indicator (WiP)
- Dynamic Volume Steps
- CM12 Theme Engine
- Volume keys switch depending on rotation. So the volume up key is always either on the top or to the right of volume down. (Toggle-able)
- Default Volume Control Stream (Ring or Media)
- Advanced power menu with reboot options.
- Pre-Optimized OATs for better ART performance
- MUCH MORE...
How To Install TeamEOS on Zenfone 2
Step 1. Make sure you are rooted.Step 2. Make sure youre running a proper working custom recovery. If you are not install custom recovery on your phone. Please first install it by your self.
Step 3. Download and Copy Gapps and TeamEOS ROM to your SDCard.
Step 4. Boot into Recovery.
Step 5. Perform a FULL factory wipe and wipe/system and dalvik cache as a precaution.
Step 6. Flash TeamEOS.
Step 7. Flash Gapps zip from SDCard.
Step 8. Reboot, First boot may take up to 10 minutes.
Download here
GApps - http://bit.ly/1hDZwMp
ASUS Zenfone 2 Z00A/ZE551ML - http://bit.ly/1TZRH5N
ASUS Zenfone 2 Z008/ZE550ML - http://bit.ly/1hDZGDL
In this Tutorial We shared Install [Official] TeamEOS 5.1.1 Lollipop on Zenfone 2 ZE551ML (Z00A)/ ZE550ML (Z008) with step by step tutorial. When You install Custom Rom and try to root your device your warranty void automatically. We are not responsible for bricked devices, dead SD cards, do some research if you have any concerns about features included in this ROM before flashing it.
Go to link download

Wednesday, May 24, 2017
Enjoy 975 naira plus 50MB on MTN
Enjoy 975 naira plus 50MB on MTN
Enjoy 975 Naira to call all network in Naija plus 50MB at just 300Naira only. This offer is available only on MTN. To enjoy just load 300 Card and TextV300to131.

Go to link download
Install Android x86 6 0 Marshmallow on PC notebook with Dual Boot
Install Android x86 6 0 Marshmallow on PC notebook with Dual Boot
Hello Guys In this tutorial you will learn How to Install Android x86 6.0 Marshmallow on PC notebook with Windows, Linux and Mac Dual Boot supported. After installation of Android x86 on computer or notebook you can enjoy android application, games like asphalt and modern combat and more much. Note : - WiFi Connection not working on Android x86 6.0. So, you can not use internet services but Android x86 developers are working on this project and it will fix ASAP. You can also check out [Official] Android 5.1 x86 RC1 Lollipop ISO image for you PC. That is the most stable version of Android x86.
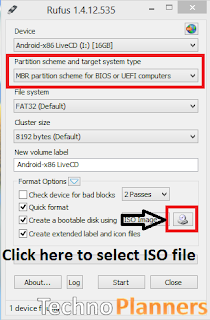
Requirement
- Android x86 6.0 ISO Image. (Download All files from end of post)
- Rufus for Windows
- 1 USB flash drive or Bootable CD/DVD
- USB Device (SD-Card, External hard disk, USB Pen Drive)
How to Install Android x86 6.0 on PC with Dual Boot
Step 1. Download Android x86 ISO and Rufus boot maker from end of post.
Step 2. By Using Rufus, Make a bootable USB/CD/DVD using the ISO image file that you downloaded from below.
Step 3. After that, Restart your PC via USB/CD/DVD drive as the source.
- (Make USB To Boot First And Before CD/DVD ROM Under Your System’s BIOS Settings)
Step 4. Now Android x86 menu Appear on your screen, Just select Install Android-x86 to harddisk.
Step 5. Choose Partition, Select your hard disk partition where you want to install it.
Step 6. Now, It will ask for installation for Grub Bootloader. Just select "YES".
Step 7. Now, another prompt message will ask you to make system /R/W. hit "YES" on this.
Step 8. After that, It will ask for install internal space. Use 2047 MB for space, As that is the maximum supported.
Step 9. Now, Restart your PC. You can select Android-x86 6.0-rc1 to boot Android and Choose Windows to start Windows on your PC.
Enjoy Android Android x86 6.0 Marshmallow on your PC, notebook and Laptop with Windows, Linux and MAC dual boot. Share this tutorial with your friends and family.
Step 5. Choose Partition, Select your hard disk partition where you want to install it.
Step 6. Now, It will ask for installation for Grub Bootloader. Just select "YES".
Step 7. Now, another prompt message will ask you to make system /R/W. hit "YES" on this.
Step 8. After that, It will ask for install internal space. Use 2047 MB for space, As that is the maximum supported.
Step 9. Now, Restart your PC. You can select Android-x86 6.0-rc1 to boot Android and Choose Windows to start Windows on your PC.
Download here
http://bit.ly/1NXFzzu
Enjoy Android Android x86 6.0 Marshmallow on your PC, notebook and Laptop with Windows, Linux and MAC dual boot. Share this tutorial with your friends and family.
Go to link download
How To Install Pixel Master Camera on CM 12 1 Rom Zenfone 5
How To Install Pixel Master Camera on CM 12 1 Rom Zenfone 5
Tutorial - How To Install Pixel Master Camera Application for CM 12.1 Rom. We can install default Asus Pixelmaster Camera App using TWRP Recovery Tool.

Pre-Requesting
Step 2. Copy downloaded file in SD-Card.
Step 3. Now Reboot your mobile into TWRP recovery.
Step 4. In TWRP recovery select "Install" and choose That downloaded file.
Step 5. After selecting, Swipe the slider to right side to continue installation.
Step 6. After Successful installation your mobile will restart automatically.
Done. Please Note: - You will not get any ZenUI updating from Play store. To update Pixel Master and Asus Galley you need to download Apk file and install as normal app. If you not using CyanogenMod on Zenfone you can also check out How To Install [CM 12.1] CyanogenMod Lollipop 5.1.1 on Zenfone 5.
Pre-Requesting
- TWRP Recovery Installed (Check Out How To Install flash TWRP).
- Pre Installed CM12.1 Rom
- Pixel Master patch file (Download From Below Link)
How to Install Pixel Master Camera on CM12.1
Step 1. Download Pixel Master patch from below Link.Step 2. Copy downloaded file in SD-Card.
Step 3. Now Reboot your mobile into TWRP recovery.
Step 4. In TWRP recovery select "Install" and choose That downloaded file.
Step 5. After selecting, Swipe the slider to right side to continue installation.
Step 6. After Successful installation your mobile will restart automatically.
Download here
https://db.tt/hJUxJ8xO
Done. Please Note: - You will not get any ZenUI updating from Play store. To update Pixel Master and Asus Galley you need to download Apk file and install as normal app. If you not using CyanogenMod on Zenfone you can also check out How To Install [CM 12.1] CyanogenMod Lollipop 5.1.1 on Zenfone 5.
Go to link download
Sunday, May 21, 2017
Install CM12 1 on Zenfone 5 Android 5 1 1 Very Stable
Install CM12 1 on Zenfone 5 Android 5 1 1 Very Stable
Tutorial - How to Install Android 5.1.1 CM12.1 on Asus Zenfone 5 Very Stable version. Here you can download CM12.1 and find a guide how to install it on your device. There are lots of changes in ROM like to improve batter backup, performance, touch, sensor, audio is more loud if we compared to stock ROM. Now you can use the device in horizontal mode and the last one is the camera. There is an available dual camera application available one is Cynogenmod camera and the second is Asus Stock Camera app.
Pre Requirement
Step 2. Power off your device. Press and hold Vol UP + Power till see the ASUS Logo.
Step 3. Now extract ADB on your PC and copy the downloaded new-twrp image file in ADB folder.
Step 4. Open ADB folder and Press and hold Shift button and Right Click on mouse then choose open CMD WINDOW HERE.

Step 5. Now Write below CMD to flash TWRP Recovery on Device
Step 7. Now Copy CM12.1 ROM zip file in device internal storage.
Step 8. Open TWRP recovery via bootloader (Use Step 2 to open the device in the bootloader). Then select recovery option using volume and power key.
Step 9. Select Wipe Option then check Dalvik Cache, Cache and Data then Swipe to Wipe.
Step 10. Now Go back and select Install > Scroll down and select ROM zip > Swipe to flash.
Step 11. Again Go back and Select Wipe then Swipe to Factory Reset.
Step 12. Now Reboot System.
Congratulation, Now You can use the CM12.1 ROM on Asus Zenfone. Note first boot can be take 10 minutes if it will not start re-apply steps from step 8. You can also check out How to Install Stock Rom on Asus Zenfone 5. Share this tutorial with your friends and family.
Pre Requirement
- TWRP Recovery (Download All files from end of post)
- Device Bootloader Unlocked (Also Check out How To Unlock Bootloader on Asus Zenfone 5)
- ADB Tool
- CM12.1 ROM
How to Install CM12.1 on Asus Zenfone 5
Step 1. After Unlocked bootloader. Now flash TWRP custom recovery on your device.Step 2. Power off your device. Press and hold Vol UP + Power till see the ASUS Logo.
Step 3. Now extract ADB on your PC and copy the downloaded new-twrp image file in ADB folder.
Step 4. Open ADB folder and Press and hold Shift button and Right Click on mouse then choose open CMD WINDOW HERE.
Step 5. Now Write below CMD to flash TWRP Recovery on Device
- fastboot flash recovery new-twrp.img
Step 7. Now Copy CM12.1 ROM zip file in device internal storage.
Step 8. Open TWRP recovery via bootloader (Use Step 2 to open the device in the bootloader). Then select recovery option using volume and power key.
Step 9. Select Wipe Option then check Dalvik Cache, Cache and Data then Swipe to Wipe.
Step 10. Now Go back and select Install > Scroll down and select ROM zip > Swipe to flash.
Step 11. Again Go back and Select Wipe then Swipe to Factory Reset.
Step 12. Now Reboot System.
Download here
ADB Tool - http://bit.ly/1ILHUGh
TWRP img - http://bit.ly/1Ma4Ajo
CM12.1 ROM - http://bit.ly/1jFQtvG
Congratulation, Now You can use the CM12.1 ROM on Asus Zenfone. Note first boot can be take 10 minutes if it will not start re-apply steps from step 8. You can also check out How to Install Stock Rom on Asus Zenfone 5. Share this tutorial with your friends and family.
Go to link download
CM13 ROM Update Android 6 0 on Zenfone 2 without Root
CM13 ROM Update Android 6 0 on Zenfone 2 without Root
Hello Guys, In this text tutorial I will teach you how to update ASUS zenfone 2 in android 6.0 marshmallow. First, I am telling you this is a custom ROM from cynogenmod CM13 for zenfone 2 but in the upcoming months we will get an official update from ASUS. This ROM has android 6.0.x OS and Linux kernel 3.10.x version.

First boot can take up-to 10 minutes to make cache files for applications. Once its done, you can confirm Android 6.0.x version install on your system by Going to Settings > About Phone > it must show Android version 6.0.1. You can play Marshmallow eggster game by hitting Android version 5 to 6 times. Thank you for using our tutorial you can also check out How to Flash TWRP Recovery on Asus Zenfone 2 Laser, Please share this tutorial with your friends and family.
Before Updating
First, you have to make a backup of your Application, Personal data, Contact detail, Internal Storage, etc. Because this tutorial will wipe your data and files. You can also make a backup of your stock firmware using CWM/ TWRP custom recovery. In this tutorial I am using TWRP recovery.Requirement
- Android 6.0 ROM for Zenfone 2 (Download all files from end of post)
- GApps for Marshmallow
- Custom Recovery Installed if you dont have any custom recovery, please first flash custom recovery on your device.
Make a full backup
- Power Off your device
- Reboot device in Recovery Mode by using the Power + Volume UP button
- Once the Team Win Recovery Open, Select "Backup"
- Check "Cache, Data and System" option from the list and "swipe to backup" button.
- It will take server minutes to complete and its depend on device data size. Once its done, Boot your device normally and save TWRP folder on your PC/ SD-Card.
Android 6.0 Zenfone 2 Flash Using TWRP Recovery
- Download ROM and GApps Zip file from the end of the post on your computer.
- Then, connect your device with your computer/PC with the help of the USB cord.
- Place both files in your device internal/external storage.
- Disconnect the USB cable and also power off your device.
- Reboot into recovery mode.
- From recovery select “Wipe” then select format data and write yes to confirm wipe.
- Now go back to the main menu and select “Install”.
- First Pick the CM13 Marshmallow zip file and flash it on your ASUS ZenFone 2.
- Once its done, flash Google Apps zip.
- Done, select Wipe Cache and swipe to wipe
- Go back to main menu of recovery select “reboot system now”.
Using CWM Recovery
- Use above steps from 1st step to 5th step.
- Select “Wipe data/ factory reset”“wipe cache partition” and “wipe dalvik cache”, then select “Yes” to confirm.
- Now select “Apply update” from the main menu and select “Choose from internal storage” or choose an external storage if you place the zip file in SD_Card.
- Select CM13 ROM file and it will install without confirmation.
- Once the ROM is installed, flash the GApps file.
- Reboot your device.
Download here
GApps - http://bit.ly/1NBj4y8
Z00A - http://bit.ly/1LZVdtL
Z008 - http://bit.ly/1LZVk8A
First boot can take up-to 10 minutes to make cache files for applications. Once its done, you can confirm Android 6.0.x version install on your system by Going to Settings > About Phone > it must show Android version 6.0.1. You can play Marshmallow eggster game by hitting Android version 5 to 6 times. Thank you for using our tutorial you can also check out How to Flash TWRP Recovery on Asus Zenfone 2 Laser, Please share this tutorial with your friends and family.
Go to link download
Friday, May 19, 2017
Facebook Not Accessible on Etisalat Smartpack
Facebook Not Accessible on Etisalat Smartpack
~CAUTION~
***~ Never put other phones IMEI in your phone, be careful,
its Illegal using different IMEI in phone & may brick your phone permanently ~***
================
What required
================
- An Android Phone with Invalid IMEI
- Phone Must be Rooted. [See my Posts: How to root MTK Phone]
- Original IMEI Number of your Phone! You will get it below the battery/body of phone
- MobileUncle Tool installed ! [Download: MTK MobileUncle Tool ]
- Confident & Awareness
- Being a Good Citizen
================
How to do
================
- Roote your Android Phone. [See my Posts: How to root MTK Phone] & [Things-to-do-after-rooting]
- Install Mobileuncle tool
- Open Mobileuncle tool
- Grant Root Permission when Asked [Things-to-do-after-rooting]
- Go to Engineering Mode
- Select Mtk Setting
- Go to Connectivity
- Select CDS Information
- Select Radio Information
- You will get two option : Phone 1 & Phone 2!
- Select : Phone 1
- Go to top & Delete: AT+ .
- Now write the following line there:
- AT +EGMR = 1,7,"IMEI_1" ( example: AT(space)+EGMR = 1,10,"15xxxxxxxxxxxxx")
- Click on Send CommandButton
- Now go back & Select: Phone 2 & Delete: AT+
- Now write the following line there:
- AT +EGMR = 1,10,"IMEI_2" ( example: AT(space)+EGMR = 1,10,"15xxxxxxxxxxxxx")
- Click on Send CommandButton
- Restart Phone
- Check IMEI by presing : *#06#
================
Know that
================
## After the text AT and before +EGMR put a (space)
## In Place of : IMEI_1 or IMEI_2 provide your own & original IMEI
(Never put other IMEI, Alerting you again, its Illegal & may brick your phone permanently)
~CAUTION~
You must use your original IMEI, using others phone IMEI is illegal & I am not responsible for your action of anytype!

Go to link download
How to Connect PC Link on Zenfone Latest Update
How to Connect PC Link on Zenfone Latest Update
Tutorial - How you can install and connect PC Link on Asus Zenfone 4, Zenfone 5. Zenfone 6. Zenfone Selfie, Zenfone 2, Zenfone 5 LTE, Zenfone 2 Laser, Zenfone Delux with your computer and laptop.
The Best think about the PC Link Application. You can operate your Zenfone from your PC, Play any android game on your Computer like Asphalt 8, Temple Run and there is lots of features.
Requirement
Step 2. Launch PC Link on both device
Step 3. Connect your Zenfone with pc using a USB Cable and a dialog will shows up if “Enable USB debugging to us PC Link” Select OK
Step 4. Check “USB Debugging” option the select OK

Step 5. Now, On you PC under device name double click on your device.

Congratulations, Now you can use PC Link on Zenfone. If you are running your device on Android 5.0 version you can using PC Link without data cable. You can also check out How to Connect PC Link using Wifi Connection on Asus Zenfone Device.
The Best think about the PC Link Application. You can operate your Zenfone from your PC, Play any android game on your Computer like Asphalt 8, Temple Run and there is lots of features.
Requirement
- PC Link (Download from End of Post)
- You are using PC Link Updated Version
- Windows Operating System
- USB Data Cable
How To Install and Connect PC Link
Step 1. Install PC Link on you PC (Download from Below Link)Step 2. Launch PC Link on both device
Step 3. Connect your Zenfone with pc using a USB Cable and a dialog will shows up if “Enable USB debugging to us PC Link” Select OK
Step 4. Check “USB Debugging” option the select OK
Step 5. Now, On you PC under device name double click on your device.
Download here
http://pclink.asus.com
Congratulations, Now you can use PC Link on Zenfone. If you are running your device on Android 5.0 version you can using PC Link without data cable. You can also check out How to Connect PC Link using Wifi Connection on Asus Zenfone Device.
Go to link download
Possible to Increase Output Volume on Zenfone 5 6
Possible to Increase Output Volume on Zenfone 5 6
Tutorial - How to increase volume sound on Asus Zenfone 5 and Zenfone 6. Now you can increase your Zenfone volume easily. This method tested on Lollipop 3.23.40.60 Update and i dont know it will work for Kitkat firmware or not, but you can test it and share it with our other visitors. Also you have a rooted Zenfone. Also Check out One Click Root for Zenfone 4, 5, 6 and Zenfone 2.
Step 2. Now, Install ES Explorer from Play Store.

Pre-Requesting
- Rooted Zenfone
- ES file Explorer (Download from Play Store)
- Volume Mod file (Download from End of Post)
How to Increase Volume on Asus Zenfone
Step 1. Download Volume Mod file from below link and unzip file using password - (technoplanners.blogspot.com) then copy files in your internal storage.
Step 2. Now, Install ES Explorer from Play Store.
Step 3. Once Installed, Open ES Explorer then tap on upper left corner button and select Tools then Enable Root Explorer and it will prompt to Grant Super SU (Root Permission). Now Hit on Grant Button.
Step 4. Now Go To Device/System/etc/parameter-framework/setting/Audio/ directory and Rename your AudioConfigurableDomains_axxxcg.xml to AudioConfigurableDomains_axxxcg.xml.old .
Step 5. Now Go Internal storage then copy AudioConfigurableDomains_axxxcg.xml files and Paste into Device/System/etc/parameter-framework/setting/Audio/paste here.
Download here
http://bit.ly/1QWJREK
http://bit.ly/1QWJREK
Now Reboot Your Device. Now you will get Highest sound on your Asus Zenfone 5 and Zenfone 6. Also check out How to Fix Boot Loop on Asus Zenfone 5. If you brick your zenfone 5 you can fix it by using Fix Boot Loop Tutorial.
Go to link download
Thursday, May 18, 2017
How to Flash TWRP Recovery on Asus Zenfone 2 Laser
How to Flash TWRP Recovery on Asus Zenfone 2 Laser
In preivew post we talk about How to Root ASUS Zenfone 2 Laser. Now In this new tutorial Techno Planners will show you How to Install TWRP Recovery for ASUS ZenFone 2 Laser ZE551KL/Z00T, ZenFone 2 Laser Z600KL/Z00L and ZenFone Selfie ZD551KL.
TWRP Recovery
Team Win Recovery Project is the best custom recovery to install any custom ROM on your device. You can access all button using the touch screen.
Compatible Device Model
Requirement
Install ADB Drivers
From the end of post Download ADB drivers and fastboot.zip file on your PC. Once it downloaded, Connect your device with PC and Install the Drivers.

Fast-boot
Download and extract fastboot zip file on your desktop using WinRAR tool.
Enable USB Debugging mode
Enable USB debugging mode on your device from Settings > about > Build number. Hit 7 times on build number to enable developer mode. Once it shows developers mode enabled. Now Go back to settings > Developers Options > Check USB Debugging mode.

Unlock Bootloader
From below link download Unlock Bootloader Application Apk file on your PC. Copy it onto your device. Install It and Run.

Download TWRP Recovery image file according to your device model. Copy image file in fastboot folder.
Now your device will reboot in recovery mode. That means you have successfully installed TWRP recovery on your Zenfone 2 Laser. Now you can install Custom ROM like [CM13] Android 6.0 marshmallow on your Zenfone 2 Lasers.
TWRP Recovery
Team Win Recovery Project is the best custom recovery to install any custom ROM on your device. You can access all button using the touch screen.
Compatible Device Model
- Zenfone 2 Laser ZE551KL
- Zenfone 2 Laser Z600KL/Z00L
Requirement
Install ADB Drivers
From the end of post Download ADB drivers and fastboot.zip file on your PC. Once it downloaded, Connect your device with PC and Install the Drivers.
Fast-boot
Download and extract fastboot zip file on your desktop using WinRAR tool.
Enable USB Debugging mode
Enable USB debugging mode on your device from Settings > about > Build number. Hit 7 times on build number to enable developer mode. Once it shows developers mode enabled. Now Go back to settings > Developers Options > Check USB Debugging mode.
Unlock Bootloader
From below link download Unlock Bootloader Application Apk file on your PC. Copy it onto your device. Install It and Run.
Download TWRP Recovery image file according to your device model. Copy image file in fastboot folder.
How to flash TWRP on Zenfone 2
- Connect your device with PC using data cable.
- From the fastboot folder. Press Shift(Keyboard) + Right Click (mouse) and Click on Open Windows Commend here.

- Type "adb fastboot reboot-bootloader" without quotes in CMD Window.
- Once your device open in droidboot mode. Type "fastboot flash recovery recovery.img" and press enter.
- Type "fastboot oem reboot -recovery" and hit enter.
- Done.
Download here
ADB - http://bit.ly/1L59rca
Fastboot Tool - http://bit.ly/1L59zZg
Fastboot Tool - http://bit.ly/1L59zZg
UnlockBootloader Apk Z00T - http://bit.ly/1UfC6NQ
UnlockBootloader Apk Z00L - http://bit.ly/1mPY4Jz
Zenfone 2 Laser ZE551KL/ Z00T - http://bit.ly/1QrTjxx
Zenfone 2 Laser Z600KL/ Z00L - http://bit.ly/1QrTk4A
Now your device will reboot in recovery mode. That means you have successfully installed TWRP recovery on your Zenfone 2 Laser. Now you can install Custom ROM like [CM13] Android 6.0 marshmallow on your Zenfone 2 Lasers.
Go to link download
How To Get Swype On iPhone Swype For iPhone Download iOS Swype
How To Get Swype On iPhone Swype For iPhone Download iOS Swype
How To Get Swype On iPhone - Swype For iPhone Download iOS Swype :- Hii friends in this article we have find a Best Keyboard for iOS Iphone which is called swype. This keyboard for iphone is different from the default keyboard which comes with factory installed in your iphone. And this ios keyboard has some Extra features and designs which looks too good and easy to use in your Iphone or iPad. Many people searches for Best Keyboard for Iphone and Ipad, Best Alternative Keyboard for Iphone, how to get swype on iphone, Download swype in iphone, swype keyboard for Apple iphone, swype for iphone 6 to type easily, swype text on iphone 5s, iphone swype 6s plus, swype type on iphone, iphone swype typing keyboard download. On the demand of People we have find the direct downloading links for this Keyboard for iphone. fleksy for ios Many people asks= does iphone have swype texting?
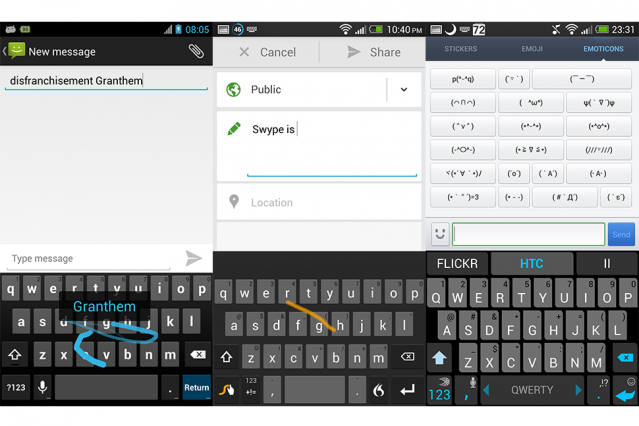
Incoming Searches for Iphone - Swype Download
Swype allows you to sort with one hand, utilizing a swipe movement to hit the keys you require. For those of you whove never attempted this sort of console, its simpler than it sounds. Swype likewise has sync and reinforcement capacities, so you never lose your words when you move from gadget to gadget. The application as of now has 250 million clients and it ought to get all the more now that its accessible on the iOS App Store. It as of now expenses $1 and bolsters English, French, Italian, German, and Spanish at this moment.
"Were super eager to have Swype come to iOS users,"Aaron Sheedy, Swype VP of item advertising, told Digital Trends back in June. "Its been one of our objectives for a long, long time."
Swype has been accessible on Android, Windows Phone, and other versatile OSs for quite a while. In spite of the fact that Sheedy couldnt remark on the accurate way Swype took to manufacture its organization with Apple, he did say that he supposes its an incredible open door for the organization. He additionally applauded the consoles a huge number of clients, whom he accepts made the interest for Apple to change its strategy on outsider consoles.
"Were going to do all that we can to bring all the considerable components on Swype to iOS."
"Its the force of individuals needing to enter those words the way they need to," Sheedy said. "Swype has reevaluated the way we write."
"Were going to do all that we can to bring all the considerable elements on Swype to iOS," he included.
Swype has what Sheedy calls a "sub-nerd space of console cherishing specialists" dealing with improving Swype for iOS 8. One of the components that Swype is most amped up for conveying to iOS clients is its living dialect capacity, which adds proposed and inclining words to your own lexicon consequently. The organization is additionally extremely glad for its unparalleled precision and the 92 dialect models that guarantee close perceptive word forecast.
Swypes calculation can perceive "long series of words that go together" to anticipate what the following word you write will be. Sheedy gave the sample of apparently irrelevant words like, "I promise faithfulness," which the calculation comprehends as a component of a typical expression, including the self-evident "to the banner," toward the end of the sentence for you.
Swypes best course of action is to get its console on everybodys iPhone and iPad once iOS 8 is discharged. The organization is certain that its attention on precision will persuade iOS clients to download Swype. The applications adversaries are additionally getting in on the new arrangement, however.
Download- Click the provided Links
Incoming Searches for Iphone - Swype Download
- iphone app for typing download swype
- iphone swipe Download from Apple Store
- iphone standard apps Swype
- itunes store iphone
- Swype keyboards apps for iphone
- free Swype keyboard app for iphone
Go to link download
Wednesday, May 17, 2017
How To Use A BIS Plan For Browsing On iPhone iPad Using SecureMyline
How To Use A BIS Plan For Browsing On iPhone iPad Using SecureMyline
?????APK Editor APK :
????? ?? ???? ??? ????? APK Editor APK ?
???? ????? APK Editor APK:

???? ?????? ?? ?????
download apk kinemaster
APK Editor APK ??? :
????? ????? APK Editor APK
?? ???? ?????? ?? ????????? APK Editor APK ?????? ?????? !!
??????? ???? ????? ????? :
- apk launcher
- apk downloader directly from google play
- apk kingdom hearts
- apk vidmate
- download apk kinemaster
- apk android kik
Go to link download
Tuesday, May 16, 2017
Watch Foreign Channel On Your Android Using MOBDRO
Watch Foreign Channel On Your Android Using MOBDRO
Sometimes it happens that there is no Custom Recovery available on your reach for your Phone.
This is how you can build your own Recovery withou t getting help of others.
================
? What required ?
================
(1) Rooted your Android;
(2) BusyBox Pro. (Download)
(3) Apktool (Download)
(4) Root Explorer ((Link)/miexplorer (Link)
(5) Stock "Recovery.img"? "boot.img" (From your Stock ROM)
(I will show you later how to create stock rom)
(6) CTR Sample Recovery.img
Download according to your Phone resolution from below:
..........
Resolution:--> 240*240
http://www.androidfilehost.com/?fid=23578570567722957
Resolution:--> 320*480
http://www.androidfilehost.com/?fid=23578570567722960
Resolution:--> 480*800
http://www.androidfilehost.com/?fid=23578570567722962
Resolution:--> 480*854
http://www.androidfilehost.com/?fid=23578570567722958
Resolution:--> 540*960
http://www.androidfilehost.com/?fid=23578570567722959
Resolution:--> 600*1024
http://www.androidfilehost.com/?fid=23578570567722961
Resolution:--> 720*1280
http://www.androidfilehost.com/?fid=23578570567722963
Resolution:--> 768*1024
http://www.androidfilehost.com/?fid=23578570567722964
Resolution:--> 768*1280
http://www.androidfilehost.com/?fid=23578570567722965
Resolution:--> 800*1200
http://www.androidfilehost.com/?fid=23578570567722966
Resolution:--> 800*1280
http://www.androidfilehost.com/?fid=23578570567722967
Resolution:--> 1024*600
http://www.androidfilehost.com/?fid=23578570567722968
Resolution:--> 1280*1920
http://www.androidfilehost.com/?fid=23578570567722969
Resolution:--> 1280*720
http://www.androidfilehost.com/?fid=23578570567722970
Resolution:--> 1280*768
http://www.androidfilehost.com/?fid=23578570567722971
........
===========
? How to ?
===========
? 1. Install BusyBox pro & Open it, Root per mission will ask, grant root permission.
? 2. Now Click Install. Wait until installation finished.
? 3. Download ApkTool
- Extract zip File
- Put the extracted file (ApKTool) in Memory Card [not inside any folder]
- Install ApKTools.apk
- Do not delete any files from ApKTools
- Open ApKTool Give root permission
? 4. Rename the downloaded CTR Sample recovery img name to recovery.img
? 5. Open Root Explorer Root Explorer/miexplorer
- Go to RW or Root drive
- Grant root permission
- Enter cache folder
- Delete "lost+found" & recovery folders
(If wont delete change properties/ Permission: RW-R-R)?
? 6. Now inside Cache folder Create 03 folders name as:
- Ported Recovery
- Boot
- Boot Stock Recovery
? 7. Copy "boot.img" of stock ROM to the boot folder you have created in previous stage inside Cache folder(See up)
? 8. Copy "CTR Simple recovery.img" (You named it as "recovery.img") to Ported Recovery inside Cache folder (See up)
? 9. Copy "recovery.img" of stock ROM (You will see it as "recovery.img") to Stock Recovery folder inside Cache folder (See Up)
? 10. Open Apktool
- Touch and hold Cache Folder for 02 Seconds
- Click on get access permission (need root)
? 11. Now do the same for Boot folder
- Click on get access permission (need root)
- Open The folder
- Click on boot.img
- Click on expack-mt65xx(need root)
- boot.img will now extract
- After extracting "boot.img" (Some text mg will appear like blocks, record etc)
- Now you will find 3 files (kernel,ramdisk.cpio.gz,ramdisk)
? 12. Follow step 10 & 11 for Ported Recovery folder
? 13. Follow step 10 & 11 for Stock recovery folder
? 14. Now go to :ported recovery/ramdisk:
Delete the following files:
- meta_init.rc
- meta_init.modem.rc
- meta_init.project.rc
- fstab
- uventd.rc
- uventd.goldfish.rc
? 15. Now go to :Boot/ramdisk:
Copy the following files:
- meta_init.modem.rc
- meta_init.project.rc
- meta_init.rc
Now paste them to Ported Recovery/ramdisk Folder
.
? 16. Now go to :Stock Recovery/ramdisk:
Copy the following files:
- fstab
- ueventd.rc
- ueventd.goldfish.rc
Now paste them to Ported Recovery/ramdisk Folder
? 17. Now go to : Stock Recovery Folder
Copy the following file:
- kernel
Now paste it to Ported Recovery/ramdisk Folder.
? 18. Now go to : device/cache Folder:
Delete the following folders:
- Stock Recovery
- Boot
? 19. Open apktool
- Go to : Root/cache/Ported Recovery
- Click on ramdisk folder
- Click on "repack-mt65xx (need root)"
- If OK appears after loading files
- Then You have done it successfully
? 20. Now go to : device/cache/Poted Recovery
- Copy "new.img" file and paste it to SD Card
- Rename it as "recovery.img"
- Flash it with MobileUnle Tool..
YOU ARE NOW AN EXPERT

Go to link download
Update MTN Bis Still Working With SimpleServer On PC
Update MTN Bis Still Working With SimpleServer On PC
Here is a list including link page for Custom ROM of Various Android Phone
1. Walton Primo H2
Jelly Bean ROM: (Ported by me) or (Others)
KitKat ROM: (Ported by me) or (Others)
All ROM together: Click Here
2. Walton Primo F2
3. Walton Primo F3i
4. Symphony W85
Go to link download
Innjoo Note Is Now Available On Jumia com
Innjoo Note Is Now Available On Jumia com
Dibawah ini Segitiga Info sajikan pengenalan karakter The Last Naruto the Movie langsung dari Official Site Movie ini. Tak hanya itu, teks pengenalan juga sudah diterjemahkan dalam bahasa Indonesia. Postingan ini akan terus update jika ada karakter baru yang mereka rilis.


Download Filenya
[2Mb | Characters "The Last".zip]
Sumber: Narutonian
Go to link download
How to Install Android 6 0 Marshmallow on Zenfone 5 Boot Animation
How to Install Android 6 0 Marshmallow on Zenfone 5 Boot Animation
Tutorial - How to install Android 6.0 Marshmallow Boot Animation on Asus Zenfone 4, Zenfone 5, Zenfone 6, Selfie, Zoom, Laser, ZenPad and all Android phone supported. Every Android lover known the Marshmallow release for some device and it very stable and more powerful version if we compare with oldest version. But I like one feature it boot animation. Marshmallow Boot animation is very styles and colorful thats why i install it on my Zenfone 5 and share this tutorial with our lovely users. We also attach a video tutorial, it will more helpful to understand this guide. Also Check out How to Install ZenMotion feature on Zenfone 5 and Zenfone 6 (Wake/Sleep Supported).
Pre-Requirement
Note : Choose the right version of Marshmallow Boot Animation. For Example if you have a screen of resolution 1280x720 pixels, you would choose the 720p version and The Zenfone 5 have 720 pixels and i am providing 720 pixel file that you can download from end of post.


Pre-Requirement
- Marshmallow Boot Animation file (Download from end of post)
- ES file Explorer (Download from Play Store)
- Rooted Zenfone Also check out One Click Root for Zenfone 4, 5, 6 and Zenfone 2
Note : Choose the right version of Marshmallow Boot Animation. For Example if you have a screen of resolution 1280x720 pixels, you would choose the 720p version and The Zenfone 5 have 720 pixels and i am providing 720 pixel file that you can download from end of post.
How to Install Android 6.0 Marshmallow on Zenfone 5
Step 1. First download Marshmallow Boot animation zip file and copy in your device internal storage.
Step 2. Install ES file Explorer on your device.
Step 3. Open ES Explorer then tap on upper left corner button and select Tools then Enable Root Explorer and it will prompt to Grant Super SU (Root Permission). Hit on Grant Button.
Step 4. Now Go To Device/System/Media directory and Rename your bootanimation to old.bootanimation.zip .
Step 5. Now Go Internal storage then copy BootAnimation.zip file and Paste into Device/System/Media/paste here.
Step 6. Now Reboot Your Device.
Download here
http://bit.ly/1PC2aOX
Congratulation. Now your old and boring Asus boot animation convert into marshmallow boot animation. I hope you love it. Please share it with your friends and family
Go to link download
Monday, May 15, 2017
How to Install Android N 7 0 Boot Animation on Any Android Phone
How to Install Android N 7 0 Boot Animation on Any Android Phone
In this Tutorial I will show you how to install Android Nougat 7.0 Boot Animation on Any Android Phone or device. This is next android version for nexus devices and we got this boot animation from final developer preview. This method test with stock and custom ROM but do it with your own risk i am not responsible for any damage.
2. Copy both file in your device storage (internal/external).
3. Go to file manager, tap on ES Explorer APK to Install, you may get an unknown source warning If you Install the apk first time on your device. Tap on settings, Swipe down and enable unknown source option, tap on OK. Now go back and try to install APK.
4. Open it and enable Root Explorer mode and grant super su permission if it ask.

6. Navigate to the /system/media folder on your device. choose and Rename the file name from "bootanimation.zip" to "bootanimation.zip.bak" or "bootanimation.zip.old", then press "OK."

7. Then copy Android nougat boot animation zip file from wherever you downloaded and paste it, and paste it to system/media folder.
8. Once youve done that, long-press the newly-copied bootanimation.zip file, then choose "Permissions." Finally, set the Owner category to "Read" and "Write," then make sure all other categories are set to just "Read."
9. Reboot and Enjoy
Congratulation, Now you can enjoy new boot animation on your older android phone. If you find any thing help full from this blog. Please share this tutorial with other android users. Before you go also check read about Android N-ify you can install Android 7.0 feature on your Android phone with this.
Requirement
- Android Nougat Boot Animation
- ES Explorer APK (Download Link given in end of the post)
How to Install Android N 7.0 on any Android
1. First Download the boot-animation.zip and ES Explorer APK from end of post link given.2. Copy both file in your device storage (internal/external).
3. Go to file manager, tap on ES Explorer APK to Install, you may get an unknown source warning If you Install the apk first time on your device. Tap on settings, Swipe down and enable unknown source option, tap on OK. Now go back and try to install APK.
4. Open it and enable Root Explorer mode and grant super su permission if it ask.
6. Navigate to the /system/media folder on your device. choose and Rename the file name from "bootanimation.zip" to "bootanimation.zip.bak" or "bootanimation.zip.old", then press "OK."
7. Then copy Android nougat boot animation zip file from wherever you downloaded and paste it, and paste it to system/media folder.
8. Once youve done that, long-press the newly-copied bootanimation.zip file, then choose "Permissions." Finally, set the Owner category to "Read" and "Write," then make sure all other categories are set to just "Read."
9. Reboot and Enjoy
Download here
ES Explorer APK - http://bit.ly/29w75RX
BOOT Animation - http://bit.ly/29JJdKQ
Congratulation, Now you can enjoy new boot animation on your older android phone. If you find any thing help full from this blog. Please share this tutorial with other android users. Before you go also check read about Android N-ify you can install Android 7.0 feature on your Android phone with this.
Go to link download
Sunday, May 14, 2017
Nigerians Biggests Shopping Event Happening Now on Konga
Nigerians Biggests Shopping Event Happening Now on Konga

Episode 002 Pendekar Pedang Terhebat! Pemburu Hadiah Roronoa Zoro
Episode 003 Morgan VS Luffy! Siapa Gadis Cantik Ini?
Episode 004 Masa lalu Luffy! "Akagami" Shanks Muncul!
Episode 005 Kekuatan Misterius! Bajak Laut Clown Kapten Buggy!
Episode 006 Keputus-Asaan! Pejinak Binatang Mohji VS Luffy
Episode 007 Pendekat Pedang Zoro VS Cabaji Sang Akrobat
Episode 008 Kekuatan Sejati Dari Buah Setan!
Episode 009 Pembohong Terhormat! Kapten Usopp!
Episode 010 Orang Yang Paling Aneh! Jango Sang Hipnotis
Episode 011 Bajak Laut Kepala Pelayan, Kapten Kuro
Episode 012 Bentrok Dengan Bajak Laut Kucing Hitam!
Episode 013 Duet Yang Menakutkan! Nyaban Bersaudara vs Zorro
Episode 014 Luffy, Kembali Beraksi! Perlawanan Keputusasaan Nona Kaya
Episode 015 Kekalahan Kuro!
Episode 016 Lindungi Kaya! Bajak Laut Usopp Berjuang Keras!
Episode 017 Ledakan Kemarahan! Kuro vs Luffy! Bagaimana Akhirnya!
Episode 018 Kau Makhluk Yang Aneh! Gaimon Dan Teman-Teman Anehnya!
Episode 019 Masa Lalu Santoryu! Janji Antara Zoro dan Kuina!
Episode 020 Koki Terkenal! Sanji Dari Restoran Mengapung
Episode 021 Tamu Yang Tidak Terduga! Masakan Sanji Dan Hutang Gin
Episode 022 Armada Bajak Laut Terbesar! Kapten Don Krieg!
Episode 023 Lindungi Baratie! Bajak Laut Legenda Zeff Si Kaki Merah!
Episode 024 Mihawk Si Mata Elang! Zoro Telah Dikalahkan!
Episode 025 Teknik Tendangan Super! Sanji vs Pearl Si Perisan Besi!
Episode 026 Impian Zeff Dan Sanji! Lautan Yang Indah All Blue!
Episode 027 Komandan Pasukan Pertempuran, Gin!
Episode 028 Aku Tak kan Mati! Pertarungan Luffy Melawan Krieg!
Episode 029 Akhir Pertempuran Yang Mematikan!
Episode 030 Berangkat! Perjalanan Luffy Bersama Seorang Koki!
Episode 031 Orang Terkejam Di East Blue! Manusia Ikan Arlong!
Episode 032 Penyihir Desa Cocoyashi! Tangan Kanan Arlong!
Episode 033 Kematian Usopp?! Luffy, Apa Kau Percaya?
Episode 034 Kebenaran! Usopp Menceritakan Kebenaran Nami!
Episode 035 Cerita Masa Lalu! Wanita Perkasa Bellemere-san!
Episode 036 Selamat! Bellemere Dan Keluarga Nami!
Episode 037 Luffy Bergerak! Akhir Dari Janji!
Episode 038 Luffy Terjebak! Merman vs Bajak Laut Luffy!
Episode 039 Luffy Tenggelam! Zoro vs Hatchan Si Gurita!
Episode 040 Ksatria Hebat! Pertarungan Sengit Sanji Dan Usopp!
Episode 041 Luffy Terbebas! Keberanian Nami Dan Mugiwara
Episode 042 Mengerikan! Serangan Arlong Dari Dalam Laut!
Episode 043 Akhir Dari Kerajaan Merman! Nami Adalah Rekanku!
Episode 044 Penuh Kebahagiaan! Perpisahan Dengan Desa Cocoyashi!
Episode 045 Buronan! Mugiwara Luffy Menjadi Terkenal
Episode 046 Mengejar Mugiwara! Petualangan Besar Yang Dialami Buggy!
Episode 047 Kau Selalu Kutunggu! Kembalinya Kapten Buggy!
Episode 048 Kota Awal Dan Akhir! Sampai Di Loguetown!
Episode 049 Sandai Kitetsu Dan Yubashiri! Pedang Baru Zoro
Episode 050 Usopp vs Penembak Jitu Daddy! Duel Di Depan Umum!
Episode 051 Pertarungan Di Kontes Memasak? Sanji vs Kepala Koki!
Episode 052 Pembalasan Buggy! Tersenyum Saat Dieksekusi!
Episode 053 Lahirnya Sebuah Legenda! Menuju Grandline!
Episode 054 Jalan Menuju Petualangan Baru! Gadis Kecil Apis!
Episode 055 Makhluk Suci! Rahasia Apis Dan Pulau Legendaris!
Episode 056 Eric Mulai Menyerang! Pelarian Besar Dari Pulau Gunkan!
Episode 057 Pulau Terpencil! Legendaris Pulau Yang Hilang!
Episode 058 Duel Di Reruntuhan! Pertarungan Zoro vs Eric!
Episode 059 Luffy Terkepung! Rencana Rahasia Komodor Nelson!
Episode 060 Kebangkitan Legenda 1000 Tahun!
Episode 061 Akhir Dari Kemarahan! Jalan Menuju Redline!
Episode 062 Masalah Pertama? Munculnya Paus Raksasa Laboon!
Episode 063 Janji Seorang Pria!Ikan Paus Berjanji Akan Bertemu Lagi!
Episode 064 Kota Pecinta Bajak Laut? Tiba Di Whiskey Peak!
Episode 065 Ledakan Santoryu! Zoro vs Baroque Works!
Episode 066 Luffy vs Zorro, Pertarungan Yang Tak Terduga!
Episode 067 Mengantar Putri Vivi! Bajak Laut Luffy Bergerak!
Episode 068 Berjaunglah Coby! Buku Harian Perjuangan Coby-Meppo!
Episode 069 Penentuan Dari Coby Dan Helmeppo!
Episode 070 Pulau Prasejarah! Bayangan Mengintai Di Little Garden!
Episode 071 Pertarungan Dahsyat! Raksasa Dorry & Broggy!
Episode 072 Luffy Marah! Trik Licik Dalam Pertarungan Sejati!
Episode 073 Broggy Meratapi Kemenangannya! Hukuman Dari Dewa Elbaf!
Episode 074 Seorang Manusia Lilin! Tangisan Penyesalan Dan Kemarahan!
Episode 075 Luffy Diserang Dengan Sihir! Perangkap Warna!
Episode 076 Serangan Balasan! Kepandaian Usopp Dan Kaenboshi!
Episode 077 Perpisahan Di Pulau Raksasa! Menuju Ke Arabasta!
Episode 078 Nami Sakit! Salju Yang Turun Di Lautan!
Episode 079 Serangan! Wapol Si Manusia Kaleng!
Episode 080 Pulau Tanpa Dokter! Petualangan Di Pulau Tak Bernama!
Episode 081 Apa Kau Senang? Dokter Yang Disebut Penyihir!
Episode 082 Resolusi Dalton! Pasukan Darat Wapol!
Episode 083 Pulau Penuh Salju! Kekuatan Kerajaan Drum!
Episode 084 Rusa Kutub Berhidung Biru! Rahasia Dari Chopper!
Episode 085 Impian Yang Terbuang! Dokter Gadungan Hiluluk!
Episode 086 Bunga Sakura Hiluluk! Dan Titipan Impian!
Episode 087 Melawan Pasukan Wapol! Kemampuan Buah Baku-Baku!
Episode 088 Buah Iblis Tipe Zoan! 7 Perubahan Wujud Chopper!
Episode 089 Runtuhnya Kekuasaan Kerajaan!
Episode 090 Sakura Hiluluk! Keajaiban Di Gunung Kerajaan Drum!
Episode 091 Selamat Tinggal Kerajaan Drum! Aku Akan Pergi Kelaut!
Episode 092 Pahlawan Arabasta! Dan Munculnya Balerina!
Episode 093 Bubuk Pemanggil Hujan Dan Pasukan Pemberontak!
Episode 094 Pertemuan Yang Kuat! Namanya Adalah Hiken No Ace!
Episode 095 Ace Dan Luffy! Kenangan Hangat Dan Ikatan Persaudaraan!
Episode 096 Kota Hijau, Erumalu! Dan Kungfu Dugong!
Episode 097 Iblis Yang Hidup Di Dunia Sangat Panas!
Episode 098 Datangnya Bajak Laut Gurun Pasir! Lelaki Yang Hidup Bebas!
Episode 099 Jiwa Seorang Penipu! Hati Pasukan Pemberontak, Kamyu!
Episode 100 Pahlawan Pemberontak, Kohza! Janji Kepada Vivi
#THANKS TO BLOGNARUCHIGO :D
Go to link download
Saturday, May 13, 2017
The Best Method To Run WhatsApp on PC
The Best Method To Run WhatsApp on PC
??ASUS_ZEN_UI_V4?
?#?Features?:
- KitKat 4.4.2
- AUSU Boot Logo & Boot Animation
- ASUS Apps
- Real Calc Added
- Mixplorer Added
- Multi Color Auto Changing Status bar
- Auto Color Changing Network Signal indicator
- Dual 3G
- Video Call
- Xposed Supported
- Very Smooth
- 500 MB RAM Free
- Pre-Rooted (Flash using King user for update version)
- GAAPS
- Stan Camera Removed for incompatibility
- Added Lenovo Super Camera
- Viper Added for Better Sound (Default Viper Removed for incompatibility)
?#?Credits?:
- STAN for Source V.3 & V.4 Update Patch
- Mobasser vai
- Md Fahad
- Saifur Rahman
- Droid Adda
- The Andro Talk
- Primo H2 Users fb Group
- TurkDev Forum
?#?My_Openion?:
- I think I will use it for a long time
- Still no Bugs faced
- Sound is little Low
?#?Link?:
- Click Here
- ???? ?? ????; ?????? ?? ??????? (???????? ??????????? ??????)


Go to link download
Subscribe to:
Posts (Atom)