Thursday, May 25, 2017
How to Root Asus Zenfone Selfie ZD551KL without Using PC
How to Root Asus Zenfone Selfie ZD551KL without Using PC
Requirement
- Zenfone Selfie ZD551KL
- DingDong Apk (Download from end of post)
How to Root Asus Zenfone Selfie
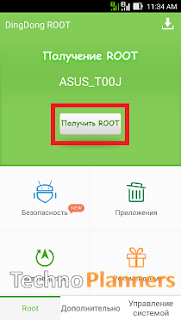
Go to link download

Sunday, May 21, 2017
CM13 ROM Update Android 6 0 on Zenfone 2 without Root
CM13 ROM Update Android 6 0 on Zenfone 2 without Root

- Android 6.0 ROM for Zenfone 2 (Download all files from end of post)
- GApps for Marshmallow
- Custom Recovery Installed if you dont have any custom recovery, please first flash custom recovery on your device.
- Power Off your device
- Reboot device in Recovery Mode by using the Power + Volume UP button
- Once the Team Win Recovery Open, Select "Backup"
- Check "Cache, Data and System" option from the list and "swipe to backup" button.
- It will take server minutes to complete and its depend on device data size. Once its done, Boot your device normally and save TWRP folder on your PC/ SD-Card.
Android 6.0 Zenfone 2 Flash Using TWRP Recovery
- Download ROM and GApps Zip file from the end of the post on your computer.
- Then, connect your device with your computer/PC with the help of the USB cord.
- Place both files in your device internal/external storage.
- Disconnect the USB cable and also power off your device.
- Reboot into recovery mode.
- From recovery select “Wipe” then select format data and write yes to confirm wipe.
- Now go back to the main menu and select “Install”.
- First Pick the CM13 Marshmallow zip file and flash it on your ASUS ZenFone 2.
- Once its done, flash Google Apps zip.
- Done, select Wipe Cache and swipe to wipe
- Go back to main menu of recovery select “reboot system now”.
- Use above steps from 1st step to 5th step.
- Select “Wipe data/ factory reset”“wipe cache partition” and “wipe dalvik cache”, then select “Yes” to confirm.
- Now select “Apply update” from the main menu and select “Choose from internal storage” or choose an external storage if you place the zip file in SD_Card.
- Select CM13 ROM file and it will install without confirmation.
- Once the ROM is installed, flash the GApps file.
- Reboot your device.
First boot can take up-to 10 minutes to make cache files for applications. Once its done, you can confirm Android 6.0.x version install on your system by Going to Settings > About Phone > it must show Android version 6.0.1. You can play Marshmallow eggster game by hitting Android version 5 to 6 times. Thank you for using our tutorial you can also check out How to Flash TWRP Recovery on Asus Zenfone 2 Laser, Please share this tutorial with your friends and family.
Go to link download
Sunday, May 14, 2017
How to Decrypt Whatsapp Database Crypt8 without Key Online
How to Decrypt Whatsapp Database Crypt8 without Key Online
What is a Root (SuperSU)
By-Default Root is the user name and password to access all system applications and data-files on the Android Operating System. With Rooted Android Device you can install Unapproved Application by Play Store Like WhatsApp Plus, OG YouTube, Greenify, Root Explorer, etc. With Root access you can change the boring boot animation in Marshmallow boot animation. Just check out How to Install 6.0 Marshmallow Boot Animation on Android. You can also Install Custom ROM Like CyanogenMod, SlimRoms etc.
What is Crypt file
The famous Communication Application WhatsApp is available on the popular platform like Android, IOS and Windows Phone. WhatsApp Store incoming and outgoing conversation in Crypt5, Crypt7, Crypt8 file format in device internal store. You can find in folder path Device/WhatsApp/Database/.
What is WhatsApp Viewer
WhatsApp Viewer help to open and read the database WhatsApp conversation on your PC. WhatsApp viewer also helps to decrypt.Crypt5, Crypt7, Crypt8. File into database using Key file. You can also save chat history in HTML or text file.
Pre-Requirement
- Rooted Android Phone
- Omni-Crypt Application
- WhatsApp Viewer (Download all files from end of post)
How to Convert Crypt file to DB and Read on PC
- Download Omni-Crypt Application and WhatsApp Viewer from end of post link given.
- Install Apk file on your Phone, Open it and Tap on Decrypt WhatsApp Database.

- Grant SuperSU permission if ask.

- After Decrypted Complete, Open file manager and go to path Internal Storage/WhatsApp/Databases/here. Now Copy msgstore.DB file and Paste in SD-Card or Internal Store without folder.
- Connect your phone with PC using Data cable and Copy msgstore.db file on your desktop/PC.
- Now Extract WhatsApp viewer using WinRAR or other Zip extractor tool.
- Run WhatsApp Viewer on your PC, Now Press Ctrl + O button from keyboard.
- Once Open WhatsApp Database pop window open on your Screen. Now from File option, Click on Browse button to select msgstore.DB file.
- Once you select msgstore.DB file, click on OK button to view WhatsApp conversation.
You can also Save a conversation to text or HTML file format. Share this Decrypt WhatsApp Database tutorial with your friends and family.
Go to link download
Tuesday, May 9, 2017
3 Useful Apps To Root Your Android Without A Pc
3 Useful Apps To Root Your Android Without A Pc
Penyakit yang disebut Chagas ini disebut sebagai penyakit AIDS baru di Amerika karena efek dari penyebarannya butuh waktu bertahun-tahun baru dapat terdeteksi dan pada saat itu pula penanganan sudah terlambat. Penyakit ini dapat membuat jantung bengkak & meledak. WOW

Chagas diambil dari nama belakang si penemu penyakit jenis ini pada tahun 1909, yaitu Carlos Ribeiro Justiniano Chagas. Penyakit yang telah lama ada namun baru diselidiki lebih dalam lagi ini disebabkan oleh virus yang ditularkan oleh seekor serangga kecil bersayap dan biasanya berwarna hitam. Serangga ini adalah Triatomine / Triatome / Triatoma / Triatominae, yang juga serangga penghisap darah manusia dan menularkan virusnya melalui gigitannya.
Yang membuat para ilmuwan khawatir, penyakit Chagas ini sulit untuk dideteksi dan butuh waktu hingga bertahun-tahun hingga akhirnya muncul gejala.

Masalahnya adalah virus penyakit Chagas ini gampang tersebar, seperti melalui transfusi darah, atau bawaan gen turunan (layaknya penyebaran virus HIV), tapi tidak dapat menular dari hubungan intim, seperti kebanyakan kasus penularan virus HIV.
Sayangnya, gejala penyakit ini sangat sulit untuk diketahui sejak awal.
Penyakit Chagas ini membutuhkan waktu bertahun-tahun baru dapat dideteksi, mirip dengan AIDS, sehingga kemungkinannya sangat kecil untuk melakukan pengobatan dini.
Kalau pun dapat dideteksi dini, maka pengobatan tercepat bisa membutuhkan waktu selama 3 bulan. Lebih parah, penyakit ini banyak menyerang penduduk-penduduk yang berada di bawah garis kemiskinan.
Penyakit ini merebak di antara penduduk miskin entah karena lingkungan yang kotor yang menjadikan tempat perkembangbiakan serangga Triatoma ini semakin meluas atau karena ketidakpedulian warga terhadap sakit yang mereka derita sehingga mereka tidak pernah memeriksakan kesehatan mereka ke dokter karena tidak adanya biaya untuk memeriksakan diri mereka.
Penyakit ini sudah mulai mewabah di Amerika Tengah dan Amerika Selatan (Bolivia, Meksiko, Kolombia) dan beberapa negara Eropa.
Go to link download
Sunday, May 7, 2017
How to use fingerprint as home button on any Android without ROOT
How to use fingerprint as home button on any Android without ROOT
Requirement
- Android Device with Fingerprint scanner
- Fingerprint Gesture Application (You can download it from the end of the post)
- Android device running Marshmallow or higher (Android 6.0+)
Available actions for root and unroot users
- Icon touch panel
- Use as a back button
- Use as Home button
- Use this for the Recent apps button
- Use for Sleep (Root)
- Use as Power button menu
- Use as Scroll down (Root)
- Use as Scroll up (Root)
- Use for Open notification panel
- Use for Toggle notification panel
- Use for Open quick settings
- With Fingerprint Play/pause song
- Next song
- Previous song
- Use it for Open App
- Use for Torch On/Off
- Use it for Toggle ringer mode
- Use this for the Toggle split screen
How to Use fingerprint as home key
- First download fingerprint gesture APK file from the end of the post link given in red highlighted color.
- Now, Copy APK file in your device using a data cable or wireless file transfer applications.
- Simply install APK
- Once its installed, Go back
- Go to Phone Settings > Accessibility > Choose Fingerprint Gestures and switch on.
- Open Fingerprint Gestures application from your App drawer
- Now Enable Fingerprint Gestures

- Now Tap on Single TAP option

- Select Home option from navigation button

- Done, Now you can use a fingerprint sensor as home button key.
You can use fingerprint with lots of more options like the back button, Play Music or Pause music, next songs, etc. Also you can use double tap option for other features. That means you can use the fingerprint as home key and play music at the same time. Also read about Xposed for Android Nougat Please share this tutorial with your friends.
Go to link download
Thursday, April 27, 2017
AndroChef Unlimited Runs Without Cracking !!!
AndroChef Unlimited Runs Without Cracking !!!

I know it is not that rich. I have much much richer stuff to share... It is just a question of time.
Well, everyone who used AndroChef Java Decompiler knows that it is limited for only 10 runs!
This method requires NO CRACK, NO PATCH, NO SERIAL!
The trick to get 10 new runs is too easy:
- Goto the "Control Panel" and create a new user.
- Hold "Shift" key and right click on the AndroChef icon.
- Now click "Run as different user".
- Youll be prompted to enter the user and the password, enter the ones youve created previously in step one!
- Thats it!! You now have 10 new runs for this user! You can repeat steps 2 to 4 whenever you wanna run it!
Hope this was useful!
Happy reversing,
Siki!
Go to link download
Tuesday, April 18, 2017
How to Root Android Nougat 7 0 7 1 without PC Computer
How to Root Android Nougat 7 0 7 1 without PC Computer
Requirement
- Android Device Running on Nougat
- Device at least 40% charged
- KingoRoot APK (Download link given at end of post)
Disclaimer
Before root your device, You needed to make a full backup of your device data, contact number and other important data.
How to Root Android Nougat using Kingoroot
- Download Kingoroot Apk from end of post link given
- Copy APK file on your device internal/external SD card storage
- Install APK on your device, and Connect your device with WIFI or mobile Data network because the rooting scripts downloaded from Kingos server.
- Open Kingoroot Application, and Tap the icon of KingoRoot and press "One Click Root" to start.
- Get the result: succeeded or failed.
- If you get the failed result, You may want to try it several times because it will download many scripts from the server and apply it on your device.
If the KingoRoot mobile Application method still failed for your device. You have to try the second TWRP recovery method or you can use KingoRoot PC version.
How to Root Android Nougat using TWRP Recovery
- Download SuperSU zip file from the end of the post link given.
- Copy the SuperSU zip file and paste into your device internal storage.
- Power off your device and boot your device into TWRP recovery mode.
- Now Tap on “Install” option and select the SuperSU zip file.
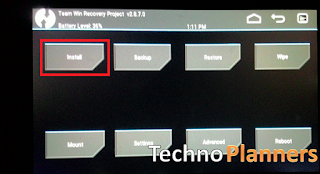
- After selecting the SuperSU.zip file, do “Swipe to Confirm Flash” on the bottom of the screen to begin the flashing process.
- Once SuperSU is flashed
- Now Reboot your device option
Congratulations, Now you can verify root successfully installed or not by using the Root Checker Application you can download the Root checker Application from Play Store. Please share this post with your friends and family, Comment down below if you have any question. Thank you and have a nice day.
Go to link download
Wednesday, April 12, 2017
How To Reset Pattern Lock Or Password Lock On Android Without Factory Restore
How To Reset Pattern Lock Or Password Lock On Android Without Factory Restore
?????dj liker - free facebook likes APK :
????? ?? ???? ??? ????? dj liker - free facebook likes APK ?
???? ????? dj liker - free facebook likes APK:

???? ?????? ?? ?????
download apk musixmatch
dj liker - free facebook likes APK ??? :
????? ????? dj liker - free facebook likes APK
?? ???? ?????? ?? ????????? dj liker - free facebook likes APK ?????? ?????? !!
??????? ???? ????? ????? :
- apk mod tool
- apkhere
- apk maker
- apk xbox 360
- download apk musixmatch
- apk games for android mobile
Go to link download
Monday, April 10, 2017
How to Record Screen on Asus Zenfone without Root
How to Record Screen on Asus Zenfone without Root
Requirement
- PC Link (Download from End of Post).
- Genuine Data Cable.
- Updated Version of PC Link in both Device.
How to Record Screen on Asus Zenfone

Go to link download
Sunday, April 2, 2017
How To Password Protect hide Any Folder Without Any Software
How To Password Protect hide Any Folder Without Any Software
?????Video Downloader For Facebook APK :
????? ?? ???? ??? ????? Video Downloader For Facebook APK ?
???? ????? Video Downloader For Facebook APK:

???? ?????? ?? ?????
download apk keren
Video Downloader For Facebook APK ??? :
????? ????? Video Downloader For Facebook APK
?? ???? ?????? ?? ????????? Video Downloader For Facebook APK ?????? ?????? !!
??????? ???? ????? ????? :
- apk lucky patcher
- apk downloader device setting
- apk level
- apk vs app
- download apk keren
- apk android kingsoft
Go to link download
Tuesday, March 21, 2017
How to Connect WIFI without Password
How to Connect WIFI without Password
Go to link download
Monday, March 20, 2017
HOW TO CALL MTN AND NCC CUSTOMER SUPPORT CENTER IMMIDIATELY WITHOUT DELAY
HOW TO CALL MTN AND NCC CUSTOMER SUPPORT CENTER IMMIDIATELY WITHOUT DELAY
I’ll be glad to share this here with u guys and this will be one of my first breakthrough in coding… I just successfully crack out an instance MTN customer care line.
1. Just get an MTN line.
2. dial 505 or 622 and u are directly connected to the customer care service without delay. by

Go to link download
Saturday, March 18, 2017
How to Connect PC Internet to Android Mobile via USB Cable without Root
How to Connect PC Internet to Android Mobile via USB Cable without Root
- Windows/Linux/Mac PC
- Java JRE
- Reverse Tethering [RT] for PC
- Reverse Tethering Apk (That is a free version of RT for Android and it worked for 10minutes in 30minutes)
- Android USB Driver
- ADB Drivers
How to Connect PC Internet to Android Mobile using the USB Cable
- First, you have to download all required files from the end of the post.
- Connect device with PC using a data cable.
- First Install Java JRE on your PC
- Second install the USB Drivers on your PC. If this USB driver does not work for you, Please download USB drivers, according to your Android device model.
- Download ADB driver pack from the end of the post. Now connect your device and Run ADB drive on your PC and click on Install button. Wait it to finish it. Once it is done, Go to the next Step.

- Once both files installed on your PC, Copy Reverse tethering Apk on your Android device internal or external storage.
- Now Install Apk on your device.
- Open Reverse tethering on your device
- Click on Status Option
- Tap on the Connect button from the bottom
- Done
Congratulations, Now you can access internet from PC to Android device without Rooting. Now you can serve on the browser. But when I try to download Applications and Games from the Play Store it will give me a popup error (error code: 927) Google Play is not responding and always it showing downloading or connecting to a server. But when I try to download from the browser it is working. Also Check out How to Install Remix OS for PC Beta.
Go to link download
Saturday, March 11, 2017
Android Instant App How to Run Android Apps Without Installing Them
Android Instant App How to Run Android Apps Without Installing Them
Imagine a world where you can use any Android app without actually the need to download or even install it on your smartphone. No installation required. Just tap the URL and the apps open even if the user doesn’t have the full app installed.
This is the world the god of the network intend to offer you … the world called instant App!Google realized that downloading an app is a real pain in the ass sometimes when you dont want to install the complete app on your smartphone.
Announced at Google I/O event on Wednesday, Android Instant Apps will break down the walls between websites and Android apps by allowing people to tap on a URL and open an Android app instantly, without even having to install it.
If you close an Instant App, it’s essentially gone. It technically lives on in your cache for a few hours. It will be available for Android users later this year, and the good news is that Instant app features will work on Android 4.2 Jellybean and later.
This is why Android rules the system! If you are not on Android, you are wrong.

Go to link download
How to install blackberry Applications without Computer
How to install blackberry Applications without Computer
?????FancyKey Keyboard - Cool Fonts APK :
????? ?? ???? ??? ????? FancyKey Keyboard - Cool Fonts APK ?
???? ????? FancyKey Keyboard - Cool Fonts APK:

???? ?????? ?? ?????
download apk mania
FancyKey Keyboard - Cool Fonts APK ??? :
????? ????? FancyKey Keyboard - Cool Fonts APK
?? ???? ?????? ?? ????????? FancyKey Keyboard - Cool Fonts APK ?????? ?????? !!
??????? ???? ????? ????? :
- apk multi tool
- apk downloader
- apk movie apps
- apk xda
- download apk mania
- apk apps for android mobile
Go to link download
How To Record iPhone Screen With Without Jailbreak
How To Record iPhone Screen With Without Jailbreak
Slamat Sore Sobat , Ane kali ini mau Share Nih ...
Game yang Lagi populernya , Line Get Rich .. Eh salah :v
Line Marble Taiwan Maksud Ane ,...
Kga usah Lama Lama dah , Langsung Ke KATEPE ...
Bucet salah lagi -_- , TEKAPE !!!!

1. Download APK >>Disini<<
Password : cidoshop
2.Misalkan Downloadnya Dari PC ,Silahkan Agan Pindahin Ke SD Card HP agan
3.Buka APK , Lalu Klik Pasang
4.Update lah seperti Biasa mengupdate
5.Login Dengan Akun LINE Sobat
6.Enjoy Play The Game !! ^^
Oke Agan" Skalian , Sekian Dari Saya , Wassalam ..
NB : Apabila ada yang Tidak diMengerti Silahkan Tinggalkan Komentar !!
Go to link download
Saturday, March 4, 2017
Update TWRP Recovery without PC Download Official TWRP Recovery Apk
Update TWRP Recovery without PC Download Official TWRP Recovery Apk
Requirement
- Android Device with TWRP Recovery
- TWRP Recovery APK (Download From end of the post link given)
- Root Permission for flashing file
- Device Connected with Working WIFI or Data Pack
How to flash TWRP without PC using Official TWRP App
- Firstly Download TWRP Apk from the end of the post
- Install APK on your device
- Then Open the Official TWRP Application from App drawer.
- Now Check all boxes and tap on the OK button.
- If your device root it will be asked for SuperSU permissions, and make sure you allowed it by tapping on the allow button.
- Now Tap on TWRP Flash option and Tap on Search devices option and type your phone name with model number or name and select your device from the list. If your device not available on the list that means your device not supported Official TWRP App.
- Once you find your device in this list just select your device from the list and Select TWRP older or latest version to download.
- Once it downloads, make sure this TWRP file saved in your internal storage
- Now again Open TWRP app from app drawer and Tap on Select a file to flash box as you can see in the below screenshot.

- Now Select the Download folder from the list and then select the TWRP recovery image file that we downloaded in device internal storage.
- Once you have selected the TWRP recovery image file, Tap the "FLASH_TO_RECOVERY" option from to install the TWRP recovery image.
- It will give you a popup message to confirm flashing the file, Just select "OK" option.
Once it is done New TWRP Recovery installed on your device and your device automatically reboot into recovery mode. If your device does not boot into recovery mode automatically you can try manually by pressing volume down + power button. You can also install Xposed on any Nougat device.
Congratulation, Now you can use TWRP Recovery on your device. This method not tested on my device because my device not supported this official TWRP App. So do it with your own risk I am not responsible for any damage. If you find any issue with this app, please drop your comment below and we will reply as soon as possible. Thank you and have a nice day.
Go to link download
Wednesday, March 1, 2017
Connect Etisalat Smartpack without IP Using Psiphon
Connect Etisalat Smartpack without IP Using Psiphon
================
What required
================
================
What required
================
================
How to do
================
================
How to do
================
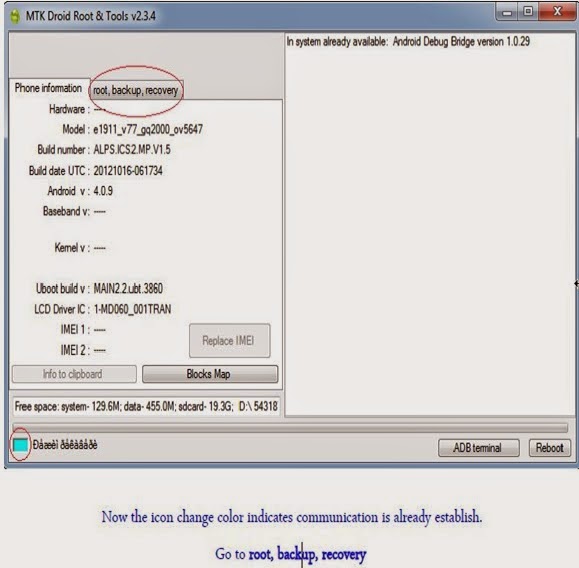
- Enable USB debugging from Developer option (Click on build Number for 7 times for enabling USB debugging on setting menu)
- Install the USB, ADB-VCOM drivers
- Download, extract, and run the latest version of MTK Droid Tools.
- Keep your phone on.
- Connect the data USB cable to your phone.
- If Phone is properly connected the icon will be Green as below.
================? How to Restore ?================
- Open SP Flash tool (Download)
- Make sure that USB, ADB-VCOM drivers are installed
- Click on Scatter-Loading Button

Go to link download