Showing posts with label firmware. Show all posts
Showing posts with label firmware. Show all posts
Tuesday, May 30, 2017
How to Root Zenfone 5 in 3 24 40 87 WW TW Lollipop Firmware
How to Root Zenfone 5 in 3 24 40 87 WW TW Lollipop Firmware
Tutorial - How to Root Asus Zenfone 5 in Latest 3.24.40.87 WW - TW Lollipop Firmware. In previews post we talk about How to Update Zenfone 5 in 3.24.40.87 WW/ TW firmware. Now We are sharing How to Root with step by step guide. This method tested on my Zenfone 5 WW SKU firmware.
Pre - Requirement

Pre - Requirement
- Zenfone Root Files
- Windows PC
- Intel USB Universal Drivers
How to Root Zenfone 5
Step 1. Download Zenfone Root file from end of post.
Step 2. Extract downloaded file on your PC.
Step 3. Now Enable USB debugging feature on your device from Settings > Developer option. If Developer option not available in your settings you can enable it from Settings > About > Software Information and click 7 to 8 times Build number for enable developer option.
Step 4. Now Connect your Zenfone with your PC using data cable.
Step 5. Open Zenfone Root folder that you extracted on your PC, and double click on Root file.
Step 6. After Click on root file it will open commend windows on your screen. Now press any key to continue and Wait to finish it. Dont disconnect your Zenfone data cable in root process.
Download here
USB Drivers - http://intel.ly/1JWOVrg
Zenfone Root - http://bit.ly/1TNh7Rs
Congratulation, After reboot you have a root access power. With root power you can access more application and system files. With this method you also can root Zenfone 4, Zenfone 6 and Zenfone 2 Kitkat and Lollipop supported. You can also check out How to Install Multi-user Mode on Asus Zenfone 5 and Zenfone 6.
Go to link download

Tuesday, May 16, 2017
Moto G4 Plus Nougat update Download Install Official OTA Firmware
Moto G4 Plus Nougat update Download Install Official OTA Firmware
Now Nougat Update for Moto G4/G4 Plus available in Lenovo Moto G4/G4 Plus. And this firmware work for XT1643 XT1640 XT1642 XT1622 and XT1626. This is an official update from MOTO. So you can install it without loosing your personal data and games. Currently this firmware status of testing. That is the reason MOTO does not provide an OTA update at this time.
For first boot it can take up to 10 - 15 minutes for making catch files on this device. So, please keep patience. If you find other bugs or issue with this update, please drop your comment below. Thank you and have a nice day.
Requirement
- A Device running on stock recovery
- Device at-least 60% charged
- Nougat Firmware for Moto G4/G4 Plus (Download from end of the post)
- We are not responsible for any damage to your phone do it with your own risk. But this method is tested on my moto g4 plus (INDIA Variant)
- Take a complete backup of your phone for safer side and then proceed
Before Installing
Before you go to the next step please make sure backup your personal photos, Games, contract and other data.How to Install Nougat update on Moto G4 Plus
- First enable Debugging mode from settings > About and tap the Build Number 7 times.
- Download Nougat zip firmware file for Moto G4 Plus from below link and save it to internal memory.

- Reboot Moto G4 Plus to Recovery mode by pressing and hold the Volume Down and Power Button.
- Press Volume down once to highlight the Recovery mode option. Press Power button to select it and reboot into recovery mode.
- Now select Apply update from the SD Card.
- Choose the zip file you downloaded and wait to complete the installation process. For installing it can take up to 15 minutes
- Done! Reboot your phone and enjoy.
Download here
ROM- http://bit.ly/2eSpWhJ
For first boot it can take up to 10 - 15 minutes for making catch files on this device. So, please keep patience. If you find other bugs or issue with this update, please drop your comment below. Thank you and have a nice day.
Go to link download
Wednesday, May 3, 2017
How to Update Zenfone 5 in 3 24 40 87 WW TW Lollipop Firmware
How to Update Zenfone 5 in 3 24 40 87 WW TW Lollipop Firmware
Tutorial - How to Update ASUS Zenfone 5 in 3.24.40.87 Lollipop firmware. Recently ASUS release there latest firmware for Zenfone 5 A500CG and A5001CG device model. Your device must run on 3.24.40.78 firmware before updating. Otherwise System Update can be fail. In preview Post we talk about How to Root Zenfone 5 in 3.24.40.87 Lollipop Latest firmware.

Whats New in 3.24.40.87
- Improved SIM network stability
- Improved and FIX power saving mode
- Improved video Performance
- Update Google Security Policy
- Improved 3G network Connectivity
How to Update 3.24.40.87 firmware in Zenfone 5
Step 1. Download Firmware
First Download 3.24.40.87 firmware according to your device SKU. for example if your device running on WW SKU you have to download 3.24.40.87 WW sku firmware from end of post.
Step 2. Copy Zip file in your Device
After Download, Connect your zenfone with PC using Data cable and Copy firmware zip file in device internal storage.
Step 3. System Update Notification
Now disconnect your zenfone, you will see a System update file detected notification. Just tap on it. Then select update package and press OK button then again press OK button to start.
Step 4. Successfully System Update
After Press OK button It will reboot and Start Install System Update file on your device. It can be take 15 - 20 minutes to complete.
Download here
TW Firmware - http://bit.ly/1lcVlJn
WW Firmware - http://bit.ly/1lcVfBC
Congratulations, After its done you can use your device in update 3.24.40.87 Firmware. You can also check out How to Install ZenMotion Wake/Sleep on Asus Zenfone 5 and Zenfone 6. Dont forget to Share this tutorial.
Go to link download
Friday, April 21, 2017
Full Firmware Zenfone 5 T00F T00J V2 22 40 53
Full Firmware Zenfone 5 T00F T00J V2 22 40 53
Hello Guys, In this post I will tell you How to flash Full Firmware V2.22.40.53 ASUS Zenfone 5 T00F/T00J. If your device going to bootloop that means your device cannot start or its show ASUS logo and shut down and reboot again and again or it is showing boot animation continuously. That means you have to fix a bootloop issue on your zenfone. Use this tutorial for fix bootloop on Zenfone 5.
How to Update Manully Zenfone 5?
Requirement
Install Drivers on your PC
Now you will get New Firmware on your Asus Zenfone 5. You can also check out How to flash Nougat Firmare on Zenfone 5 and Zenfone 6.
How to Update Manully Zenfone 5?
- Open Settings > About Phone > System Update
- Now Download the .zip file from the end of post link given
- Now Copy and Paste this .zip file to device your Internal Storage using data cable
- After Copy Unplug USB cable from your device and Update notice will be popping up on your zenfone screen
- Just click on update notification
- Done.
- Or you can Update your device using SD Card
- Just Copy and paste .zip to SD Card then open recovery by pressing the Power than Volume Down button and select apply updates from SD Card)
- Done
Requirement
- ADB Driver
- Intel Driver
- ADB Fastboot Tool
- Zenfone Stock Firmware ROM (Download All Requirement files from the end of the post link given)
- Windows PC
Install Drivers on your PC
- Download Intel driver from end of the post. Once it downloaded on your PC, Install it on your PC like normal software.
- Install ADB Driver
- Download ADB Drivers from end of the post.
- Connect your zenfone in recovery mode
- Run ADB Driver, and Click on Install button
- Done
How to flash firmware Zenfone 5 ADB Method
- Now Download ADB Fastboot tool and extract it on your PC desktop.
- Copy Stock ROM zip file in extracting adb folder.
- Now select recovery mode, then press the power button (if you dont know how to open recovery mode using droidboot mode, then Power off your device and Press and hold Power off button after vibrate suddenly press the Volume Down button. May be it show no command or show android image, Now Press and hold Volume down and Volume Up button again and again it will show you recovery menu.
- Connect your device with PC using ASUS USB Data cable.
- Now select apply updates from adb option
- Now open the adb folder and press and hold the SHIFT key, then click Right Mouse Button and select the open command here.

- Now Type below command and hit enter
- Wait until the process is complete
- Once its done, Reboot your device
- This method can be used to downgrade. But Do it with your own risk.
adb sideload filenamee.zip
Download here
Intel USB Drivers- http://intel.ly/1hCwP2o
ADB Drivers- http://bit.ly/2cUnlTg
ADB TOOL- http://bit.ly/2dGYSjQ
Firmware- http://bit.ly/1GuHFRN
Now you will get New Firmware on your Asus Zenfone 5. You can also check out How to flash Nougat Firmare on Zenfone 5 and Zenfone 6.
Go to link download
Monday, April 17, 2017
New Updated Method To Download Nokia Firmware
New Updated Method To Download Nokia Firmware
Asus Zenphone 2 (Asus zen ui rom v5)
Features:
- Kitkat
- video call
- dual 3g
- New framework
- Xposed Supported
- walkman added
- RealCalc added
- Viper
- Orchi Night Mode
- Soft key light modifier
- Nav key enabler
- Lenovo Super cam added
- Kingroot added
- GAAPS
Link:
Click Here
Uploaded by: Obaidul Rana
Sound Patch for Asus 5:
Flash this patch
Click Here: >>
ROM Has Password:
For Retrieve Password please watch the above video
Sound Patch for Asus 5:
Flash this patch
Click Here: >>
Go to link download
Monday, March 27, 2017
ROM Android 6 0 ZenFone 2 Marshmallow Firmware ZE551ML ZE550ML
ROM Android 6 0 ZenFone 2 Marshmallow Firmware ZE551ML ZE550ML
Hello Guys, In this post I will tell you How to flash Full Firmware Marshmallow ASUS ZenFone 2 ZE551ML/ZE550ML. This is a beta version of Android Marshmallow. Before flashing this Firmware please make a full backup of your device data. You can also read my old post about How to Update Zenfone 2 Laser to Marshmallow ROM.
How to Update Manully ZenFone 2?
Requirement
Install Drivers on your PC
Now you will get New Marshmallow Firmware on your Asus ZenFone 2. If you have Zenfone 5 then you can also check out How to flash Nougat Firmare on Zenfone 5 and Zenfone 6.
How to Update Manully ZenFone 2?
- Open Settings > About Phone > System Update
- Now Download the .zip file from the end of post link given
- Now Copy and Paste this .zip file to device your Internal Storage using data cable
- After Copy Unplug USB cable from your device and Update notice will be popping up on your zenfone screen
- Just click on update notification
- Done.
- Or you can Update your device using SD Card
- Just Copy and paste .zip to SD Card then open recovery by pressing the Power than Volume Down button and select apply updates from SD Card)
- Done
Requirement
- ADB Driver
- Intel Driver
- ADB Fastboot Tool
- Zenfone Stock Firmware ROM (Download All Requirement files from the end of the post link given)
- Windows PC
Install Drivers on your PC
- Download Intel driver from end of the post. Once it downloaded on your PC, Install it on your PC like normal software.
- Install ADB Driver
- Download ADB Drivers from end of the post.
- Connect your zenfone in recovery mode
- Run ADB Driver, and Click on Install button
- Done
How to flash firmware ZenFone 2 ADB Method
- Now Download ADB Fastboot tool and extract it on your PC desktop.
- Copy Stock ROM zip file in extracting adb folder.
- Now select recovery mode, then press the power button (if you dont know how to open recovery mode using droidboot mode, then Power off your device and Press and hold Power off button after vibrate suddenly press the Volume Down button. May be it show no command or show android image, Now Press and hold Volume down and Volume Up button again and again it will show you recovery menu.
- Connect your device with PC using ASUS USB Data cable.
- Now select apply updates from adb option
- Now open the adb folder and press and hold the SHIFT key, then click Right Mouse Button and select the open command here.
- Now Type below command and hit enter
- Wait until the process is complete
- Once its done, Reboot your device
- This method can be used to downgrade. But Do it with your own risk.
adb sideload filenamee.zip
Download here
Intel USB Drivers- http://intel.ly/1hCwP2o
ADB Drivers- http://bit.ly/2cUnlTg
ADB TOOL- http://bit.ly/2dGYSjQ
Firmware- http://bit.ly/2kwA1hW
Now you will get New Marshmallow Firmware on your Asus ZenFone 2. If you have Zenfone 5 then you can also check out How to flash Nougat Firmare on Zenfone 5 and Zenfone 6.
Go to link download
Saturday, March 25, 2017
How to Update Zenfone 2 Laser to Marshmallow firmware Complete Guide
How to Update Zenfone 2 Laser to Marshmallow firmware Complete Guide
Hello Guys ASUS roll out Marshmallow official firmware for ASUS Zenfone 2 Laser ZE550KL. Here is a complete guide to server methods first is ADB and the second is an OTA update. An old post we talk about How to Root Zenfone Max step by step.
Before Update
Before you go to the next step please make sure backup your personal photos, Games, contract and other data. Because after update your internal storage decreases the size of storing it can fail to update or remove some files from your Android phone.
Make sure before update currently your device running on latest Lollipop firmware. Otherwise, it will be failed to update your device. You can also check out More Tutorials on ASUS Zenfones device
Requirements
- Marshmallow Firmware, Download all files from end of the post
- ADB Tool only for Method 1
- Intel USB Drivers [Method 1]
- Device Running on Most latest Lollipop firmware
How to Update Zenfone 2 Laser to Marshmallow [Method 1]
- Download the firmware and ADB Tool from end of post
- Download and Install USB Drivers on your PC
- Extract ADB Tool on your desktop
- Copy Firmware.zip file in adb tool folder
- Turn off your Zenfone 2 Laser
- Go to recovery mode by pressing the Power + Volume down button, it will show android logo now press volume up + down and then release volume up (hold the volume down button until recovery) then select apply updates from ADB.
- Now Connect your Zenfone to PC using a data cable
- Open Command Window by press and hold CTRL Key of a keyboard, then right click from mouse select Open windows Commend here
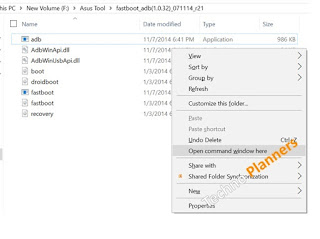
- Type below command in CMD Window and hit the enter button
- Wait until the process is done and make sure you device not disconnected while this process
- Once its done, it will be rebooted automatically.
adb sideload WW-21.40.1220.zip
How to Update Zenfone 2 Laser to Marshmallow [Method 2]
- Download the_Firmware_from end of the post
- Connect Device with data cable
- Copy firmware.zip file to Internal Storage
- Disconnect device from the PC
- System update notice will be appearing in the notification area of the zenfone
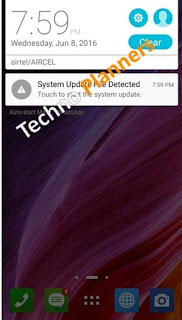
- Tap on it, hit on OK button
- Wait until the process is done
- Once its done, it will be rebooted automatically.
Download here
USB Drivers- http://bit.do/Drivers
ADB Tool- http://bit.do/ADB-TOOL
Firmware- http://bit.do/6-0-firmware
Once it is done, You can enjoy official update of Android Marshmallow on your ASUS Zenfone 2 Laser ZE550KL. If you fail to update your device with this method, please comment down below, we will reply As soon as possible. Please Share this info with your friends and family and tell him to update their device Lollipop to marshmallow. Before you go also check out Android 7.0 N-IFY module for Zenfones.
Go to link download
Friday, March 17, 2017
How To Update Zenfone 5 to Firmware 3 23 40 60 Download
How To Update Zenfone 5 to Firmware 3 23 40 60 Download
Recently Asus launch Latest firmware 3.23.40.60 WW for Zenfones. In this Tutorial We are showing How To Update Zenfone 5 in Lollipop 5.0 using the OTA file. You can download Android Lollipop OTA file from End of post. Before you apply this update please make sure your device already updated in 3.23.40.52 firmware otherwise its fail. Just check out How to Update Asus Zenfone 5 in 3.23.40.52 firmware.
Pre-Requirement

Step 2. Copy the zip file in your Phone Internal Store without any folder, Then Remove the USB Cable from device you will see a notification, press on it, then click on OK button.
Step 3. Now your device shut down automatically and system update can be take more than 10 minutes.
Pre-Requirement
- Android Lollipop OTA file
- Device Running at 50% Battery
- Make Sure you have updated to v3.23.40.52 firmware
- Backup all your personal Data
How To Update Zenfone 5 in 3.23.40.60
Step 1. Download Lollipop OTA file from Below Link.Step 2. Copy the zip file in your Phone Internal Store without any folder, Then Remove the USB Cable from device you will see a notification, press on it, then click on OK button.
Step 3. Now your device shut down automatically and system update can be take more than 10 minutes.
Download here
http://bit.ly/1GtEUvt
Once your Device Successfully Install the firmware Open the Settings > About > System Software it must be shown Build Number 3.23.40.60. Congratulations, you have Latest Android Lollipop in your Zenfone. Before you go Just check out How To Install [CM 12.1] CyanogenMod Lollipop on Zenfone 5 (Android Lollipop 5.1.1 for Zenfone 5).
Go to link download
Sunday, March 5, 2017
How to Update Galaxy J7 to Android 6 0 Marshmallow Official firmware
How to Update Galaxy J7 to Android 6 0 Marshmallow Official firmware
Hello Guys, AS we know as Samsung release Marshmallow firmware for Galaxy J7 device and In this post we are talking about How to Update Galaxy J7 to Android 6.0 Marshmallow Official firmware using FOTA Auto update and ODIN Manual Update. You can Root Galaxy J7 and Install TWRP Recovery in Marshmallow firmware.
Congratulation, Now you can taste Marshmallow sweat on your SAMSUNG Galaxy J7. Share this tutorial with your friends, Comment down below if you have any question. Before you Go read about How to Install Android N Boot animation on Any Android you can also install it on your Galaxy J7 for free.
Warning
- Make A Backup of your Personal Data, Contact, WhatsApp Chat, and internal storage, because there is no guarantee of keeping the data.
- FOTA Update is Not working for ROOT/Custom Recover users, So use manual ODIN Method.
Requirement
- Marshmallow File (Size 872MB) only for ODIN user (Download from end of the post)
- ODIN Software
- Battery Charged at lest 40% Percent
- Data Cable
How to Update Galaxy J7 to Marshmallow Official
- Go to Settings > About > System Update
- Tap on Check for Update
- If your Device detects system update available, Download Update file (Size 872MB Approx)
- After Update Install it on your device.
How to Update Galaxy J7 to Marshmallow Official using ODI
- Download marshmallow firmware, USB Drivers and ODIN file from the end of the post.
- Extract USB Drivers and Install it on your PC
- Extract ODIN and Run on your PC
- Turn Off your device and Boot device into Download Mode by press and hold "Vol Down + Home + Power" buttons
- Once your device successfully enters into Download mode, Now Connect your device to USB Cable with PC
- You will see an ID: COM port turned blue and Add message in the Odin that means your device has successfully connected with PC
- Now add the firmware ‘.tar‘ file to the PDA tab in Odin.

- Make sure that only these two options are tick “Auto Reboot” and “F.Reset Time“.

- Now click on ‘Start‘ button and it will start flashing the file. Wait until you see ‘Pass‘ in Green Color on Odin screen.
- Done and Enjoy
Download here
Drivers- http://bit.ly/1E9D3uS
ODIN- http://bit.ly/2ac5Ckj
Firmware- http://bit.ly/2alRw2x
Congratulation, Now you can taste Marshmallow sweat on your SAMSUNG Galaxy J7. Share this tutorial with your friends, Comment down below if you have any question. Before you Go read about How to Install Android N Boot animation on Any Android you can also install it on your Galaxy J7 for free.
Go to link download
Subscribe to:
Posts (Atom)