Showing posts with label lollipop. Show all posts
Showing posts with label lollipop. Show all posts
Tuesday, May 30, 2017
How to Root Zenfone 5 in 3 24 40 87 WW TW Lollipop Firmware
How to Root Zenfone 5 in 3 24 40 87 WW TW Lollipop Firmware
Tutorial - How to Root Asus Zenfone 5 in Latest 3.24.40.87 WW - TW Lollipop Firmware. In previews post we talk about How to Update Zenfone 5 in 3.24.40.87 WW/ TW firmware. Now We are sharing How to Root with step by step guide. This method tested on my Zenfone 5 WW SKU firmware.
Pre - Requirement
![Root Zenfone 5 in 3.24.40.87 [WW - TW] Lollipop Firmware](https://blogger.googleusercontent.com/img/b/R29vZ2xl/AVvXsEgoASMokQGAUSjLnPWlPJ1RsM6cLLyPow8cCG8Z6PknbQROCH6rVbr2h-AnfQa9ZEhfpgkwDXii0c1xoK8lZ_vLp7ZE9ZyyV0jyWJjw3HSr8wlAKZAdgsMLDLgQxqjNpzWjxfY7VAhp3us/s400/How+to+Root+Zenfone+5+in+3.24.40.87+%255BWW+-+TW%255D+Lollipop+Firmware.png "How to Root Zenfone 5 in 3.24.40.87 [WW - TW] Lollipop Firmware")
Pre - Requirement
- Zenfone Root Files
- Windows PC
- Intel USB Universal Drivers
How to Root Zenfone 5
Step 1. Download Zenfone Root file from end of post.
Step 2. Extract downloaded file on your PC.
Step 3. Now Enable USB debugging feature on your device from Settings > Developer option. If Developer option not available in your settings you can enable it from Settings > About > Software Information and click 7 to 8 times Build number for enable developer option.
Step 4. Now Connect your Zenfone with your PC using data cable.
Step 5. Open Zenfone Root folder that you extracted on your PC, and double click on Root file.
Step 6. After Click on root file it will open commend windows on your screen. Now press any key to continue and Wait to finish it. Dont disconnect your Zenfone data cable in root process.
Download here
USB Drivers - http://intel.ly/1JWOVrg
Zenfone Root - http://bit.ly/1TNh7Rs
Congratulation, After reboot you have a root access power. With root power you can access more application and system files. With this method you also can root Zenfone 4, Zenfone 6 and Zenfone 2 Kitkat and Lollipop supported. You can also check out How to Install Multi-user Mode on Asus Zenfone 5 and Zenfone 6.
Go to link download
Sunday, May 28, 2017
How To Install Official TeamEOS 5 1 1 Lollipop on Zenfone 2
How To Install Official TeamEOS 5 1 1 Lollipop on Zenfone 2
Tutorial - How To Install [Official] TeamEOS 5.1.1 Lollipop on Zenfone 2 ZE551ML (Z00A)/ ZE550ML (Z008) with step by step guide. TeamEOS should work like a charm for you if you follow the procedure correctly. But Do it with your own Risk Im not responsible of any damaged. But dont worry Ive tested this rom. Note : - Backup your data before perform this tutorial. How To Install [CM 12.1] CyanogenMod Lollipop on Zenfone 2.
![[Official] TeamEOS 5.1.1 Lollipop on Zenfone 2](https://blogger.googleusercontent.com/img/b/R29vZ2xl/AVvXsEiwFPmvkLtQFkoXQx1BWaufm8I-OTBySQOLT_Ez3CYTDh5Z6NwHY8cLzQQAxEG_N8ysRQ0ID1K3mMwlkvCNVV4jjfX1D-Y6f88we3C0YuDBRD3F0MCxD5yxs21hIICEhF9Yrjjd_4qgOcQ/s640/%255BOfficial%255D+TeamEOS+5.1.1+Lollipop+on+Zenfone+2.png "How To Install [Official] TeamEOS 5.1.1 Lollipop on Zenfone 2")
[ROM] TeamEOS Features for Zenfone 2
Step 2. Make sure youre running a proper working custom recovery. If you are not install custom recovery on your phone. Please first install it by your self.
Step 3. Download and Copy Gapps and TeamEOS ROM to your SDCard.
Step 4. Boot into Recovery.
Step 5. Perform a FULL factory wipe and wipe/system and dalvik cache as a precaution.
Step 6. Flash TeamEOS.
Step 7. Flash Gapps zip from SDCard.
Step 8. Reboot, First boot may take up to 10 minutes.
In this Tutorial We shared Install [Official] TeamEOS 5.1.1 Lollipop on Zenfone 2 ZE551ML (Z00A)/ ZE550ML (Z008) with step by step tutorial. When You install Custom Rom and try to root your device your warranty void automatically. We are not responsible for bricked devices, dead SD cards, do some research if you have any concerns about features included in this ROM before flashing it.
[ROM] TeamEOS Features for Zenfone 2
- NX Gesture Navigation Bar
- Re-sizable Navigation Bar
- Ambient Display
- EOS Wallpaper Showcase
- Custom Quick Toggles/Tiles
- Soft-key Long-Press and Double-Tap Actions
- Screen Recording
- Network Indicator (WiP)
- Dynamic Volume Steps
- CM12 Theme Engine
- Volume keys switch depending on rotation. So the volume up key is always either on the top or to the right of volume down. (Toggle-able)
- Default Volume Control Stream (Ring or Media)
- Advanced power menu with reboot options.
- Pre-Optimized OATs for better ART performance
- MUCH MORE...
How To Install TeamEOS on Zenfone 2
Step 1. Make sure you are rooted.Step 2. Make sure youre running a proper working custom recovery. If you are not install custom recovery on your phone. Please first install it by your self.
Step 3. Download and Copy Gapps and TeamEOS ROM to your SDCard.
Step 4. Boot into Recovery.
Step 5. Perform a FULL factory wipe and wipe/system and dalvik cache as a precaution.
Step 6. Flash TeamEOS.
Step 7. Flash Gapps zip from SDCard.
Step 8. Reboot, First boot may take up to 10 minutes.
Download here
GApps - http://bit.ly/1hDZwMp
ASUS Zenfone 2 Z00A/ZE551ML - http://bit.ly/1TZRH5N
ASUS Zenfone 2 Z008/ZE550ML - http://bit.ly/1hDZGDL
In this Tutorial We shared Install [Official] TeamEOS 5.1.1 Lollipop on Zenfone 2 ZE551ML (Z00A)/ ZE550ML (Z008) with step by step tutorial. When You install Custom Rom and try to root your device your warranty void automatically. We are not responsible for bricked devices, dead SD cards, do some research if you have any concerns about features included in this ROM before flashing it.
Go to link download
Tuesday, May 23, 2017
Resurrection Remix Lollipop for Zenfone 5 v5 5 9 Build 7 0
Resurrection Remix Lollipop for Zenfone 5 v5 5 9 Build 7 0
Tutorial - How to install Resurrection ROM on Asus Zenfone 5 [v5.5.9 Build 7.0]. You can download this rom from end of the post. This is the most stable version if we compare to previous build, but there is two bug FM and GPS are not Working. In preview post We talk about Install CM12.1 on Zenfone 5 Very Stable.
Pre-Requirement
Step 2. Power off your device. Press and hold Vol UP + Power till see the ASUS Logo.
Step 3. Now extract ADB on your PC and copy the downloaded new-twrp image file in ADB folder.
Step 4. Open ADB folder and Press and hold Shift button and Right Click on mouse then choose open CMD WINDOW HERE.

Step 5. Now Write below CMD to flash TWRP Recovery on Device
Step 6. After Successfully flash recovery image on device. Select Reboot option from droidboot.
Step 7. After reboot Now Copy RR Rom, GApps and Xposed files to external SD card. Dont use internal storage.
Step 8. Open TWRP recovery via bootloader (Use Step 2 to open the device in the bootloader). Then select recovery option using volume and power key.
Step 9. Now Select WIPE option, then Type Yes to format the internal storage.
Step 10. Go Back and Select Install then tap on Select storage (Micro SD-Card).
Step 11. Now Select RR Rom to flash, then Select Gaaps and last one select Xposed file.
Step 12. After flash all files now select wipe caches then Reboot device.
Congratulation, Now you can use Resurrection ROM on your Asus Zenfone 5. Share this post with your friends and family.
Pre-Requirement
- Resurrection ROM Zip file
- Xposed framework (for fix device storage issue)
- GApps Zip file
- Bootloader Unlocked (Also Check out How To Unlock Bootloader on Asus Zenfone 5)
- ADB Tool
- TWRP Recovery Installed (Download All Requirements files from End of post)
How to Install Resurrection ROM on Zenfone 5
Step 1. Download All requirements files from end of the post and after unlocking bootloader now flash twrp recovery on the device.Step 2. Power off your device. Press and hold Vol UP + Power till see the ASUS Logo.
Step 3. Now extract ADB on your PC and copy the downloaded new-twrp image file in ADB folder.
Step 4. Open ADB folder and Press and hold Shift button and Right Click on mouse then choose open CMD WINDOW HERE.
Step 5. Now Write below CMD to flash TWRP Recovery on Device
- fastboot flash recovery new-twrp.img
Step 6. After Successfully flash recovery image on device. Select Reboot option from droidboot.
Step 7. After reboot Now Copy RR Rom, GApps and Xposed files to external SD card. Dont use internal storage.
Step 8. Open TWRP recovery via bootloader (Use Step 2 to open the device in the bootloader). Then select recovery option using volume and power key.
Step 9. Now Select WIPE option, then Type Yes to format the internal storage.
Step 10. Go Back and Select Install then tap on Select storage (Micro SD-Card).
Step 11. Now Select RR Rom to flash, then Select Gaaps and last one select Xposed file.
Step 12. After flash all files now select wipe caches then Reboot device.
Download here
ADB Tool - http://bit.ly/1ILHUGh
TWRP img - http://bit.ly/1Ma4Ajo
Xposed - http://bit.ly/1XOY0Ll
GApps - http://bit.ly/1XOYwZL
RR ROM - http://bit.ly/1XOYGQV
Congratulation, Now you can use Resurrection ROM on your Asus Zenfone 5. Share this post with your friends and family.
Go to link download
Saturday, May 13, 2017
Xposed framework for Zenfone Lollipop Stock Rom effortless Guide
Xposed framework for Zenfone Lollipop Stock Rom effortless Guide
Hello Guys, In Previews post we discuss How to Install ZenMotion on Zenfone. Presently We are sharing a crisp Guide about Xposed for Zenfone Lollipop. Thanks to XDA developers Who made this Xposed structure for our x86 based procedures gadget.
Xposed Module
Xposed is an Application that progressions the framework conduct utilizing modules. There are bunches of modules accessible in the Xposed Installer App. Yet, a few modules are not working for our Zenfone.
Tested Modules on Zenfone
Here is some tried and working modules list that works for Zenfone device.
Caution
Before introducing Xposed on your gadget. Please take a backup of your Applications, Contacts, Internal Storage and other data. It can stuck on the bootloop issue. Do it at your own Risk, I am not responsible for any harm.
Requirement
Rooted Zenfone, To begin with, you need to root your gadget before introducing this. If you have a rooted device you can second requirement otherwise check out How To Root Zenfone Lollipop.
Windows Platform
You require a Windows 7, 8, 8.1 or 10 PC. It can just work with Windows Operating System. Along these lines, you cannot utilize Linux or Mac framework.
Enable USB debugging Mode
Enable developer option from Settings > About > Software information > Tap 7 times build number. Once it shows developer mode enable. Go back to Settings > Developer Options > Check Enable USB Debugging Mode option from the list.
Install Intel USB Drivers on your PC
Intel USB drivers associate Android phone to the PC and its get to all framework programming and equipment data from android gadget to PC. Download Intel USB drivers from end of post and introduce the drivers on your Windows PC.
Download Xposed Lollipop
Now Download Xposed Zenfone Lollipop document from end of post link given. When it downloaded on your PC Extract it on your desktop utilizing WinRAR device.
Congratulation, Now you can utilize Xposed Application on your Zenfone. In the event that you discover any bug. It would be ideal if you drop your remark and impart it to our different guests. Do you know you can introduce Zenfone 5 Custom ROM on your Zenfone 6. Here is some Custom ROMs for Zenfone 5.
Xposed Module
Xposed is an Application that progressions the framework conduct utilizing modules. There are bunches of modules accessible in the Xposed Installer App. Yet, a few modules are not working for our Zenfone.
Tested Modules on Zenfone
Here is some tried and working modules list that works for Zenfone device.
- GravityBOX [LP] 5.1.2
- Lolistart 1.1.2
- LPThemer 1.6
- Lucky Patcher 3.6.5
- OMZen Beta 8
Caution
Before introducing Xposed on your gadget. Please take a backup of your Applications, Contacts, Internal Storage and other data. It can stuck on the bootloop issue. Do it at your own Risk, I am not responsible for any harm.
Requirement
Rooted Zenfone, To begin with, you need to root your gadget before introducing this. If you have a rooted device you can second requirement otherwise check out How To Root Zenfone Lollipop.
Windows Platform
You require a Windows 7, 8, 8.1 or 10 PC. It can just work with Windows Operating System. Along these lines, you cannot utilize Linux or Mac framework.
Enable USB debugging Mode
Enable developer option from Settings > About > Software information > Tap 7 times build number. Once it shows developer mode enable. Go back to Settings > Developer Options > Check Enable USB Debugging Mode option from the list.
Install Intel USB Drivers on your PC
Intel USB drivers associate Android phone to the PC and its get to all framework programming and equipment data from android gadget to PC. Download Intel USB drivers from end of post and introduce the drivers on your Windows PC.
Download Xposed Lollipop
Now Download Xposed Zenfone Lollipop document from end of post link given. When it downloaded on your PC Extract it on your desktop utilizing WinRAR device.
How to flash Xposed for Zenfone
- Open Extracted folder that you downloaded from below link.
- Connect your Zenfone with PC using data cable.
- Double Click on InstallXposedInstaller.bat file. Wait, it finished it.

- Grant SuperSU Permission if ask on device.
- Once it finished, Click on the InstallXposedFramework.bat file. Your Phone will reboot automatically in server second.

- It can take 5 to 8 minutes to first boot. If screen stuck at booting for more than 10 mins you are probably bricked.
- Done
How to Install Xposed on Custom Marshmallow ROM
- Download Xposed Apk and framework from Below Link
- Copy both file on your device.
- Install Apk
- Power off and Reboot your device into custom Recovery using Power + Volume down button
- Tap on install, Now find framework file and install it.
- Once it done, Reboot your device and Enjoy
Download here
Intel USB Drivers - http://intel.ly/1BJDf2w
Xposed Zenfone - http://bit.ly/20uoJsE
Xposed Apk - http://bit.ly/1UF6kLC
Framework - http://bit.ly/1UF6lir
Xposed Apk - http://bit.ly/1UF6kLC
Framework - http://bit.ly/1UF6lir
How to Uninstall Xposed from Zenfone
- Download requirement file from the above link.
- Extract it on your desktop using WinRAR tool.
- Connect your Zenfone with PC using data cable.
- Open extracted folder and double click on RemoveXposedFramework,bat file.

- It will reboot automatically in server minutes.
- Done
Congratulation, Now you can utilize Xposed Application on your Zenfone. In the event that you discover any bug. It would be ideal if you drop your remark and impart it to our different guests. Do you know you can introduce Zenfone 5 Custom ROM on your Zenfone 6. Here is some Custom ROMs for Zenfone 5.
Go to link download
Wednesday, May 10, 2017
How To Install CM 12 1 CyanogenMod Lollipop on Asus Zenfone 4 T00I A400CG
How To Install CM 12 1 CyanogenMod Lollipop on Asus Zenfone 4 T00I A400CG
Tutorial - How To Install CM 12.1 CyanogenMod Lollipop 5.1.1 Rom on Asus Zenfone 4 T00I/A400CG. This CM 12.1 Rom is unofficial but stable for Zenfone 4. You can install it on WW, TW, CC, KE, CN and all device supported. We also attach a video tutorial on Installation Guide CM12.1 on Zenfone 5. How To Install [CM 12.1] CyanogenMod Lollipop on Zenfone 5.

Bug: Tethering not Working
Bug: Tethering not Working
How to Install CyanogenMod 12.1 on ASUS Zenfone 4
Step 1. Make sure your Zenfone 4 running on the latest firmware 7.3.3 .
Step 2. Unlock Bootloader, Unlock tool can be download (Download from - http://bit.ly/1JHyhZg).
Step 3. Extract Unlock bootloader tool > install apk> unlock
Step 4. Download CyanogenMod 12.1 ROM from below Link (Download from below Link).
Step 5. Download ADB tools if you dont have it (Download from below link ).
Step 6. Download Intel usb driver if you dont have/install it (Download from - http://intel.ly/1JWOVrg).
Step 7. Copy boot.img, system.img and recovery_TWRP.img place it to ADB folder.
Step 8. Turn off Zenfone 4.
Step 9. Enter Fastboot mode (Power + Volume up).
Step 10. Connect Zenfone 4 to PC.
Step 11. At ADB Folder press shift+right click > open Command here.
Step 12. At command prompt type (press enter after each line and wait until finish) :
- fastboot flash system system.img
- fastboot flash boot boot.img
- fastboot flash recovery recovery_TWRP.img
Step 13. Factory Reset.
Step 14. Done
Download here
ADB Tool- http://bit.ly/1WRCxOS
CM12.1 Rom- http://bit.ly/1QglEJe
Warning: When you install a custom ROM on your android device, it voids your warranty. We are not responsible of any damage. Do it your own risk. Also Check out How to Install Android 6.0 Marshmallow Boot Animation on Asus Zenfone.
Go to link download
Wednesday, May 3, 2017
How to Update Zenfone 5 in 3 24 40 87 WW TW Lollipop Firmware
How to Update Zenfone 5 in 3 24 40 87 WW TW Lollipop Firmware
Tutorial - How to Update ASUS Zenfone 5 in 3.24.40.87 Lollipop firmware. Recently ASUS release there latest firmware for Zenfone 5 A500CG and A5001CG device model. Your device must run on 3.24.40.78 firmware before updating. Otherwise System Update can be fail. In preview Post we talk about How to Root Zenfone 5 in 3.24.40.87 Lollipop Latest firmware.
![Update Zenfone 5 in 3.24.40.87 [WW/ TW] Lollipop Firmware](https://blogger.googleusercontent.com/img/b/R29vZ2xl/AVvXsEgJCZQOfzkQf-m2ZZ4s9umia7L7mog1BfHeYMedjjnoEYOC4S6pVl_S2Yxylrh3CD2BEfthoj-iKR76yIqQQAtMFwAPsSMfThwWYk61TDPvpiwyAWdoqp8DWaOjWMEgdo1s9LpXmId0gRc/s1600/How+to+Update+Zenfone+5+in+3.24.40.87+Lollipop+Firmware.png "How to Update Zenfone 5 in 3.24.40.87 [WW/ TW] Lollipop Firmware")
Whats New in 3.24.40.87
- Improved SIM network stability
- Improved and FIX power saving mode
- Improved video Performance
- Update Google Security Policy
- Improved 3G network Connectivity
How to Update 3.24.40.87 firmware in Zenfone 5
Step 1. Download Firmware
First Download 3.24.40.87 firmware according to your device SKU. for example if your device running on WW SKU you have to download 3.24.40.87 WW sku firmware from end of post.
Step 2. Copy Zip file in your Device
After Download, Connect your zenfone with PC using Data cable and Copy firmware zip file in device internal storage.
Step 3. System Update Notification
Now disconnect your zenfone, you will see a System update file detected notification. Just tap on it. Then select update package and press OK button then again press OK button to start.
Step 4. Successfully System Update
After Press OK button It will reboot and Start Install System Update file on your device. It can be take 15 - 20 minutes to complete.
Download here
TW Firmware - http://bit.ly/1lcVlJn
WW Firmware - http://bit.ly/1lcVfBC
Congratulations, After its done you can use your device in update 3.24.40.87 Firmware. You can also check out How to Install ZenMotion Wake/Sleep on Asus Zenfone 5 and Zenfone 6. Dont forget to Share this tutorial.
Go to link download
Tuesday, May 2, 2017
Custom ROMs List for Redmi Note 3 Lollipop Marshmallow
Custom ROMs List for Redmi Note 3 Lollipop Marshmallow
Now we are sharing the List of best stable Custom ROM for Xiaomi Redmi note 3. Lots of users search on Google Custom ROMs for Redmi note 3 for their device. Here we are providing Custom ROMs with their features and Bugs information. So, it helps to decide which is a better ROM for you.

CyanogenMOD 13.0 for Xiaomi Redmi Note 3 Snapdragon
CyanogenMOD 13 ROM which based on Android 6.0.x Marshmallow with kernel Linux 3.10.x and this current ROM status on Stable. This ROM is Better than MIUI, thats for sure. And there is No lagging. NO bugs with Ultra smooth performance. That is why this is Better than MIUI. Also Read How to Get CM13 for Redmi Note 3 Custom ROM.
Working
- FM Radio
- Fingerprint Sensor
- Bluetooth
- Wifi
- Audio
- Camera
- RIL
- GPS
Status: Stable
CyanogenMod 12.1 for Xiaomi Redmi Note 3 Snapdragon
CyanogenMod 12.1 ROM which based on Android 5.1.1 Lollipop with kernel Linux 3.10.x and this ROM status on BETA. And At this time finger Print Sensor not working and that is possible there are lots of hidden bugs in this ROM and this ROM has not tested completely.
Working
- Camera
- Audio
- RIL
- Wifi
- Bluetooth
- Other basic stuff
Bugs
- Fingerprint Not Working
ROM OS Version: 5.1.x Lollipop
ROM Kernel: Linux 3.10.x
Based On: CyanogenMod
Resurrection Remix for Xiaomi Redmi Note 3
Resurrection Remix ROM which based on Android 6.0.1 Marshmallow and CyanogenMOD. This ROM status of testing thats why at this time we are not providing bug report.
RR Features
- 3 Finger Swipe Screenshot Gesture
- SystemUI Tuner -Enabled By default
- Audio FX
- Lock Screen Auto-rotate
- List View Animations
- App Circle Bar
- Lock Screen
- Animate Dim -Dim
- Brightness Slider -Enable/Disable
- Navigation Bar [Can be Enabled/Disable Navbar]
- Toast Animations
- Quick Settings Drag able Tiles
- Advanced Reboot Menu
- Carrier Label Switches
- System Animations
- Double Tap Power button to enable Camera gesture
- Battery Bar customization Color
- Status Bar Weather
- Weather Position (Left/right)
There is some List of best Custom ROMs for Xiomi Redmin Note 3. At this time, we are choosing three ROMs CM13.0, CM12.1 and Resurrection Remix for Xiaomi Redmi Note 3. Please Share more information and bug report of this ROMs with our other visitors.
Go to link download
Saturday, April 29, 2017
Android 5 1 x86 Lollipop ISO image Download
Android 5 1 x86 Lollipop ISO image Download
In this post we share Android 5.1 x86 Lollipop image for Windows PC and Mac computers. Now You can install Android 5.1 x86 on your PC with windows 7, 8 and 10. This is the Latest Android x86 version and more compatible for all Computer and Laptops. Below you can read all new features comes in Android 5.1 x86. You can also check out Tutorial about How to install Android 5.1 Lollipop on PC with Windows.

Android 5.1 x86 features
Android 5.1 x86 features
- Play Store and Google Services/ Apps Pre-Installed.
- Wifi and Bluetooth Working.
- Up to 4x speed up (Faster then Preview Version 5.0.2).
- Many improvements and Bug fixed.
- Now Support for 64-bit SoCs using ARM, x86, and MIPS-based cores.
Download here
http://bit.ly/1HDdHM9
Go to link download
Friday, April 28, 2017
How To Install CM 12 1 CyanogenMod Lollipop on Zenfone 2 Download
How To Install CM 12 1 CyanogenMod Lollipop on Zenfone 2 Download
Tutorial - How To Install CM12.1 CyanogenMod Lollipop 5.1.1 on Asus Zenfone 2 ZE551ML (Z00A) with step by step tutorial. CyanogenMod should work like a charm for you if you follow the procedure correctly. But Do it with your own Risk Im not responsible of any damaged. But dont worry ive tested this rom.Note : - Backup your data before perform this tutorial. Also Check out One Click Root for Zenfone 4, 5, 6 and Zenfone 2.
![Install [CM 12.1] CyanogenMod Lollipop on Zenfone 2 Download](https://blogger.googleusercontent.com/img/b/R29vZ2xl/AVvXsEhgTCcN8lC2gXe-2ZHHRVOujK7tKV5OZYt-H4hUnO_TFJWHumuT2cHHseW71tNB1xQzwH4mfm-p_KZzEQ3kM2eYGhjINIAZ-ZRlVjDfho4f2lMRQwQ9Zlee4sXTXPQJLRCnUy-crYPot_U/s640/CyanogenMod+Lollipop+on+Zenfone+2.PNG "How To Install [CM 12.1] CyanogenMod Lollipop on Zenfone 2 Download")
CyanogenMod Working Features
- Working Features
- adb
- android Wear
- audio
- AudioFX
- bluetooth
- brightness
- camera (partially, see the broken section)
- device Encryption
- drm / widevine (partially, main app works but some issues remain)
- dt2wake
- flashlight / torch
- gps
- microphone
- microphone mute for voice call
- netflix
- NFC
- NFC account setup during OOBE
- power profile information (battery usage information)
- radio (lte default, sms, voice calls)
- Rotator
- sdcard
- sensors
- SIP calling (tried built-in mic/speaker, headset, speakerphone)
- usb-otg
- USB MTP
- USB PTP
- vibrator
- video playback, including youtube
- voice recognition
- VPN
- wifi
- WiFi tethering
CyanogenMod Not-Working Features
- Auto-brightness sometimes goes completely black
- Boot hangs sometimes (mediaserver seems to go crazy)
- Button backlight should be removed
- camera is mostly working except:
- crashes when switching between cameras
- video camera hangs during first boot (?)
- video recording audio volume is too low
- chrome (beta onlty?) rotating the display to landscape shows a blank screen
- gapps crashes on first boot (clean install)
- Hardware-backed keystore
- offmode charging (USB Charge Only Mode): Can’t get out of it
- selinux enforcing mode
- sim card not detected on first boot (clean install)
- USB UMS (Mass Storage)
- VP8 codec
How To Install CyanogenMod 12.1 on Zenfone 2
Step 1. First time flashing CyanogenMod 12.1 on your device, or coming from another ROM.
Step 2. Download the zip(s) from below Link.
Step 3. Install a compatible Recovery
Step 4. Perform a NANDroid backup of your current ROM (Optional)
Step 5. Wipe data & cache partitions of your device (required when coming from stock!).
Step 6. Flash CyanogenMod.
Step 7. Optional: Install the Google Apps addon package.
Download here
CM Recovery- http://bit.ly/1MrV8gT
GApps- http://bit.ly/1gSHjuU
CM 12.1 Rom- http://bit.ly/1gSF9LW
In this Tutorial We shared Install CM 12.1 Lollipop 5.1.1 Rom on Asus Zenfone 2. When You install Custom Rom and try to root your device your warranty void automatically. We are not responsible for bricked devices, dead SD cards, do some research if you have any concerns about features included in this ROM before flashing it. Also Check out How to Connect PC Link using Wifi Connection on Asus Zenfone.
Go to link download
Wednesday, April 26, 2017
How to Install Paranoid Android 5 1 1 Lollipop for Asus ZenFone 2
How to Install Paranoid Android 5 1 1 Lollipop for Asus ZenFone 2
Tutorial - How to Install (Paranoid) Android 5.1.1 Lollipop for Asus ZenFone 2 Z00A (ZE551ML) and Z008 (ZE550ML). Recently Paranoid Launch new rom Android 5.1.1 Lollipop for Asus Zenfone 2 Phone. Paranoid should work like a charm for you if you follow the procedure correctly. But Do it with your own Risk Im not responsible of any damaged. Note : - Backup your data before perform this tutorial. How To Install [CM 12.1] CyanogenMod Lollipop on Zenfone 2.
Files Requirements
Files Requirements
- Intel USB Drivers for Android
- ADB Fastboot Tool
- And some more, which will be mentioned below
How To Install Android 5.1.1 Lollipop on Zenfone 2
Step 1. Your ZenFone 2 must be unlock bootloader, steps are there for unlocking
Step 2. After unlocking, install TWRP Recovery on your ZenFone 2
Step 3. Download ParanoidAndroid 5.1.1 Lollipop Custom ROMs from below link.
Step 4. Download the Gapps from below Link
Step 5. After downloading both zip, place both pa_Z00A-5.1-20150816.zip and Gapps.zip in your MicroSD
Step 6. Now power off, Once it is off, hold down the volume up button and hold on to the power button until the phone vibrates. After the vibration stops, release the power button and continue pressing the volume up button until the green Android robot appears. You should see a blue line below saying "Waiting Fastboot command", Now here click vol down till you see Recovery mode in top big rectangle box, click power button
Step 7. It will enter TWRP, first take the backup of ur current OS (tick everything), so you can restore if u want to use stock at some point (even the apps will be there, but if you kept the obb, data in internal, it will be wiped,so better copy android folder to PC)
Step 8. Now click wipe,click advanced wipe, select everything except the microsd (be careful), if you want to keep the internal files, then untick internal storage also.
Step 9. Click the install, choose externalSD, search for those zip, and install pa_Z00A-5.1-20150816.zip, then install Gapps.zip and then reboot your ZenFone 2.
Enjoy the ParanoidAndroid 5.1.1 Lollipop in ZenFone 2.
Download here
GApps - http://bit.ly/1yg1JFQ
ZenFone 2 Z00A (ZE551ML)- https://adf.ly/1MyvsB
ZenFone 2 Z008 (ZE550ML)- https://adf.ly/1Myvx1
Go to link download
Tuesday, April 25, 2017
How To Install flash TWRP Philz Recovery for Zenfone 5 Kitkat Lollipop
How To Install flash TWRP Philz Recovery for Zenfone 5 Kitkat Lollipop
How to Install TWRP Philz Recovery on Zenfone 5 working with Kitkat and Lollipop Android operating system. Download Required file from end of post. You must check out One Click Root for Zenfone 4, 5, 6 and Zenfone 2.
")
Step 2. Enable USB Debugging (Settings - Developer Option - Enable USB Debugging Option)
Step 3. Connect Zenfone 5 With PC/Laptop
Step 4. Double click TWRPRecovery-install.bat
Step 2. Enable USB Debugging (Settings - Developer Option - Enable USB Debugging Option)
Step 3. Connect Zenfone 5 With PC/Laptop
Step 4. Double click PhilZ Touch Recovery-installer.bat
Step 2. Enable USB Debugging (Settings - Developer Option - Enable USB Debugging Option)
Step 3. Connect Zenfone 5 With PC/Laptop
Step 4. Double click lockbootloader-forOTA.bat
TWRP Recovery Zenfone 5 (Work at Kitkat/Lollipop)
Step 1. Download File AboveStep 2. Enable USB Debugging (Settings - Developer Option - Enable USB Debugging Option)
Step 3. Connect Zenfone 5 With PC/Laptop
Step 4. Double click TWRPRecovery-install.bat
PhilZ Touch Recovery Zenfone 5 (Work at Kitkat/Lollipop)
Step 1. Download File AboveStep 2. Enable USB Debugging (Settings - Developer Option - Enable USB Debugging Option)
Step 3. Connect Zenfone 5 With PC/Laptop
Step 4. Double click PhilZ Touch Recovery-installer.bat
To Apply OTA Update, you must back to Original Recovery:
Step 1. Download File AboveStep 2. Enable USB Debugging (Settings - Developer Option - Enable USB Debugging Option)
Step 3. Connect Zenfone 5 With PC/Laptop
Step 4. Double click lockbootloader-forOTA.bat
Download here
http://bit.ly/1FxFkAx
In this Post we show Installation Flash TWRP and Philz Recovery for Asus Zenfone 5 Kitkat and Lollipop support. You can also check out How To Get Double Tap (ZenMotion) feature in Asus Zenfone 5.
Go to link download
Monday, April 17, 2017
How To Download Install Xposed Framework on Zenfone Lollipop
How To Download Install Xposed Framework on Zenfone Lollipop
Every Zenfone Users know that Android Lollipop Update available for all Zenfone Devices. So this is a big change from Kitkat to Lollipop like application compatibility has gone. In same way Xposed Framework not supporting to Zenfone Lollipop because some Zenfone device running on x86 (32-bit) processor. So that is why Xposed not working on Zenfone. So Some Developers has made it working on Zenfone too. he has compiled it from xposed framework Sources. You can also check out How To Root Zenfone Lollipop.

Pre-Requirement
- Device Running On Android Lollipop 5.0
- Windows PC/ Mac Computer
- Xposed Installer file (Download from Below Link)
Install Xposed Framework on Zenfone Lollipop
Step 1. First of all download Xposed Installer Alpha from below link.
Step 2. After Downloading extract all files into a folder anywhere on your PC.
Step 3. Now double click on "InstallxposedInstaller.bat", this will install xposed app on your mobile.
Step 4. After Successful install double click on "InstallxposedFramework.bat" file, this will install framework files in system.
Download here
http://bit.ly/1InRx15
It can be take long time to install Xposed Framework on device. You can uninstall by simply double click on "RemovexposedFramework.bat". You can also check out How To Update Asus Zenfone 5 in Lollipop.
Go to link download
Sunday, April 16, 2017
Android 5 0 Lollipop causa instabilidade na câmera e lanterna do Nexus 4 e 5
Android 5 0 Lollipop causa instabilidade na câmera e lanterna do Nexus 4 e 5

O Android 5.0 Lollipop está começando a chegar para alguns aparelhos, especialmente os da linha Nexus, e por ser uma atualização que mexe com toda a plataforma, diversos bugs estão sendo encontrados por alguns usuários.
Agora foi a vez de bugs relacionados ao funcionamento da lanterna e da câmera em alguns aparelhos serem descobertos. O problema afeta principalmente o Nexus 5, porém, ele também pode ser visto no Nexus 4, mas em escala menor.
Ao que tudo indica, ao acionar a lanterna dos dispositivos, a câmera deixa de funcionar, e só volta a ficar disponível quando os usuários reiniciam os aparelhos. Vale lembrar que o recurso de lanterna é novo no Android, e isso deve estar fazendo com que a plataforma tenha dificuldades em rodar a novidade.
Confira uma sequência de imagens que evidenciam o problema:
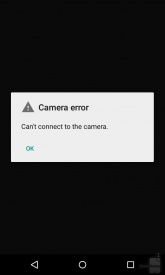

Para tentar contornar a situação sem precisar desligar e ligar seus aparelhos, algumas pessoas notaram que é possível utilizar a câmera, mesmo após a aparição do problema. Para isso é preciso acessá-la através da tela bloqueada, como podemos ver na última imagem da sequência acima.
Como o Android 5.0 Lollipop é uma grande atualização, problemas em seu início não normais, e não devem preocupar os usuários do sistema operacional. A Google já está ciente do problema, e logo deve lançar um pequeno update com intuito de resolver a questão de uma vez por todas.
Como a maioria dos dispositivos ainda não está com o Android 5.0 Lollipop instalado, podemos imaginar que, quando a plataforma for disponibilizada, o problema terá sido corrigido pela Google, já que não deverá ser difícil encontrar o defeito e corrigi-lo.
Go to link download
Custom ROMs for Zenfone 5 List Lollipop Marshmallow Nougat
Custom ROMs for Zenfone 5 List Lollipop Marshmallow Nougat
Now we are sharing the List of best stable Custom ROM for ASUS Zenfone 5. Zenfone 5 users love to taste Custom ROM on their device. Here we are providing Custom Rom with their features and Bugs information. So, it helps to decide which is a better ROM for you.

CM12.1 Stable Version for Zenfone 5
CyanogenMod 12.1 which based on Android 5.1.1 but this is an unofficial version of CM12.1. Below you can read feature and bugs on this Rom. Also, check out How to Install CM12.1 on Zenfone 5.
Working Features on CM12.1
- Output Sound is louder
- Dual Sim Working
- Camera quality is better
- You can use horizontal mode in home
- Better Touch Performance
- Battery backup is better if compare to the previous build
Bugs on CM12.1
- Showing? Mark in battery indicator in charge mode
- SD-Card is not working in some device
Resurrection ROM for Zenfone 5
Resurrection ROM v5.5.9 Build 7.0 also based on Android 5.1.1 and its last build date is 25 November 2015. Also Check out How to Install Resurrection Remix on Zenfone 5.
Working features on Resurrection ROM
- Dual Sim Working
- Apollo Music Player
- Come With Dual Launcher
- Double Tap to Sleep features available
Bugs on Resurrection ROM
- FM not Working
- GPS not Working
Stable Big Rom 10 for Zenfone 5
Big Rom is based on Stock firmware 3.24.40.87 and there is a minor change in this ROM like boot animations and pre-added some interesting features you can read below. Also Check out How to Install BIG_ROM v13.0 on Zenfone 5.
Features of Big Rom
- Based on Latest Stock ROM 3.24.40.87
- Gapps Pre-Installed
- Comes with custom Boot Animation
- Motion Gestures
- Phone Tester
- Pre - Rooted
- Increase Sound Volume
- Battery Performance is better
- Set CPU
- Sony Music Player
Stable Gecko ROM for Zenfone 5
Gecko ROM also based on Stock 3.24.40.80 Firmware and its have Android 5.0.x Lollipop. There is lots of change, but it looks likes Stock ROM.
Features
- ROM space Compressed
- Latest Google Apps Installed
- Sony WalkMan Player
- Screencast feature
- Block Ads
- Fixed SD-Card Write Permission
Shell ROM for Zenfone 5
This is Stock ROM based on stock Lollipop firmware 3.23.40.87 but customize with lots of features like ZenMotion, Volume Increase, etc., by the ShesnonRibeiro XDA developer. Also Check out How to Install Shell ROM Zenfone 5.
Shell ROM Features
- ZenMotion added (Working Double Tap to Wake/Sleep).
- Horizontal mode work on home screen.
- Now output volume is louder.
- Updated to new dialer and Contact interface
- Multi User mode (Add Two or more users in one device)
- New font added
- Root explorer Application pre installed
- Improve Performance and battery backup
CM13 Android 6.0 ROM for Zenfone 5
CyanogenMod 13 which based on Android 6.0.1 with smoother and faster performance, but this is an unofficial version of CM13 and this current ROM status experimental. Below you can read feature and bugs on this Rom. Also, check out How to Install Android 6.0 Marshmallow on Zenfone 5 T00J/T00F.
Features
- Odexed, first boot faster
- No additional applications
- LATEST sources
- Monthly security update
- CM boot animation
- Lock Screen
- Miscellaneous
- Navigation
- Dark UI mode
- Settings button in status Bar
- Dual Sim Card Working
- Calling fixed
Bugs and Issues
- Camera Fixed
- GPS
- FM
Euphoria OS 2.0 for Zenfone 5
Euphoria OS 2.0 with Android 6.0 Marshmallow ROM for Zenfone 5/6. This ROM provided by the senior XDA developer.
Features
- Rooted
- Great Battery
- Play Store worked
- Smoother and faster Performance
- Fast booting
- Voice calls
Bugs fixed
- Camera not working
- GPS
- FM Radio
Resurrection Remix MM 5.6.7 for Zenfone 5
This is official build of Resurrection Remix based on Android 6.0.x Marhsmallow for Zenfone 5 with latest marshmallow source code. If you want to taste this ROM use this tutorial about Install Resurrection Remix MM 6.0 for Zenfone 5.
RR Working
- Camera
- Bluetooth/WiFi
- Flash Light
- SMS
Bug
- GPS
- Radio not working
BIG ROM Zenfone 5 13.0 Pro
Big ROM is another custom rom for ASUS zenfone 5 and zenfone 6 with amazing features and a new kernel for improving performance and battery life. At this time this ROM based on stock WW 3.24.40.87 firmware. You can check out tutorial How to Install Big ROM.
Whats New in Big ROM Pro
- Base in Stock Firmware WW 3.24.40.87
- Support Zenfone 6
- Network Traffic in BR Center/status bar
- Carrier label in BR Center/status bar
- CPUspied in BR Center/status bar
- Restart UI in BR Center/status bar
- Floating mode (Multitasking)
- KnockCode in BR Center/LockScreen (need enables in Xposed)
- Gesture in BR Center/Button
- Update kernel BORETS24 DT2W 17/03/2016
- Update open gapps 13/04/2016
Zenfone 5 Dirty Unicorn v10.5 Unofficial ROM
Dirty Unicorn ROM is another custom rom for ASUS zenfone 5 and zenfone 6. At this time this ROM based on AOSP Android 6.0.1 Marshmallow. You can check out tutorial about Zenfone 5 Dirty Unicorn.Android 7.0 Nougat Zenfone 5
Android 7.0 Nougat for Zenfone 5, Zenfone 6, Zenfone 2 Laser, Zenfone 2, Zenfone 3, Zenfone GO, Zenfone selfie. Once the ROM is ready for your device, We will publish a fresh post for your device as soon as possible. So please keep visiting on our blog.Lineage OS Zenfone 5
Lineage OS is another custom rom for ASUS zenfone 5 and zenfone 6 with amazing features but there is lots of bugs. Check out How to flash Lineage OS Zenfone 5.Bugs/Not Working:
- FM Radio Not working
- some video formats do not play so accurate
- problems with some apps like UC Browser
- GPS not working
Recently another developer shared another Lollipop ROM for ASUS Zenfone 5 and Zenfone 6. This is most stable and unofficial version of Android 5.0.1 from TechGenius and it is based on Stock 5.0. This builds create on latest Stock Android 5.0 3.24.40.87 source code with Linux 3.10.x kernel. Below you can read working features and bugs. How to Install Montana ROM v3.2 on Zenfone 5.
In this Post We are providing Best Custom ROMs for Asus Zenfone 5. At this time, we are choosing seven ROMs CM12.1, Resurrection ROM, Big ROM, Gecko ROM, CM13, Euphoria OS 2.0 and Resurrection Remix MM for Asus Zenfone 5/6. Please Share more information and bug report with our other visitors.
Go to link download
Thursday, March 30, 2017
Install Dolby Digital Plus Sound on Zenfone 5 Lollipop Kitkat
Install Dolby Digital Plus Sound on Zenfone 5 Lollipop Kitkat
Tutorial - How to Install Dolby Digital Sound on Asus Zenfone 4, Zenfone 5, Zenfone 6, Selfie and you can install it on any zenfone series.. Now you can change sound quality on your device earphone. In preview post we talk about Install Dolby Digital on Zenfone but unfortunately its working with Jelly bean or Kitkat. But now today i share Dolby Digital Application for Lollipop and tested with latest 3.24.40.78 firmware and its working with rooted Zenfone.
Requirement
Requirement
- Dolby Digital Apk (Download All files from End Of Post)
- Disable Application
How to Install Dolby Digital on Zenfone
Step 1. Download and Installation
First of all, you have to download Dolby Digital Apk and Disable App from below link and install it on your phone.
Step 2. Open Disable Application
After Installed both applications on your device, Now Open disable app and search musicfx application. Just tap on musicfx and tap on OK button to disable it. If it ask for Super SU permission, Just hit on Grant Button.
")
Step 3. Open Asus Music App
Now Go to app drawer and open Asus Music App. Now tap three dot button from upper right corner. Just Select Settings then tap on Fine tune audio settings and enable it.
Download here
Disable App- http://bit.ly/1SiMRhc
Dolby Digital Apk- http://bit.ly/1ZDfgk4
Congratulation, Now you can enjoy your favrate music in Dolby digital sound quality. You can also check out How to Install Multi-user Mode on Asus Zenfone 5 and Zenfone 6.
Go to link download
Thursday, March 16, 2017
How To Install CM 12 1 CyanogenMod Lollipop on Zenfone 5 Download
How To Install CM 12 1 CyanogenMod Lollipop on Zenfone 5 Download
In this Tutorial Techno Planners show you How To Install CM 12.1 CyanogenMod Lollipop Rom on Asus Zenfone 5 T00F/T00J. This CM 12.1 Rom is unofficial but stable for Zenfone 5. You can install it on WW, TW, CC, KE, CN and all device supported. We also attach a video tutorial on Installation Guide CM12.1 on Zenfone 5. Recently Asus Launch Latest Firmware 3.23.40.60 Lollipop for Zenfone You can check out How to Install Pixel Master Camera on CM 12.1.

Working CM12.1 Rom Features
- Wi-Fi
- Bluetooth
- Houdini
- Camera
- Baseband
- Vibrator
- GApps
- SD-Card
How to Install CM12.1 on Zenfone 5
Step 1. First Unlocked Bootloader on Zenfone 5 (Unlocked Bootloader Tutorial Here - How To Install flash TWRP - Philz Recovery)
Step 2. Download CyanogenMod 12.1 ROM: (Download from Below Links)
- System.img
- Boot.img
- Sdcard fix boot.img
Step 3. Copy all to ADB Folder (Download from Below Link)
Step 4. Turn off device
Step 5. Go to fastboot by pressing Power + Volume Up.
Step 6. At ADB Folder open cmd by pressing Shift + Right Click > Open command here.
Step 7. At fastboot flash boot.img by typing: fastboot flash boot boot.img
Step 8. Then flash system image by typing: fastboot flash system system.img
Step 9. Then flash SD-Card image by typing fastboot flash boot fixSdcard-boot.img
Step 10. Now Factory reset your device
Download here
ADB Folder - http://adf.ly/sb8Zt
SDCard fix boot.img - http://bit.ly/1TraJhQ
System and Boot img - http://bit.ly/1TraRxA
Done, First boot can be take more than 5 minutes. You can Enable root access by Go to Settings > About Phone > Tap build number seven times then go to developer options then select Root Enable Device + ADB. Now You have to install SuperSU from Play Store. If it dont work you can also check out How to Root Asus Zenfone.
Go to link download
Monday, March 13, 2017
Custom Kernel for Zenfone 5 6 T00J T00F Lollipop
Custom Kernel for Zenfone 5 6 T00J T00F Lollipop
Tutorial - How to flash custom lollipop kernel on Zenfone 5 and Zenfone 6. With Custom Kernel you can improve your battery life and device performance on any ASUS Zenfone device. This kernel will work on stock Lollipop firmware 3.23.40.52, 3.23.40.60, 3.24.40.78 or 3.24.40.87. This method tested with 3.24.40.78 WW firmware. And do not try this kernel with Kitkat firmware. Note:- This tutorial will void your warranty and Do it with own risk. I am not responsible for any kind of the damage.

Step 3. Open CMD Windows from ADB tool folder. By using hold Shift + Right Mouse button and select open windows command here.

Step 4. Power off your device and Reboot it in droidboot mode using Power + Volume Up button.
Step 5. Once droidboot open, Connect your device with PC using data cable.
Step 6. Now Write below cmd in commend window and hit enter.

Step 7. Once it shown done, Reboot your device.
Congratulation, Now you have a custom kernel for your device. You can check your device CPU cores working or not using the CPU Status. Attention! May be a little incompatible with 1 Gb RAM versions and Xposed. Random reboots due to long phone calls with enabled DT2W still have NOT fixed yet. Temporary solution- TURN OFF dt2w in Zenmotion before long calls making. If you detect any issue or problem in our tutorial, please drop your comment we will reply as soon as possible. Also check out How to Flash Xposed for Zenfone 5 and Zenfone 6 Please share this tutorial it help us to grow.
Requirement
- Rooted Zenfone (Also check out One Click Root for Zenfone)
- Zenfone 5 or Zenfone 6
- ADB Fastboot tool
- Windows PC (Download all files from end of post)
Features of Custom Kernel
- Added SWAP support
- Compiled with GCC 4.9 with fast optimization
- Random Linux kernel generator
- DT2W support
- Kernel Virtual machine for Intel support
- Added support of init.d. Scripts
- Added support of exFAT file system for external SD card.
- Add more governors and I/O schedulers
- Support joysticks
- Ultra kernel same page merging(UKSM) a place of KSM
- Processor works in 1 CPU per module mode a place of stock 2 CPU per module
- Hot-plug for all governors
- Under-clock to 667 MHz.
- Add more TCP IPv4 congestion algorithms (May change via Trickster-mod or Kernel Auditor apps)
- F2FS support
- ZRAM is disabled for older versions.
- Added CD emulating feature
Battery Saving Proof
This screenshot taking to proof this kernel actually helps to save battery. Now the question is how it saves the battery life and give long life battery backup. When device screen is suspended that automatically disable 2 cores from 4 cores processor and device work on 2 cores in suspend time.How to flash Custom Kernel Zenfone 5/6
Step 1, Download ADB Tool
First, you have to download ADB tool from end of post and extract it on your desktop using WinRAR Tool.Step 2. Download Custom Kernel
Now, download custom kernel and place image file in extracting adb tool folder.Step 3. Open CMD Windows from ADB tool folder. By using hold Shift + Right Mouse button and select open windows command here.
Step 4. Power off your device and Reboot it in droidboot mode using Power + Volume Up button.
Step 5. Once droidboot open, Connect your device with PC using data cable.
Step 6. Now Write below cmd in commend window and hit enter.
fastboot flash boot new_boot06.12.img
Step 7. Once it shown done, Reboot your device.
Download here
ADB Tool - http://bit.ly/1QUEyrx
Kernel - http://bit.ly/1QUEAj8
Congratulation, Now you have a custom kernel for your device. You can check your device CPU cores working or not using the CPU Status. Attention! May be a little incompatible with 1 Gb RAM versions and Xposed. Random reboots due to long phone calls with enabled DT2W still have NOT fixed yet. Temporary solution- TURN OFF dt2w in Zenmotion before long calls making. If you detect any issue or problem in our tutorial, please drop your comment we will reply as soon as possible. Also check out How to Flash Xposed for Zenfone 5 and Zenfone 6 Please share this tutorial it help us to grow.
Go to link download
Thursday, March 9, 2017
Official Android 5 1 x86 RC1 Lollipop ISO image Download
Official Android 5 1 x86 RC1 Lollipop ISO image Download
Recently Android x86 5.1 RC1 ISO image release for users. This is first stable version of Android 5.1 x86 Lollipop from Android x86 developers.

Android 5.1 x86 Key features
- Now it Supports 64-bit kernel and user space, as well as 32-bit system.
- Developers Update kernel version to 4.0.9 for better user experiences.
- Now Enable OpenGL ES hardware acceleration for Intel/AMD/Nvidia chipsets for better performance.
- Now you can booting from UEFI and installing to UEFI disk.
- Be able to install to ext4/ext3/ext2/ntfs/fat32 file systems via a text based GUI installer.
- Support Multi-touch upto 10 finger, Audio, Wifi, Bluetooth, Sensors, Camera and Ethernet (DHCP only).
- Auto-mount external usb drive and sdcard with file system vfat/ntfs/exfat/ext4.
- Now you can install it to VM including Qemu, Virtual-box and VMware emulators.
- Support foreign archs (arm / arm64) via the native bridge mechanism. (Settings -> Apps Compatibility)
Android 5.1 x86 Known issues
- Currently Uvesafb doesnt work for x86_64 processes.
- Root permission (Superuser) doesnt work for x86 and 64 bit processes.
- Suspend and resume doesnt work on some devices.
- No grub splash image.
Download here
http://bit.ly/1IlQr7K
Here you can download Android 5.1 x86 RC1 Lollipop ISO image. If you dont know how to install it on your PC. You can also check out How to install Android x86 5.1 on Windows . Please Share this amazing ISO image with your friends and family.
Go to link download
Subscribe to:
Posts (Atom)