Showing posts with label root. Show all posts

Tuesday, May 30, 2017

How to Root Zenfone 5 in 3 24 40 87 WW TW Lollipop Firmware

How to Root Zenfone 5 in 3 24 40 87 WW TW Lollipop Firmware


Tutorial - How to Root Asus Zenfone 5 in Latest 3.24.40.87 WW - TW Lollipop Firmware. In previews post we talk about How to Update Zenfone 5 in 3.24.40.87 WW/ TW firmware. Now We are sharing How to Root with step by step guide. This method tested on my Zenfone 5 WW SKU firmware.

Pre - Requirement
  • Zenfone Root Files
  • Windows PC
  • Intel USB Universal Drivers

How to Root Zenfone 5

Step 1. Download Zenfone Root file from end of post.

Step 2. Extract downloaded file on your PC.

Step 3. Now Enable USB debugging feature on your device from Settings > Developer option. If Developer option not available in your settings you can enable it from Settings > About > Software Information and click 7 to 8 times Build number for enable developer option.

Step 4. Now Connect your Zenfone with your PC using data cable.

Step 5. Open Zenfone Root folder that you extracted on your PC, and double click on Root file.
Root Zenfone 5 in 3.24.40.87 [WW - TW] Lollipop Firmware


Step 6. After Click on root file it will open commend windows on your screen. Now press any key to continue and Wait to finish it. Dont disconnect your Zenfone data cable in root process.

Download here
USB Drivers - http://intel.ly/1JWOVrg
Zenfone Root - http://bit.ly/1TNh7Rs

Congratulation, After reboot you have a root access power. With root power you can access more application and system files. With this method you also can root Zenfone 4, Zenfone 6 and Zenfone 2 Kitkat and Lollipop supported. You can also check out How to Install Multi-user Mode on Asus Zenfone 5 and Zenfone 6.

Go to link download

Read more »

Thursday, May 25, 2017

How to Root Asus Zenfone Selfie ZD551KL without Using PC

How to Root Asus Zenfone Selfie ZD551KL without Using PC


Tutorial - How to Root Asus Zenfone Selfie ZD551KL without using your computer PC. Now We find a alternative method to root your zenfone selfie with one click using ding-dong Root App. This method is not tested by Techno Planners and do it, at your own risk. Also Check out How to Install Android 6.0 Marshmallow on Zenfone.

Requirement
  • Zenfone Selfie ZD551KL
  • DingDong Apk (Download from end of post)

How to Root Asus Zenfone Selfie

Step 1. Download DingDong Apk from below link.

Step 2. Install it on your Device.

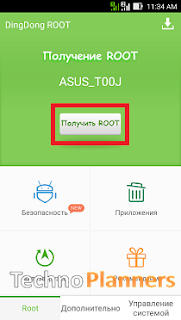
Step 3. Open it and Press the button to root.
Root Asus Zenfone Selfie (ZD551KL) without Using PC

Download here
http://bit.ly/1NQ7KKI

Congratulation i hope it will work for your device, If it not working please share it with us. We will fix it ASAP. You can also check out How to Connect PC Link using Wifi Connection on Asus Zenfone.

Go to link download

Read more »

Tuesday, May 23, 2017

Motorola Moto G Instalação root no moto g recovery desbloqueamento do bootloader e retirada do aviso XT1032 XT1033

Motorola Moto G Instalação root no moto g recovery desbloqueamento do bootloader e retirada do aviso XT1032 XT1033


Nota: - Este procedimento é apenas para Moto G e enraizamento deste dispositivo anular a garantia. Se acontecer alguma coisa ao fazer enraizamento não somos responsáveis ??para que, assim fazê-lo em seu próprio risco.


REQUISITOS
  • Drivers
  • Minimal ADB & Fastboot
  • SuperSU
  • logo.bin original
-- O PROCEDIMENTO ABAIXO FORMATARÁ COMPLETAMENTE O DISPOSITIVO, INCLUINDO ARMAZENAMENTO INTERNO. FAÇA COM CAUTELA. --

Instale o Minimal ADB & Fastboot numa pasta separada (por exemplo: C:Moto G)
Coloque o logo.bin na pasta que criou
Passe o arquivo do SuperSU para o armazenamento interno do celular e o desconecte, em seguida ligue-o no modo bootloader (vol. para baixo + power) e recolocando o cabo USB.
Clique na pasta criada com o botão direito do mouse e segurando o botão Shift, em seguida clique em Abrir janela de comando aqui
Na janela de comando, execute:

fastboot oem get_unlock_data   


Pegue o código recebido e vá até este site
Retire todos os espaços do código e o cole no espaço acima de "Can my device be unlocked?"
Caso haja algum erro ao clicar no botão abaixo, tente executar pelo Internet Explorer.
Clique em REQUEST UNLOCK KEY. Você receberá a key em seu e-mail caso seu dispositivo seja qualificado para desbloqueamento do bootloader
Volte à janela de comando e execute:

fastboot oem unlock seucódigoaqui

Aguarde o procedimento, e pronto! Agora vamos instalar um custom recovery, o fix do logo e o root!

-- CUSTOM RECOVERY

Selecione o CWM ou TWRP, como preferir. Não há recoveries disponíveis para a versão 4.3.
Coloque-o na pasta do Minimal ADB e execute, ainda na janela de comando e lembrando de digitar o nome do arquivo corretamente!: 
TWRP 2.7.1.1

fastboot flash recovery nomedoarquivobaixado.img

Em seguida, basta selecionar a opção Recovery com os botões de volume como ensinado no próprio menu do Bootloader (vol. up = selecionar, vol. down = navegação)


-- FIX DO LOGO

Novamente na janela de comando, digite:
fastboot flash logo logo.bin
fastboot reboot
-- INSTALAÇÃO DO ROOT

No menu de bootloader, selecione vá até Recovery com o botão de vol. para baixo, e selecione com o botão vol. para cima.
No menu de recovery, faça o seguinte procedimento, lembrando de ter passado o SuperSU.zip baixado para o armazenamento interno do dispositivo
wipe cache
install zip from sdcard > 0 > SuperSU.zip
reboot

Retirado do Forum ANDROIDPIT

Go to link download

Read more »

Sunday, May 21, 2017

CM13 ROM Update Android 6 0 on Zenfone 2 without Root

CM13 ROM Update Android 6 0 on Zenfone 2 without Root


Hello Guys, In this text tutorial I will teach you how to update ASUS zenfone 2 in android 6.0 marshmallow. First, I am telling you this is a custom ROM from cynogenmod CM13 for zenfone 2 but in the upcoming months we will get an official update from ASUS. This ROM has android 6.0.x OS and Linux kernel 3.10.x version.
Android 6.0 on Zenfone 2 [Z00A - Z008] without Root

Before Updating
First, you have to make a backup of your Application, Personal data, Contact detail, Internal Storage, etc. Because this tutorial will wipe your data and files. You can also make a backup of your stock firmware using CWM/ TWRP custom recovery. In this tutorial I am using TWRP recovery.

Requirement
  • Android 6.0 ROM for Zenfone 2 (Download all files from end of post)
  • GApps for Marshmallow
  • Custom Recovery Installed if you dont have any custom recovery, please first flash custom recovery on your device. 

Make a full backup
  1. Power Off your device
  2. Reboot device in Recovery Mode by using the Power + Volume UP button
  3. Once the Team Win Recovery Open, Select "Backup"
  4. Check "Cache, Data and System" option from the list and "swipe to backup" button.
  5. It will take server minutes to complete and its depend on device data size. Once its done, Boot your device normally and save TWRP folder on your PC/ SD-Card.

Android 6.0 Zenfone 2 Flash Using TWRP Recovery

  1. Download ROM and GApps Zip file from the end of the post on your computer.
  2. Then, connect your device with your computer/PC with the help of the USB cord.
  3. Place both files in your device internal/external storage.
  4. Disconnect the USB cable and also power off your device.
  5. Reboot into recovery mode.
  6. From recovery select “Wipe” then select format data and write yes to confirm wipe.
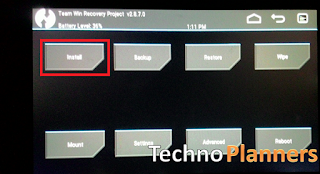
  7. Now go back to the main menu and select “Install”.
  8. First Pick the CM13 Marshmallow zip file and flash it on your ASUS ZenFone 2.
  9. Once its done, flash Google Apps zip.
  10. Done, select Wipe Cache and swipe to wipe
  11. Go back to main menu of recovery select “reboot system now”.

Using CWM Recovery
  1. Use above steps from 1st step to 5th step.
  2. Select “Wipe data/ factory reset”“wipe cache partition” and “wipe dalvik cache”, then select “Yes” to confirm.
  3. Now select “Apply update” from the main menu and select “Choose from internal storage” or choose an external storage if you place the zip file in SD_Card.
  4. Select CM13 ROM file and it will install without confirmation.
  5. Once the ROM is installed, flash the GApps file.
  6. Reboot your device.

Download here
GApps - http://bit.ly/1NBj4y8
Z00A - http://bit.ly/1LZVdtL
Z008 - http://bit.ly/1LZVk8A

First boot can take up-to 10 minutes to make cache files for applications. Once its done, you can confirm Android 6.0.x version install on your system by Going to Settings > About Phone > it must show Android version 6.0.1. You can play Marshmallow eggster game by hitting Android version 5 to 6 times. Thank you for using our tutorial you can also check out How to Flash TWRP Recovery on Asus Zenfone 2 Laser, Please share this tutorial with your friends and family.

Go to link download

Read more »

How to Root MOTO G4 Plus 7 0 Nougat Update

How to Root MOTO G4 Plus 7 0 Nougat Update


Hello Guys in this post I will show you how to root moto g4 plus on nougat update. So As you know as moto roll out a new official update for moto g4 plus and in this post I will teach you step by step how to root moto device.
root MOTO G4 Plus nougat

Pre-Required
  • Boot loader Unlocked
  • The Device should be running with custom TWRP recovery you can also check out How to Install TWRP Moto G4 Plus
  • Battery atleaste 50% charged

How to Root Moto G4 Plus Nougat
  1. Download both zip files from the end of the post link given.
  2. Copy both zip files in your device internal storage
  3. Power off your device
  4. Now Boot your device into recovery mode by pressing Volume Down + Power button and press volume down button until you see the recovery mode option.
  5. Once you find the recovery mode option just press power button and your device boot into recovery mode.
  6. Now Tap on install button and select Xtream zip file and flash it on your device
  7. Once it flashed successfully, Similarly, flash SuperSU zip file on your device
  8. Now Reboot your device
  9. Now Download Phhs Superuser App from Play Store
  10. Now you can use your device with root power.

Download here
Elementx- http://bit.ly/2mhIKK8
SupeSU- http://bit.ly/2lGpXqD

Congratulation, Now you can enjoy your moto g4 plus nougat with root power. You can also check out How to update moto g4 plus nougat update.

Go to link download

Read more »

Saturday, May 20, 2017

How to Root Remix OS Easy Tutorial RMXtools v1 5

How to Root Remix OS Easy Tutorial RMXtools v1 5


Tutorial - currently youll be able to root your Remix OS for PC/ laptop 2.0, 2.0.1 victimization RMX tool. Recently XDA developers created a package for laptop referred to as RMXtool.

What is RMX Tool
This tool is available for Windows PC 64-Bit. With this tool you can Root your Remix OS without downloading pre rooted System.image or using Linux. In this tool you can increase internal storage 4-GB to 64-GB. When you select a data image for increase internal storage size, it can take long time to create a new data image.

Android 6.0 OS for PC
The way to Install Android 6.0 OS on Computer and notebook with Windows Dual Boot. This can be the newest version of Android Marshmallow for laptops. If you like to install it on your PC please check out How to Install Android 6.0 Marshmallow OS on PC.

Features
  • Unpack/ Repack Image file
  • Create new Image
  • Resize Internal Storage
  • Scan, Fix any Image
  • Root System Image

Requirement
  • 32/64-Bit Windows PC
  • Microsoft .NET Framework 4.5
  • RMXTool (Download from end of post)

How to Root Remix OS

  1. Download RMX Tools for PC from end of post link given.
  2. Extract RMXTool. Zip on your PC using WinRAR.
  3. Open RMXTool folder, then double click to open RMXtools.
  4. Now Click on Browser button from upper right corner and select system.img file from remix OS partition.
  5. Once system.image file selected, Press Extract (system. img) button from below.
    Root Remix OS - Tutorial
  6. Once it shows Extract finish success, Now Press Root button (system.img) and it will prompt to select folder system_. Now Select extracted system_ folder.
    Root Remix OS - Tutorial
  7. Once its selected, Finally, press Repack button (system.img). And wait it finished it.
  8. Once it finishes, Open Remix OS partition drive, then delete system file and rename repack to the system.
  9. Now Reboot your PC, Open SuperSU Application from the menu.
  10. Now SuperSU show "The SU binary needs to be updated. Continue?" Tap on Continue button and then Normal button.
  11. After finishing it will ask reboot.

How to Increase Internal Storage

  1. Open RMXTool.
  2. Now Click on Browser button from upper right corner and select data.img file from remix OS partition.
  3. Once data.image file selected, Swap left to right to expand the internal storage size.
    Root Remix OS - Tutorial
  4. Once you finally select new size, Just Press Expand button.
    Root Remix OS - Tutorial
  5. Wait it to finish it.
  6. Run Remix OS and check the internal storage, from settings > Application Manager. 

Download here
http://bit.ly/1LwWisJ

Congratulations, Now you can use your Remix OS for PC with Root Access. You can also check out alternative method only for 2.0 How to Root Remix OS for PC Easily.

Go to link download

Read more »

Tuesday, May 16, 2017

How to Root Remix OS for PC Easy Tutorial

How to Root Remix OS for PC Easy Tutorial


Text Tutorial - How to Root Remix OS for Windows PC and notebook with easy and safe steps. Now you can easily Root your Remix OS by downloading pre-rooted system.img file. Do you know you can Install Remix OS on PC Hard Drive.

What is Remix OS

Remix OS is a desktop working framework which permit to Run your Windows and Mac Desktop PC as Android Operating System. Remix OS is based of Android 5.1.1 (Android-x86 venture) and its interface looked like a desktop OS. Remix OS allow to Run Android Application and Games on your PC.

System Root Remix OS for PC
  • System Image file (Download from end of post)

How to Root Remix OS

Step 1. In the first place you need to download Pre-Rooted system image file on your PC from end of post link given in red text.

Step 2. Once you downloaded system image zip file, Now Extract Zip file utilizing WinRAR or UnZip tool.

Step 3. Once you extracted zip file, You will get root file. Presently Rename it to system

Step 4. Now Copy System file and paste to the directory where you installed Remix OS.
Root Remix OS for PC (Easy Tutorial)


Step 5. Once you place system file in correct directory. Now Turn off your PC and Run Remix OS.

Step 6. On Remix OS, from left Application drawer button. You will get SuperSU App. Just Open it.

Step 7. Once you open it, You will get a message in box "The SuperSU binary need to be updated". Now tap on Continue button then tap on Normal button. It will reboot automatically in server second.

Download here
http://bit.ly/1nQFTVe

Congratulation, Now you have a Rooted Remix OS for PC. Do you know Remix OS does not support Google Apps like Play Store and Play service but you can install it manully Click on How to install Google Play Store on Remix OS.

Go to link download

Read more »

Friday, May 12, 2017

2Lines for WhatsApp ★ ROOT v1 1 2

2Lines for WhatsApp ★ ROOT v1 1 2


SD Maid Pro v4.2.0 Apk adalah sebuah aplikasi android yang akan membantu anda untuk mengosongkan penggunaan memory berlebih dan tidak berguna di hp android anda dengan cara yang mudah dan cepat. Anda yang tidak pernah melakukan tune up dan jarang membersihkan file-file tidak berguna di android pasti merasakan hp android anda semakin lama semakin melambat performanya. Apalagi ketika anda mengecek penggunaan memory di hp anda ternyata membengkak, walaupun anda tidak banyak menginstal aplikasi dan file lain di hp android anda. Nah kini dengan menggunakan aplikasi SD Maid Pro Apk ini, semua permasalahan anda tersebut dapat teratasi dengan mudah.
 
Aplikasi SD Maid Pro Apk ini akan membersihkan seluruh file yang tidak berguna dan file sementara yang hanya membebani memory di hp android anda. Pembersihan yang dilakukan oleh aplikasi SD Maid Pro Apk ini sangatlah aman, jadi anda tidak perlu khawatir terjadi sesuatu yang tidak diinginkan pada hp anda setelah dibersihkan dengan aplikasi yang satu ini.
 
Kami membagikan Versi Pro dari aplikasi SD Maid Pro Apk ini dengan gratis, sehingga anda dapat menggunakan semua fitur premium dari aplikasi pembersih memory terbaik di android ini.
Features
  • Explorer is a full fledged filemanager, use it to crawl through your Androids files.
  • You can use the Searcher if you know what file you are looking for.
  • The CorpseFinder searches your device for orphaned items and compares those to the list of installed applications.
  • AppControl lets you freeze, reset and remove applications (even system apps).
  • The SystemCleaner scans your device and filters directories which contain unnecessary files. You an even create your own filters!

  • You can optimize and shrink bloated databases to speed up access and free space.
  • View your biggest files and find out what is hogging all the space.
  • Find files that have been modified in the last X minutes.
Link Download : SD Maid Pro v4.2.0 Apk (5 Mb)

Go to link download

Read more »

Tuesday, May 9, 2017

3 Useful Apps To Root Your Android Without A Pc

3 Useful Apps To Root Your Android Without A Pc


Penyakit yang disebut Chagas ini disebut sebagai penyakit AIDS baru di Amerika karena efek dari penyebarannya butuh waktu bertahun-tahun baru dapat terdeteksi dan pada saat itu pula penanganan sudah terlambat. Penyakit ini dapat membuat jantung bengkak & meledak. WOW

Para ahli menduga bahwa penyakit ini sejenis dengan penyakit AIDS hanya saja lebih mematikan. Ilmuwan akhirnya berhasil mengidentifikasi sebuah serangga pemakan darah yang diklaim menyebarkan penyakit “AIDS versi baru” dan mempublikasikanya ke publik. Bedanya penyakit yang ditularkan bukan berupa penyakit AIDS dalam arti sebenarnya, melainkan wabah penyakit yang disebut Chagas. Warga Amerika Latin mulai banyak yang terserang oleh panyakit yang diberi nama Chagas ini.

Chagas diambil dari nama belakang si penemu penyakit jenis ini pada tahun 1909, yaitu Carlos Ribeiro Justiniano Chagas. Penyakit yang telah lama ada namun baru diselidiki lebih dalam lagi ini disebabkan oleh virus yang ditularkan oleh seekor serangga kecil bersayap dan biasanya berwarna hitam. Serangga ini adalah Triatomine / Triatome / Triatoma / Triatominae, yang juga serangga penghisap darah manusia dan menularkan virusnya melalui gigitannya.

Jika Jantung Teinfeksi Chagas

Menurut catatan jurnal PLoS Neglected Tropical Diseases, penyakit Chagas akan mengakibatkan pembengkakan di bagian jantung. Jika sudah parah, organ ini bisa pecah dan menyebabkan kematian mendadak.

Yang membuat para ilmuwan khawatir, penyakit Chagas ini sulit untuk dideteksi dan butuh waktu hingga bertahun-tahun hingga akhirnya muncul gejala.


dengan alasan itulah kini serangga Triatome dijuluki sebagai ‘AIDS baru di benua Amerika‘.
Masalahnya adalah virus penyakit Chagas ini gampang tersebar, seperti melalui transfusi darah, atau bawaan gen turunan (layaknya penyebaran virus HIV), tapi tidak dapat menular dari hubungan intim, seperti kebanyakan kasus penularan virus HIV.

Sayangnya, gejala penyakit ini sangat sulit untuk diketahui sejak awal.
Penyakit Chagas ini membutuhkan waktu bertahun-tahun baru dapat dideteksi, mirip dengan AIDS, sehingga kemungkinannya sangat kecil untuk melakukan pengobatan dini.

Kalau pun dapat dideteksi dini, maka pengobatan tercepat bisa membutuhkan waktu selama 3 bulan. Lebih parah, penyakit ini banyak menyerang penduduk-penduduk yang berada di bawah garis kemiskinan.
Penyakit ini merebak di antara penduduk miskin entah karena lingkungan yang kotor yang menjadikan tempat perkembangbiakan serangga Triatoma ini semakin meluas atau karena ketidakpedulian warga terhadap sakit yang mereka derita sehingga mereka tidak pernah memeriksakan kesehatan mereka ke dokter karena tidak adanya biaya untuk memeriksakan diri mereka.

Menurut, Science Daily, faktor yang paling utama dari peningkatan penyebaran virus ini adalah perubahan iklim. Perubahan iklim bumi yang menjadi semakin hangat ini memungkinkan si serangga membawa virus ke daerah bagian utara.

Penyakit ini sudah mulai mewabah di Amerika Tengah dan Amerika Selatan (Bolivia, Meksiko, Kolombia) dan beberapa negara Eropa.

Go to link download

Read more »

Root L5 E610 E612 E615 E617 optimus 3D Max P720

Root L5 E610 E612 E615 E617 optimus 3D Max P720


Root para LG L5 E610/E612/E615/E617 Optimus 3D Max P720/P720H/P725
1. Baixe o arquivo e descompacte-o (criar uma pasta na área de trabalho chamada L5_root ou o que quiser): kit Root ( o4xr.zip )
2.Download "IS11LG_SystemBackupTest.signed.apk" anexado abaixo e copiar para a raiz do seu telefone (armazenamento interno)
3. No telefone habilite essas duas opções :
Em "Opções -> Segurança" , habilitar "Fontes desconhecidas"
Em "Para Desenvolvedores" habilite "Debug USB"
4. Instalar "IS11LG_SystemBackupTest.signed.apk"
5. Em seguida, abra o "SystemBackupTest" instalado e não o feche.
Segure o botão de ligar e reinicie o dispositivo.
6. Quando o telefone tiver reinicializado completamente , conecte seu telefone ao computador via USB (Nota: deve ser opção de somente carregar bateria )
Se ficar reinicializando sem parar , aguarde pelo logo da LG, depois que ele aparecer conte de 3 a 4 minutos, então aperte a tecla de ligar
7. Na pasta que você criou no passo 1 (L5_root) o4xr executar o arquivo root.bat,
esperar até que o script ser executado e o telefone irá reiniciar.
8. Então no telefone, abrir o Google Play Store e procure o "SuperSU"
Faça o Upgrade do "SuperSU", e em seguida, abra o programa pede atualizações ... Clique em OK para
9. Atualizar o binário SU ...
10. Agora você tem um root. Você pode excluir a aplicação SystemBackupTest ...

Go to link download

Read more »

Monday, May 8, 2017

How to Root Zenfone 2 Laser ZE500KL Z00ED

How to Root Zenfone 2 Laser ZE500KL Z00ED


Tutorial - How to Root Asus Zenfone 2 laser ZE500KL/Z00ED with step by step guide. With the hep of root power you can access android system file and edit customized your device acording to your style. This method tested with Asus Zenfone 2 Laser ZE500KL WW_12.8.5.118. Lollipop firmware. You can also Record screen without root just check out How to Record Screen on Asus Zenfone without Root .
Root Zenfone 2 Laser ZE500KL/Z00ED

Requirement
  • ADB Fastboot Tool from End of Post.
  • Mod Boot Image file
  • Windows PC

How to Root Zenfone 2

Step 1. Install ADB Fastboot tool
  • Run it as administrator.
  • Press Y/Yes to install ADB and Fastboot.
  • Press Y/Yes to install ADB system-wide or N/No for current user only 
  • Press Y/Yes to install Drivers
Continue Driver installation 
finished!

Step 2. Now Enable USB Debugging from Settings > Developer Options (Note - If no developer options show in setting first go to Settings then About and then Build number tap 7x then developer options will show up in settings.)

Step 3. Download mod boot.img (Download from end of post)

Step 4. Enter fastboot Mode using Power+Volume up button.

Step 5. Connect Zenfone 2 Laser with PC.

Step 6. at mod_boot.img folder open CMD (Shift+Right Click>Open Command Here)

Step 7. Type this command at CMD:
  • fastboot boot mod_boot.img
Download here
ADB Tool - http://bit.ly/1kKaX7f
Mod Boot Image- http://bit.ly/1kKb82k

Done, Now your phone should automatically reboot. Once it reboot you can update SuperSU from play store if it ask for update. You can also check out How to Install Android 6.0 Marshmallow Boot Animation on Zenfone 2.

Go to link download

Read more »

Sunday, May 7, 2017

How to use fingerprint as home button on any Android without ROOT

How to use fingerprint as home button on any Android without ROOT


Hello Guys, In this tutorial I talk about how you can use the fingerprint as the home button key on any Android phone without root. This method tested on my moto g4 plus and it works superb. This app works without root, but some cool features needed root access like scroll screen using fingerprint sensor.

Requirement
  • Android Device with Fingerprint scanner
  • Fingerprint Gesture Application (You can download it from the end of the post)
  • Android device running Marshmallow or higher (Android 6.0+)

Available actions for root and unroot users

  • Icon touch panel
  • Use as a back button
  • Use as Home button
  • Use this for the Recent apps button
  • Use for Sleep (Root)
  • Use as Power button menu
  • Use as Scroll down (Root)
  • Use as Scroll up (Root)
  • Use for Open notification panel
  • Use for Toggle notification panel
  • Use for Open quick settings
  • With Fingerprint Play/pause song
  • Next song
  • Previous song
  • Use it for Open App
  • Use for Torch On/Off
  • Use it for Toggle ringer mode
  • Use this for the Toggle split screen

How to Use fingerprint as home key

  1. First download fingerprint gesture APK file from the end of the post link given in red highlighted color.
  2. Now, Copy APK file in your device using a data cable or wireless file transfer applications.
  3. Simply install APK
  4. Once its installed, Go back
  5. Go to Phone Settings > Accessibility > Choose Fingerprint Gestures and switch on.
  6. Open Fingerprint Gestures application from your App drawer
  7. Now Enable Fingerprint Gestures
    use fingerprint as home button
  8. Now Tap on Single TAP option
    fingerprint as home button on android
  9. Select Home option from navigation button
    use fingerprint as home button without ROOT
  10. Done, Now you can use a fingerprint sensor as home button key.

Download here
http://bit.ly/2g4Ht1T

You can use fingerprint with lots of more options like the back button, Play Music or Pause music, next songs, etc. Also you can use double tap option for other features. That means you can use the fingerprint as home key and play music at the same time. Also read about Xposed for Android Nougat Please share this tutorial with your friends.

Go to link download

Read more »

Friday, May 5, 2017

How to Install TWRP Recovery Root Galaxy J7 on Android 6 0 J700H

How to Install TWRP Recovery Root Galaxy J7 on Android 6 0 J700H


Recently, Samsung rolls out Android 6.0.1 [6.0] Marshmallow for Galaxy J7 and J5. Here we are telling How to install TWRP Recovery and Root Galaxy J7 by uses ODIN. This method is tested, but do it with your own risk I am not responsible for any damage, delete files and other issues. Before doing root or installing custom recovery take a backup of Photos, Music, Documents and other important data.

Requirement
  • SuperSU Zip
  • TWRP Recovery
  • ODIN for PC
  • Samsung USB Drivers for PC (Download all files from end of the Post)
  • Device battery at lest 40% Charged

Install USB Drivers on your PC
First, you have to install the USB Drivers on your PC. So, Download USB_Drivers from end of post. Once it downloaded, Connect your J7 to PC using a data cable and Run setup and install it.


How to Install TWRP Recovery on Galaxy J7

  1. Download ODIN and TWRP Recovery on your PC.
  2. Extract both Odin and TWRP Zip file using WinRAR and you will get a twrp-2.8.7.0-j7elte_2.tar file and Odin Software.
  3. Run ODIN on your PC.
  4. Now Power Off your J7. Then boot your device in download Mode by pressing Volume Down + Home Button + Power Key simultaneously, Now you will see warning message just press the volume up button to skip it and it, will reboot your device into Download Mode.
  5. Connect your J7 using data cable
  6. Once, you connected, it with show ID: Com box will turn blue in ODIN_interface.
    TWRP Recovery on Galaxy J7
  7. Now just click on AP from Odin and select the twrp-2.8.7.0-j7elte_2.tar from where you extracted it.
    Root Galaxy J7 on Android 6.0
  8. Once its selected, Hit on Start button and wait until it done
  9. Once its done, It will reboot automatically. Now you can use TWRP Recovery for installing custom ROM, zip and other custom modification file on your device.

How to Root Galaxy J7 on Android 6.0

  1. Make sure before root your device, You have to install custom recovery for installing root.zip file.
  2. Download SuperSU Zip on your PC.
  3. Copy SuperSU.zip on your device internal storage.
  4. Power Off your device and Reboot into recovery mode by pressing Volume UP + HOME + Power buttons.
  5. Once Recovery Open, Tap on Install Button.
  6. Now Find and Select SuperSU.zip file, which you copy in your device. Swipe to Confirm Flash. It can take up to 1 minutes.
  7. Once Completed. Tap on Wipe Cache/dalvik.
  8. Now Go back and Reboot your device.

Download here
USB Drivers- http://bit.ly/28KJPj2
ODIN- http://bit.ly/28MyQcN
TWRP- http://bit.ly/28LPlXk
SUPERSu- http://bit.ly/1swSn6w

Congratulation, Now you can use your Samsung Galaxy J7 with ROOT and Custom TWRP Recovery. With TWRP Recovery you can install any Custom ROM and Zip file like Xposed Framework zip. And with you can access system file and modify it according to your requirement. You can also check out Update Android 6.0 on Samsung Galaxy Tab 2 If you find anything help full please Share this tutorial with your friends.

Go to link download

Read more »

Thursday, May 4, 2017

How to Root the Nokia X X and XL using Frame root

How to Root the Nokia X X and XL using Frame root


How to Root the Nokia X, X+ and XL using Frame root

Nokia X is expected to hit a huge sales number as its firstly the first Nokia phone running the Android OS and secondly it is an entry level device projected at a price point where there’s nothing to stop it from making some sales records. If you’re an advanced Android user, you’d already be aware of what root access is and the great options it opens up for you. Root access is the very first thing you need to install custom launchers (advanced), uninstall system apps or even run a completely different ROM on your phone.

Rooting the Nokia X, X+ and XL

As Nokia X, X+ and XL run the same AOSP based firmware, the steps to root each of them is the same. Thanks to the XDA community, there exists an app called Frame Root which makes rooting a variety of Android devices as easy as 1-2-3. Here’s how to root these devices.

1. Enable Installation of Non-Store Apps

The very first thing to do is to allow the installation of apps which are not available on the Nokia Store. Skip this step if your’ve already done this.
Open Settings, scroll down and tap on security. Here, tick the box in front of Unknown Sources. Accept the warning.

2. Download and Install FrameRoot

Download Frame root.apk file on your phone. Then open downloads and tap on Frame root to install it on your phone.
                                            Download

3. Root the phone

The final step is to root the phone. To do this, tap on the Frame root icon on your home-screen. Once the app is opened, tap on Gandalf.
nokia x framarootYour phone will now be rooted in a few moments and the following message will appear.
Nokia X root Success
Restart your phone to complete the procedure. That’s it. Here’s an image from the root checker approving the successful root.

Go to link download

Read more »

Tuesday, April 25, 2017

How to Root Zenfone Max ZC550KL The Complete Guide

How to Root Zenfone Max ZC550KL The Complete Guide


Today, In this new tutorial I will teach you about How to Root Zenfone Max ZC550KL in One Click using Windows PC and Linux PC desktop. Yes, that is right news now you can root your Zenfone in one click. This method tested on my friends Zenfone Max and its successfully root without bricking or bootloop it. But Do It at your own Risk and I am not responsible for any damage. You can also check out How to Install Dolby Digital Sound on Zenfone.

Before Root
Root (SusperSU) Application will void your warranty. But you can go back to, the warranty period by unroot your device. Below you can read both guide. You can also check more quality post on ASUS Zenfone Tutorial Page.

Requirement
  • Zenfone Max
  • Windows PC
  • Data Cable
  • USB Drivers
  • Root_Tool (Download all files from end of post)

First Install USB Drivers
Download USB drivers from the end of the post and Install it like other softwares. Once it installed on your PC, Reboot it.

Enable USB Debugging mode
Once the above installation process is done. Now Enable USB debugging mode on your Zenfone. From Settings > about > Build number. Hit 7 times on build number to enable developer mode. Once it shows developers mode enabled. Now Go back to settings > Developers Options > Check USB Debugging mode.

How to Root Zenfone Max

  1. Download Root Tool from the end of the post,  Extract it on your desktop using WinRAR or other extractor tool.
  2. Now, Connect your device with PC using data cable
  3. Open Root Tool folder that you extract to your desktop.
  4. Click on Root.bat for Windows OS and Root.su for Linux OS.
    Root Asus Zenfone Max
  5. It will show back Commend Window on your screen and promot for Press any Key to continue and any key from your keyboard. And it will start to root your device. Please do not disconnect your device from PC while this process is running. It can harm your device.
  6. Once it is done, Your device auto reboot.

Download here
USB Driver- http://intel.ly/1BJDf2w
Root_Tool- http://bit.ly/24Io5f8

How to UnRoot Zenfone Max

  1. Use above steps from 1 to 4
  2. Click on UnRoot.bat for Windows OS and UnRoot.su for Linux OS.
    UnRoot for Asus Zenfone Max
  3. Wait until it is done.

Congratulation, Now you can access any Rooted Android Application on your Zenfone Max. This Update tutorial about Root Zenfone Max. Do you know the Android OS release their new version for Android Users and there are lots of amazing features, but one is my favorite Android N Setting Menu on any Android Lollipop and Marshmallow. Thank you using Techno Planners I hope you enjoy this Tutorial. If yes, Please share this post.

Go to link download

Read more »

Tuesday, April 18, 2017

How to Root Android Nougat 7 0 7 1 without PC Computer

How to Root Android Nougat 7 0 7 1 without PC Computer


Hello Guys in this post we talk about how to root any android nougat 7.0/7.1 without using PC Computer. As we know as Google already release Android Nougat sweet for all users and lots of users want root their device and in this post I will show you step by step guide on how you can root android nougat without PC Computer. So for this tutorial we are using two different methods first method is Kingoroot and the second method is flash SuperSU zip using custom CWM/TWRP Recovery. Both methods tested on custom ROM and stock ROM, but do it at your own risk I am not responsible for any Damage. You can also install Xposed on Android Nougat.

Requirement

  • Android Device Running on Nougat
  • Device at least 40% charged
  • KingoRoot APK (Download link given at end of post)

Disclaimer
Before root your device, You needed to make a full backup of your device data, contact number and other important data.

How to Root Android Nougat using Kingoroot

  1. Download Kingoroot Apk from end of post link given
  2. Copy APK file on your device internal/external SD card storage
  3. Install APK on your device, and Connect your device with WIFI or mobile Data network because the rooting scripts downloaded from Kingos server.
  4. Open Kingoroot Application, and Tap the icon of KingoRoot and press "One Click Root" to start.
  5. Get the result: succeeded or failed.
  6. If you get the failed result, You may want to try it several times because it will download many scripts from the server and apply it on your device.

If the KingoRoot mobile Application method still failed for your device. You have to try the second TWRP recovery method or you can use KingoRoot PC version.

How to Root Android Nougat using TWRP Recovery

  1. Download SuperSU zip file from the end of the post link given.
  2. Copy the SuperSU zip file and paste into your device internal storage.
  3. Power off your device and boot your device into TWRP recovery mode.
  4. Now Tap on “Install” option and select the SuperSU zip file.
    Root Android Nougat 7.0/7.1 without PC Computer
  5. After selecting the SuperSU.zip file, do “Swipe to Confirm Flash” on the bottom of the screen to begin the flashing process.
  6. Once SuperSU is flashed
  7. Now Reboot your device option

Download here
KingoROOT APK- http://bit.ly/1OE5MSq
SuperSU zip- http://bit.ly/2hNIL2e

Congratulations, Now you can verify root successfully installed or not by using the Root Checker Application you can download the Root checker Application from Play Store. Please share this post with your friends and family, Comment down below if you have any question. Thank you and have a nice day.

Go to link download

Read more »

Monday, April 17, 2017

Root any Zenfone Series with Apk 1 4 6r 1 5r

Root any Zenfone Series with Apk 1 4 6r 1 5r


Root Zenfone Apk 1.4.6r, 1.5r - Today we are sharing Zenfone Root Apk for your Zenfone Phones.You can simply root your zenfone by install Apk file on your device. You can also check out Install Dolby Digital Plus Sound on Zenfone 5 Lollipop and Kitkat.

List of Supported Zenfone Models
  • Asus Zenfone 4 (T00I)
  • Asus Zenfone 4.5 (T00Q)
  • Asus Zenfone 5 (T00F / T00J)
  • Asus Zenfone 6 (T00G / Z002)
  • Asus PadFone S (T00N)
  • ASUS FONEPAD Note 6 (aka K00G ME560CG) v11.2.1.22
  • Asus Zenfone 5 LTE (T00P)

Not Tested With this model
  • Asus Padfone Mini (T00E)
  • ASUS FONEPAD 7 FE170CG (K012)
  • Asus Transformer Pad TF303CL
  • Asus Transformer Pad TF103C (K010) TF103CG (K018)
  • MEMO Asus Pad 7 (K013 / K017) must ME176C ME176CX ME170C
  • MEMO Asus Pad 8 (K011) must ME181C
  • ASUS FONEPAD 7 FE375CG (K019)

How to Root Zenfone using Zenfone Apk

Step 1. Download and Install Apk file on your Device.

Step 2. Now Disable Wifi and Mobile Data on your device.

Step 3. Now open Root Zenfone Application, then Select Super SU by Chainfire then Click on Root button.

Step 4. After Press the root button it will showing “You’ve activated this demo device OFFLINE successfully“. Dont Click OK button. Just reboot your device manually.

Download here
http://bit.ly/1S83VaK

Go to link download

Read more »

Wednesday, April 12, 2017

How To Easily Root An Android Device

How To Easily Root An Android Device


Ingin gigi anda putih secara alami, yuk simak 9 tips berikut


1.      Pisang
Gosok gigi anda dengan kulit pisang selama dua menit untuk memutihkannya. Kulit pisang mengandung beberapa mineral penting yang bagus untuk gigi Anda.


2.      Kacang Almond
Mengunyah kacang almond dapat melunturkan plak dan noda dari permukaan gigi Anda. Almond mengandung protein, lemak sehat dan mampu membantu Anda mendapatkan senyum putih.


3.      Nanas
Sama halnya dengan wortel, nanas bisa membersihkan noda alami dengan meningkatkan produksi air liur dan mampu membersihkan sisa makanan sehingga mulut Anda lebih bersih dan segar.


4.      Strawberry
Strawberry mengandung asam alami yang membantu mencerahkan warna gigi. Tumbuk strawberry, kemudian gosoklah pada gigi Anda. Tunggu 15 menit, kemudian bilaslah dengan air.


5.      Pir
Mengungah pir dapat menetralkan bakteri penyebab bau mulut dan mengurangi noda kekuningan pada gigi. Kandungan airnya yang tinggi juga bisa membersihkan gigi dari kotoran yang tertinggal di sela-sela gigi.


6.      Wortel
Wortel meningkatkan produksi air liur, yang berfungsi sebagai pembersih mulut. Selain itu, wortel juga dapat memperkuat gusi Anda.


7.      Jeruk
Mengonsumsi buah-buahan yang asam seperti jeruk, akan meningkatkan produksi air liur yang dapat mencuci bersih gigi secara alami. Tapi hindari membersihkan gigi langsung menggunakan lemon, karena tingkat asam yang tinggi dapat merusak gigi.


8.      Susu
Susu dan yogurt adalah makanan yang baik untuk gigi. Selain dapat menguatkan gigi, produk olahan ini juga bisa membuat gigi terlihat lebih putih dan sehat.


9.      Apel
Mengunyah Apel dapat menguatkan gusi. Apel juga dapat meningkatkan produksi air liur yang membantu dalam membunuh bakteri. Apel juga bertindak sebagai pembersih gigi.


Go to link download

Read more »

Tuesday, April 11, 2017

New Method How to Root Infinix Zero 2GB 16GB Android

New Method How to Root Infinix Zero 2GB 16GB Android


Penyakit cacar air muncul akibat salah satu jenis virus herpes yang umumnya dikenal sebagai varicella zoster. Menyerang seseorang yang kekebalan tubuhnya sedang rendah. Biasanya penyakit ini menyerang waktu kita kecil. Penyebarannya lewat batuk/bersin (udara) dan juga lewat sentuhan kulit atau baju yang dikenakan si penderita (kontak fisik).

Gelaja permulaannya, penderita akan merasa sedikit demam, pilek, cepat merasa lelah, lesu, dan lemah. Pada kasus yang lebih berat, bisa didapatkan nyeri sendi, sakit kepala dan pusing. Beberapa hari kemudian timbullah kemerahan pada kulit yang berukuran kecil yang pertama kali ditemukan di sekitar dada dan perut atau punggung lalu diikuti timbul di anggota gerak dan wajah.

Pencegahannya tentu imunisasi waktu umur 12 bulan, tapi dianjurkan juga bagi umur 12 tahun yang belum memiliki kekebalan tubuh.

Jika anda belum pernah mengalami cacar air saat kecil, Saya akan memberikan 5 cara untuk mencegahnya, karena saat dewasa penyakit ini kondisinya bisa menjadi lebih serius dan kadang-kadang menyebabkan komplikasi.

Berikut 5 cara pencegahan penyakit cacar air
  1. Menjauh Dari Mereka Yang Terinfeksi
                  cara ini merupakan cara yang paling baik untuk mencegah terkena cacar air. Ingat lebih baik mencegah daripada mengobati.

  2. Menjaga Kebersihan Rumah dan Tubuh
                  
    Kebersihan itu keadaan bebas dari kotoran termasuk debu, sampah dam bau.
    Penting menjaga kebersihan agar terhindar dari kuman penyakit yang berbahaya yang menempel pada tubuh maupun benda disekitar kita. Selain itu kebersihan juga sebagian dari iman.

  3. Memperbanyak Mengkonsumsi Buah dan Sayur
                  Tingkatkan sistem kekebalan tubuh dengan memperbanyak konsumsi sayuran berdaun hijau dan buah-buahan segar.
    Lebih baik konsumsi brokoli dan labu karena bisa mencegah timbulnya cacar air.
    Sayuran ini juga mampu membantu tubuh melawan virus varicella.
  4. Minum Air Kelapa Dan Air Lemon
                   
    Jaga tubuh tetap bersuhu normal selama musim kemarau, misalnya dengan rajin minum air kelapa murni.
    Selain itu, minuman lain yang bisa Anda manfaatkan adalah air lemon. Lemon mengandung asam untuk melawan bakteri jahat yang menurunkan tingkat kekebalan tubuh
  5. Minum Air Putih
                 
    Air putih merupakan minuman yang paling baik dan menyehatkan untuk tubuh kita. Fungsi air putih adalah meningkatkan energi saat beraktivitas, membantu membuang racun dalam tubuh lewat urine, menjaga berat badan,
    membuat kulit terlihat segar, baik untuk kesehatan tulang, dan membantu penyerapan makanan.
Untuk pengobatan sendiri, cacar air ini sebenarnya dapat sembuh dengan sendirinya. Tapi ada baiknya kita konsultasi ke dokter agar dapat pengobatan yang lebih baik dengan obat atau salep tertentu.

Di lain waktu saya akan memberikan tips saat anda terkena cacar air.

Semoga artikel ini beranfaat untuk anda

Go to link download

Read more »

Monday, April 10, 2017

How to Record Screen on Asus Zenfone without Root

How to Record Screen on Asus Zenfone without Root


Tutorial - How to Record Screen or Display on Asus FonePad 7, MeMO Pad 7, and Fonepad 8, Zenfone 5, Zenfone 6, Zenfone Selfie, Zenfone 2, Zenfone 5 LTE, Zenfone 2 Laser, Zenfone Delux and all Zen device supported. In this method we are using PC Link to record Screen. We also attach a video Tutorial it more easy to understand to connect pc link and record display on Zenfone.


Requirement
  • PC Link (Download from End of Post).
  • Genuine Data Cable.
  • Updated Version of PC Link in both Device.

How to Record Screen on Asus Zenfone

Step 1. First, You have to download and install PC Link on Your PC. You can  also check out How to Connect PC Link on Zenfone Device.
Step 2. After Connect, At the upper right corner select first option, then click on recording button to start capturing screen. 
Record Screen on Asus Zenfone without Root

Step 3. To stop recording again go previous option then select recording.

Step 4. Now it show saved file under Document directory.

Download here
http://bit.ly/1MYRLxZ

Congratulations, Now you can record your display without root permission. If you are running Android L 5.0 on your Zenfone. You can connect PC Link without using data cable. You can also check out How to Connect PC Link using Wifi Connection on Zenfone.

Go to link download

Read more »