Showing posts with label any. Show all posts
Showing posts with label any. Show all posts
Monday, May 15, 2017
How to Install Android N 7 0 Boot Animation on Any Android Phone
How to Install Android N 7 0 Boot Animation on Any Android Phone
In this Tutorial I will show you how to install Android Nougat 7.0 Boot Animation on Any Android Phone or device. This is next android version for nexus devices and we got this boot animation from final developer preview. This method test with stock and custom ROM but do it with your own risk i am not responsible for any damage.
2. Copy both file in your device storage (internal/external).
3. Go to file manager, tap on ES Explorer APK to Install, you may get an unknown source warning If you Install the apk first time on your device. Tap on settings, Swipe down and enable unknown source option, tap on OK. Now go back and try to install APK.
4. Open it and enable Root Explorer mode and grant super su permission if it ask.

6. Navigate to the /system/media folder on your device. choose and Rename the file name from "bootanimation.zip" to "bootanimation.zip.bak" or "bootanimation.zip.old", then press "OK."

7. Then copy Android nougat boot animation zip file from wherever you downloaded and paste it, and paste it to system/media folder.
8. Once youve done that, long-press the newly-copied bootanimation.zip file, then choose "Permissions." Finally, set the Owner category to "Read" and "Write," then make sure all other categories are set to just "Read."
9. Reboot and Enjoy
Congratulation, Now you can enjoy new boot animation on your older android phone. If you find any thing help full from this blog. Please share this tutorial with other android users. Before you go also check read about Android N-ify you can install Android 7.0 feature on your Android phone with this.
Requirement
- Android Nougat Boot Animation
- ES Explorer APK (Download Link given in end of the post)
How to Install Android N 7.0 on any Android
1. First Download the boot-animation.zip and ES Explorer APK from end of post link given.2. Copy both file in your device storage (internal/external).
3. Go to file manager, tap on ES Explorer APK to Install, you may get an unknown source warning If you Install the apk first time on your device. Tap on settings, Swipe down and enable unknown source option, tap on OK. Now go back and try to install APK.
4. Open it and enable Root Explorer mode and grant super su permission if it ask.
6. Navigate to the /system/media folder on your device. choose and Rename the file name from "bootanimation.zip" to "bootanimation.zip.bak" or "bootanimation.zip.old", then press "OK."
7. Then copy Android nougat boot animation zip file from wherever you downloaded and paste it, and paste it to system/media folder.
8. Once youve done that, long-press the newly-copied bootanimation.zip file, then choose "Permissions." Finally, set the Owner category to "Read" and "Write," then make sure all other categories are set to just "Read."
9. Reboot and Enjoy
Download here
ES Explorer APK - http://bit.ly/29w75RX
BOOT Animation - http://bit.ly/29JJdKQ
Congratulation, Now you can enjoy new boot animation on your older android phone. If you find any thing help full from this blog. Please share this tutorial with other android users. Before you go also check read about Android N-ify you can install Android 7.0 feature on your Android phone with this.
Go to link download

Saturday, May 13, 2017
Fix Bootloop on any ASUS Zenfone 4 5 6 Selfie Laser etc
Fix Bootloop on any ASUS Zenfone 4 5 6 Selfie Laser etc
Hello Guys In this tutorial i will tell you How to Fix Bootloop on ASUS Zenfone 4, 5, 6 , Selfie, Laser, Zenfone. If your device going in bootloop that means your device can not start or its show ASUS logo and shutdown and reboot again and aging or it is showing boot animation continuously. That is means you have to fix bootloop issue on your zenfone.
If you can not find the firmware for your device. Please comment below and Ill update as soon as possible.
Requirement
- ADB Driver
- Intel Driver
- ADB Fastboot Tool
- Zenfone Stock ROM (Download All Reqirement files from end of the post)
- Windows PC
Install Drivers on your PC
Download Intel driver from end of the post. Once it downloaded on your PC, Install it on your PC like normal software.Install ADB Driver
- Download ADB Drivers from end of the post.
- Connect your zenfone in recovery mode
- Run ADB Driver, and Click on Install button
- Done
How to fix bootloop on Zenfone
- Now Download ADB Fastboot tool and extract it on your PC desktop.
- Copy Stock ROM zip file in extracted adb folder.
- Now Open Stock ROM using winrar and extract boot.img and recovery.img from it.
- Boot your device in droidboot mode. By Press and hold Power off button after vibrate suddenly press Volume Up button.
- Connect your device with PC using ASUS USB Data cable.
- Now open adb folder and press SHIFT + Right Mouse Button and select open command here.
- Now Type below command one by one and hit enter after each line
- After successfully flash both files dont close CMD Window.
- Now select recovery mode then press power button ( if u dont know how to open recovery mode using droidboot mode then Power off your device and Press and hold Power off button after vibrate suddenly press Volume Down button. May be it show no command or show android image, Now Press and hold Volume down and Volume Up button again and again it will show you recovery menu.
- Now select apply update from adb option
- Now type below command and hit enter then hit enter.
fastboot flash recovery recovery.img
fastboot flash boot boot.img
fastboot flash fastboot fastboot.img
adb sideload filename.zip
If you can not find the firmware for your device. Please comment below and Ill update as soon as possible.
Download here
Intel USB Drivers- http://intel.ly/1hCwP2o
ADB Drivers- http://bit.ly/2cUnlTg
ADB TOOL- http://bit.ly/2dGYSjQ
Zenfone 5 Firmware- http://bit.ly/1NIe9wm
Go to link download
Friday, May 12, 2017
How To Bypass Any Android Pattern Lock in 7 Easy Steps
How To Bypass Any Android Pattern Lock in 7 Easy Steps
Naruto Episode 368 Bahasa Indonesia [MKV] [MP4] [3GP]
Naruto Episode 367 Bahasa Indonesia [MKV] [MP4] [3GP]
Naruto Episode 366 Bahasa Indonesia [MKV] [MP4] [3GP]
Naruto Episode 365 Bahasa Indonesia [MKV] [MP4] [3GP]
Naruto Episode 364 Bahasa Indonesia [MKV] [MP4] [3GP]
Naruto Episode 363 Bahasa Indonesia [MKV] [MP4] [3GP]
Naruto Episode 362 Bahasa Indonesia [MKV] [MP4] [3GP]
Naruto Episode 367 Bahasa Indonesia [MKV] [MP4] [3GP]
Naruto Episode 366 Bahasa Indonesia [MKV] [MP4] [3GP]
Naruto Episode 365 Bahasa Indonesia [MKV] [MP4] [3GP]
Naruto Episode 364 Bahasa Indonesia [MKV] [MP4] [3GP]
Naruto Episode 363 Bahasa Indonesia [MKV] [MP4] [3GP]
Naruto Episode 362 Bahasa Indonesia [MKV] [MP4] [3GP]
Naruto Episode 361 Bahasa Indonesia [MKV] [MP4] [3GP]
Naruto Episode 360 Bahasa Indonesia [MKV] [MP4] [3GP]
Naruto Episode 359 Bahasa Indonesia [MKV] [MP4] [3GP]
Naruto Episode 358 Bahasa Indonesia [MKV] [MP4] [3GP]
Naruto Episode 357 Bahasa Indonesia [MKV] [MP4] [3GP]
Naruto Episode 356 Bahasa Indonesia [MKV] [MP4] [3GP]
Naruto Episode 355 Bahasa Indonesia [MKV] [MP4] [3GP]
Naruto Episode 354 Bahasa Indonesia [MKV] [MP4] [3GP]
Naruto Episode 353 Bahasa Indonesia [MKV] [MP4] [3GP]
Naruto Episode 352 Bahasa Indonesia [MKV] [MP4] [3GP]
Naruto Episode 351 Bahasa Indonesia [MKV] [MP4] [3GP]
Naruto Episode 350 Bahasa Indonesia [MKV] [MP4] [3GP]
Naruto Episode 349 Bahasa Indonesia [MKV] [MP4] [3GP]
Naruto Episode 348 Bahasa Indonesia [MKV] [MP4] [3GP]
Naruto Episode 347 Bahasa Indonesia [MKV] [MP4] [3GP]
Naruto Episode 346 Bahasa Indonesia [MKV] [MP4] [3GP]
Naruto Episode 345 Bahasa Indonesia [MKV] [MP4] [3GP]
Naruto Episode 344 Bahasa Indonesia [MKV] [MP4] [3GP]
Naruto Episode 343 Bahasa Indonesia [MKV] [MP4] [3GP]
Naruto Episode 342 Bahasa Indonesia [MKV] [MP4] [3GP]
Naruto Episode 341 Bahasa Indonesia [MKV] [MP4] [3GP]
Naruto Episode 340 Bahasa Indonesia [MKV] [MP4] [3GP]
Naruto Episode 339 Bahasa Indonesia [MKV] [MP4] [3GP]
Naruto Episode 338 Bahasa Indonesia [MKV] [MP4] [3GP]
Naruto Episode 337 Bahasa Indonesia [MKV] [MP4] [3GP]
Naruto Episode 336 Bahasa Indonesia [MKV] [MP4] [3GP]
Naruto Episode 335 Bahasa Indonesia [MKV] [MP4] [3GP]
Naruto Episode 334 Bahasa Indonesia [MKV] [MP4] [3GP]
Naruto Episode 333 Bahasa Indonesia [MKV] [MP4] [3GP]
Naruto Episode 332 Bahasa Indonesia [MKV] [MP4] [3GP]
Naruto Episode 331 Bahasa Indonesia [MKV] [MP4] [3GP]
Naruto Episode 330 Bahasa Indonesia [MKV] [MP4] [3GP]
Naruto Episode 329 Bahasa Indonesia [MKV] [MP4] [3GP]
Naruto Episode 328 Bahasa Indonesia [MKV] [MP4] [3GP]
Naruto Episode 327 Bahasa Indonesia [MKV] [MP4] [3GP]
Naruto Episode 326 Bahasa Indonesia [MKV] [MP4] [3GP]
Naruto Episode 325 Bahasa Indonesia [MKV] [MP4] [3GP]
Naruto Episode 324 Bahasa Indonesia [MKV] [MP4] [3GP]
Naruto Episode 323 Bahasa Indonesia [MKV] [MP4] [3GP]
Naruto Episode 322 Bahasa Indonesia [MKV] [MP4] [3GP]
Naruto Episode 321 Bahasa Indonesia [MKV] [MP4] [3GP]
Naruto Episode 320 Bahasa Indonesia [MKV] [MP4] [3GP]
Naruto Episode 319 Bahasa Indonesia [MKV] [MP4] [3GP]
Naruto Episode 318 Bahasa Indonesia [MKV] [MP4] [3GP]
Naruto Episode 317 Bahasa Indonesia [MKV] [MP4] [3GP]
Naruto Episode 316 Bahasa Indonesia [MKV] [MP4] [3GP]
Naruto Episode 315 Bahasa Indonesia [MKV] [MP4] [3GP]
Naruto Episode 314 Bahasa Indonesia [MKV] [MP4] [3GP]
Naruto Episode 313 Bahasa Indonesia [MKV] [MP4] [3GP]
Naruto Episode 312 Bahasa Indonesia [MKV] [MP4] [3GP]
Naruto Episode 311 Bahasa Indonesia [MKV] [MP4] [3GP]
Naruto Episode 310 Bahasa Indonesia [MKV] [MP4] [3GP]
Naruto Episode 309 Bahasa Indonesia [MKV] [MP4] [3GP]
Naruto Episode 308 Bahasa Indonesia [MKV] [MP4] [3GP]
Naruto Episode 307 Bahasa Indonesia [MKV] [MP4] [3GP]
Naruto Episode 306 Bahasa Indonesia [MKV] [MP4] [3GP]
Naruto Episode 305 Bahasa Indonesia [MKV] [MP4] [3GP]
Naruto Episode 304 Bahasa Indonesia [MKV] [MP4] [3GP]
Naruto Episode 303 Bahasa Indonesia [MKV] [MP4] [3GP]
Naruto Episode 302 Bahasa Indonesia [MKV] [MP4] [3GP]
Naruto Episode 301 Bahasa Indonesia [MKV] [MP4] [3GP]
Go to link download
Sunday, May 7, 2017
Fake a Call on Android Using Any Number
Fake a Call on Android Using Any Number
*** HTC Desire 816G ***
-----------------------------------------------------------
ROM Source: MTK6589 froup & Tourkdev forum
ROM Author: Tania.Sandi @ General Discovery
........................................................................
Ported to Walton Primo H2 by : Saifur Rahman
.........................................................................
ROM Source: MTK6589 froup & Tourkdev forum
ROM Author: Tania.Sandi @ General Discovery
........................................................................
Ported to Walton Primo H2 by : Saifur Rahman
.........................................................................
.jpg)
Features:
1. Kitkat 4.4.2
2. True HTC UI
3. HTC Default Launcher (Blink feed) & HTC Easy Mode Launcher
4. Dolby (Force Stop); Dont worry use following
5. Viper for android
6. Phillips Headset GUI
7. HTC Weather
8. Strong SIM Signal
9. Smooth
10. Better Battery Support
11. Xposed Supported
12. Dual 3G
13. HTC Content Transfer from Other Phone & iPhone
14. Call Auto forward
15. HTC Keyboard
16. Video Highlight
1. Kitkat 4.4.2
2. True HTC UI
3. HTC Default Launcher (Blink feed) & HTC Easy Mode Launcher
4. Dolby (Force Stop); Dont worry use following
5. Viper for android
6. Phillips Headset GUI
7. HTC Weather
8. Strong SIM Signal
9. Smooth
10. Better Battery Support
11. Xposed Supported
12. Dual 3G
13. HTC Content Transfer from Other Phone & iPhone
14. Call Auto forward
15. HTC Keyboard
16. Video Highlight
Bug:
1. Dolby Forcefully stops (Solvable try yourself)
2. When Connect to Phone SD Card automatically do not mount in Windows (Select "Connect as a media device)
3. SD Card shows as Phone memory & Phone Memory Shows as SD Card= In phones file manager (Not a big issue)
1. Dolby Forcefully stops (Solvable try yourself)
2. When Connect to Phone SD Card automatically do not mount in Windows (Select "Connect as a media device)
3. SD Card shows as Phone memory & Phone Memory Shows as SD Card= In phones file manager (Not a big issue)
Special Request:
Please Re partition your Phone as 1GB System, 2 GB Data (This might require).
.jpg)
Link:
Credit(Md Yusuf Ali Mamun)
Click Here
SS:
.jpg)
.jpg)

.jpg)

.jpg)
.jpg)

Go to link download
How to use fingerprint as home button on any Android without ROOT
How to use fingerprint as home button on any Android without ROOT
Hello Guys, In this tutorial I talk about how you can use the fingerprint as the home button key on any Android phone without root. This method tested on my moto g4 plus and it works superb. This app works without root, but some cool features needed root access like scroll screen using fingerprint sensor.
Requirement
You can use fingerprint with lots of more options like the back button, Play Music or Pause music, next songs, etc. Also you can use double tap option for other features. That means you can use the fingerprint as home key and play music at the same time. Also read about Xposed for Android Nougat Please share this tutorial with your friends.
Requirement
- Android Device with Fingerprint scanner
- Fingerprint Gesture Application (You can download it from the end of the post)
- Android device running Marshmallow or higher (Android 6.0+)
Available actions for root and unroot users
- Icon touch panel
- Use as a back button
- Use as Home button
- Use this for the Recent apps button
- Use for Sleep (Root)
- Use as Power button menu
- Use as Scroll down (Root)
- Use as Scroll up (Root)
- Use for Open notification panel
- Use for Toggle notification panel
- Use for Open quick settings
- With Fingerprint Play/pause song
- Next song
- Previous song
- Use it for Open App
- Use for Torch On/Off
- Use it for Toggle ringer mode
- Use this for the Toggle split screen
How to Use fingerprint as home key
- First download fingerprint gesture APK file from the end of the post link given in red highlighted color.
- Now, Copy APK file in your device using a data cable or wireless file transfer applications.
- Simply install APK
- Once its installed, Go back
- Go to Phone Settings > Accessibility > Choose Fingerprint Gestures and switch on.
- Open Fingerprint Gestures application from your App drawer
- Now Enable Fingerprint Gestures

- Now Tap on Single TAP option

- Select Home option from navigation button

- Done, Now you can use a fingerprint sensor as home button key.
Download here
http://bit.ly/2g4Ht1T
You can use fingerprint with lots of more options like the back button, Play Music or Pause music, next songs, etc. Also you can use double tap option for other features. That means you can use the fingerprint as home key and play music at the same time. Also read about Xposed for Android Nougat Please share this tutorial with your friends.
Go to link download
Monday, April 17, 2017
Root any Zenfone Series with Apk 1 4 6r 1 5r
Root any Zenfone Series with Apk 1 4 6r 1 5r
Root Zenfone Apk 1.4.6r, 1.5r - Today we are sharing Zenfone Root Apk for your Zenfone Phones.You can simply root your zenfone by install Apk file on your device. You can also check out Install Dolby Digital Plus Sound on Zenfone 5 Lollipop and Kitkat.
List of Supported Zenfone Models
- Asus Zenfone 4 (T00I)
- Asus Zenfone 4.5 (T00Q)
- Asus Zenfone 5 (T00F / T00J)
- Asus Zenfone 6 (T00G / Z002)
- Asus PadFone S (T00N)
- ASUS FONEPAD Note 6 (aka K00G ME560CG) v11.2.1.22
- Asus Zenfone 5 LTE (T00P)
Not Tested With this model
- Asus Padfone Mini (T00E)
- ASUS FONEPAD 7 FE170CG (K012)
- Asus Transformer Pad TF303CL
- Asus Transformer Pad TF103C (K010) TF103CG (K018)
- MEMO Asus Pad 7 (K013 / K017) must ME176C ME176CX ME170C
- MEMO Asus Pad 8 (K011) must ME181C
- ASUS FONEPAD 7 FE375CG (K019)
How to Root Zenfone using Zenfone Apk
Step 1. Download and Install Apk file on your Device.
Step 2. Now Disable Wifi and Mobile Data on your device.
Step 3. Now open Root Zenfone Application, then Select Super SU by Chainfire then Click on Root button.
Step 4. After Press the root button it will showing “You’ve activated this demo device OFFLINE successfully“. Dont Click OK button. Just reboot your device manually.
Step 4. After Press the root button it will showing “You’ve activated this demo device OFFLINE successfully“. Dont Click OK button. Just reboot your device manually.
Download here
http://bit.ly/1S83VaK
Go to link download
Monday, April 3, 2017
How to Install Google Assistant to ANY Android phone No Root
How to Install Google Assistant to ANY Android phone No Root
Google Assistant comes with Google Pixel Devices and so far, Google has not given it to every user. But This is amazing feature for Smart Phones and Everybody would like to install it on the phone. Now you can install it on your any Phone without Root. This method works for Android 4.1+. In this post Im going to tell you three methods. The first method is for the Non Rooted device, Second method is for Rooted Device. And the third method is for TWRP users. You can also install Android on your old PC.
These files will need for Non Rooted
How to Install Google Assistant to any Android phone No Root
It will not answer your query via Robot voice But it will send a message to you in response to the question.
Once Reboot is done. Now open Settings > Application Manger and find the Google application from the list and clear its data and cache files. Once the Google App restarts successfully, Go Back to your home Screen and Just press and hold your home button. Congratulation Now you have Google Assistant on your old Android Device.
How to Install Google Assistant using TWRP
Once Reboot. From your Home Screen and Just long press your home button. Congratulation Now you have Google Assistant on your old Android Device.
These files will need for Non Rooted
- Android 4.1+ OS
- Google Allo Application
How to Install Google Assistant to any Android phone No Root
- First, you need to download Google Allo application on your phone. (Download link given at the end of the post)
- Install it on your Device
- Open it and Register it with your working phone number
- After registering you can use it
It will not answer your query via Robot voice But it will send a message to you in response to the question.
How to Install Google Assistant on Android
These files will need for Rooted users- Solid Root file manger
- You need to download Solid Root Apk on your phone. (Download link given at the end of the post)
- Install it
- Open and Enable Root Explorer from Tool bar
- First enable the root storage feature from the slide out the left-hand panel and tap the settings_gear_icon. Scroll down to the bottom and check “Show root storage. Now Go back.

- Again Tap on the three line menu button from top left corner and select Root.
- Scroll Down until you see System Folder, open this folder.
- Scroll down until you see build.prop file. Just tap on “build.prop” and make sure Open the file using SE Text Editor.
- Find the line that reads ro.product.model=[YOUR_DEVICE_MODEL_Name] and replace it with this line: ro.product.model=Pixel XL
- Add this line after: ro.opa.eligible_device=true
- Save and exit the file and file manager.
- Reboot your device
Once Reboot is done. Now open Settings > Application Manger and find the Google application from the list and clear its data and cache files. Once the Google App restarts successfully, Go Back to your home Screen and Just press and hold your home button. Congratulation Now you have Google Assistant on your old Android Device.
How to Install Google Assistant using TWRP
- These files will need for TWRP users
- TWRP Recovery Per Installed
- Download three zip files from the end of the post link given.
- Copy all three files in your device internal storage
- Now Reboot your device into TWRP Recovery mode
- Once TWRP Recovery boot, Tap on Install
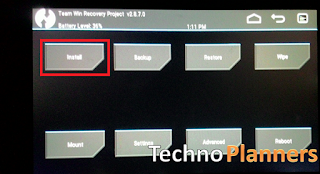
- Now find Google_Assistant_Velvet.zip and flash it.
- Similarly, flash Google_Assistant_BuildProp.zip
- Reboot your device.
Download here
Google Allo APK- http://bit.ly/2kyGEEu
Solid Root Apk- http://bit.ly/2l7d1GS
Three zip files- http://bit.ly/2eh6ZSJ
Once Reboot. From your Home Screen and Just long press your home button. Congratulation Now you have Google Assistant on your old Android Device.
Go to link download
Sunday, April 2, 2017
How To Password Protect hide Any Folder Without Any Software
How To Password Protect hide Any Folder Without Any Software
?????Video Downloader For Facebook APK :
????? ?? ???? ??? ????? Video Downloader For Facebook APK ?
???? ????? Video Downloader For Facebook APK:

???? ?????? ?? ?????
download apk keren
Video Downloader For Facebook APK ??? :
????? ????? Video Downloader For Facebook APK
?? ???? ?????? ?? ????????? Video Downloader For Facebook APK ?????? ?????? !!
??????? ???? ????? ????? :
- apk lucky patcher
- apk downloader device setting
- apk level
- apk vs app
- download apk keren
- apk android kingsoft
Go to link download
Subscribe to:
Posts (Atom)