Showing posts with label laser. Show all posts
Showing posts with label laser. Show all posts
Thursday, May 18, 2017
How to Flash TWRP Recovery on Asus Zenfone 2 Laser
How to Flash TWRP Recovery on Asus Zenfone 2 Laser
In preivew post we talk about How to Root ASUS Zenfone 2 Laser. Now In this new tutorial Techno Planners will show you How to Install TWRP Recovery for ASUS ZenFone 2 Laser ZE551KL/Z00T, ZenFone 2 Laser Z600KL/Z00L and ZenFone Selfie ZD551KL.
TWRP Recovery
Team Win Recovery Project is the best custom recovery to install any custom ROM on your device. You can access all button using the touch screen.
Compatible Device Model
Requirement
Install ADB Drivers
From the end of post Download ADB drivers and fastboot.zip file on your PC. Once it downloaded, Connect your device with PC and Install the Drivers.

Fast-boot
Download and extract fastboot zip file on your desktop using WinRAR tool.
Enable USB Debugging mode
Enable USB debugging mode on your device from Settings > about > Build number. Hit 7 times on build number to enable developer mode. Once it shows developers mode enabled. Now Go back to settings > Developers Options > Check USB Debugging mode.

Unlock Bootloader
From below link download Unlock Bootloader Application Apk file on your PC. Copy it onto your device. Install It and Run.

Download TWRP Recovery image file according to your device model. Copy image file in fastboot folder.
Now your device will reboot in recovery mode. That means you have successfully installed TWRP recovery on your Zenfone 2 Laser. Now you can install Custom ROM like [CM13] Android 6.0 marshmallow on your Zenfone 2 Lasers.
TWRP Recovery
Team Win Recovery Project is the best custom recovery to install any custom ROM on your device. You can access all button using the touch screen.
Compatible Device Model
- Zenfone 2 Laser ZE551KL
- Zenfone 2 Laser Z600KL/Z00L
Requirement
Install ADB Drivers
From the end of post Download ADB drivers and fastboot.zip file on your PC. Once it downloaded, Connect your device with PC and Install the Drivers.

Fast-boot
Download and extract fastboot zip file on your desktop using WinRAR tool.
Enable USB Debugging mode
Enable USB debugging mode on your device from Settings > about > Build number. Hit 7 times on build number to enable developer mode. Once it shows developers mode enabled. Now Go back to settings > Developers Options > Check USB Debugging mode.

Unlock Bootloader
From below link download Unlock Bootloader Application Apk file on your PC. Copy it onto your device. Install It and Run.

Download TWRP Recovery image file according to your device model. Copy image file in fastboot folder.
How to flash TWRP on Zenfone 2
- Connect your device with PC using data cable.
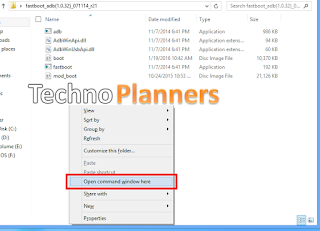
- From the fastboot folder. Press Shift(Keyboard) + Right Click (mouse) and Click on Open Windows Commend here.

- Type "adb fastboot reboot-bootloader" without quotes in CMD Window.
- Once your device open in droidboot mode. Type "fastboot flash recovery recovery.img" and press enter.
- Type "fastboot oem reboot -recovery" and hit enter.
- Done.
Download here
ADB - http://bit.ly/1L59rca
Fastboot Tool - http://bit.ly/1L59zZg
Fastboot Tool - http://bit.ly/1L59zZg
UnlockBootloader Apk Z00T - http://bit.ly/1UfC6NQ
UnlockBootloader Apk Z00L - http://bit.ly/1mPY4Jz
Zenfone 2 Laser ZE551KL/ Z00T - http://bit.ly/1QrTjxx
Zenfone 2 Laser Z600KL/ Z00L - http://bit.ly/1QrTk4A
Now your device will reboot in recovery mode. That means you have successfully installed TWRP recovery on your Zenfone 2 Laser. Now you can install Custom ROM like [CM13] Android 6.0 marshmallow on your Zenfone 2 Lasers.
Go to link download
Saturday, May 13, 2017
Fix Bootloop on any ASUS Zenfone 4 5 6 Selfie Laser etc
Fix Bootloop on any ASUS Zenfone 4 5 6 Selfie Laser etc
Hello Guys In this tutorial i will tell you How to Fix Bootloop on ASUS Zenfone 4, 5, 6 , Selfie, Laser, Zenfone. If your device going in bootloop that means your device can not start or its show ASUS logo and shutdown and reboot again and aging or it is showing boot animation continuously. That is means you have to fix bootloop issue on your zenfone.
If you can not find the firmware for your device. Please comment below and Ill update as soon as possible.
Requirement
- ADB Driver
- Intel Driver
- ADB Fastboot Tool
- Zenfone Stock ROM (Download All Reqirement files from end of the post)
- Windows PC
Install Drivers on your PC
Download Intel driver from end of the post. Once it downloaded on your PC, Install it on your PC like normal software.Install ADB Driver
- Download ADB Drivers from end of the post.
- Connect your zenfone in recovery mode
- Run ADB Driver, and Click on Install button
- Done
How to fix bootloop on Zenfone
- Now Download ADB Fastboot tool and extract it on your PC desktop.
- Copy Stock ROM zip file in extracted adb folder.
- Now Open Stock ROM using winrar and extract boot.img and recovery.img from it.
- Boot your device in droidboot mode. By Press and hold Power off button after vibrate suddenly press Volume Up button.
- Connect your device with PC using ASUS USB Data cable.
- Now open adb folder and press SHIFT + Right Mouse Button and select open command here.
- Now Type below command one by one and hit enter after each line
- After successfully flash both files dont close CMD Window.
- Now select recovery mode then press power button ( if u dont know how to open recovery mode using droidboot mode then Power off your device and Press and hold Power off button after vibrate suddenly press Volume Down button. May be it show no command or show android image, Now Press and hold Volume down and Volume Up button again and again it will show you recovery menu.
- Now select apply update from adb option
- Now type below command and hit enter then hit enter.
fastboot flash recovery recovery.img
fastboot flash boot boot.img
fastboot flash fastboot fastboot.img
adb sideload filename.zip
If you can not find the firmware for your device. Please comment below and Ill update as soon as possible.
Download here
Intel USB Drivers- http://intel.ly/1hCwP2o
ADB Drivers- http://bit.ly/2cUnlTg
ADB TOOL- http://bit.ly/2dGYSjQ
Zenfone 5 Firmware- http://bit.ly/1NIe9wm
Go to link download
Monday, May 8, 2017
How to Root Zenfone 2 Laser ZE500KL Z00ED
How to Root Zenfone 2 Laser ZE500KL Z00ED
Tutorial - How to Root Asus Zenfone 2 laser ZE500KL/Z00ED with step by step guide. With the hep of root power you can access android system file and edit customized your device acording to your style. This method tested with Asus Zenfone 2 Laser ZE500KL WW_12.8.5.118. Lollipop firmware. You can also Record screen without root just check out How to Record Screen on Asus Zenfone without Root .

Requirement

Requirement
- ADB Fastboot Tool from End of Post.
- Mod Boot Image file
- Windows PC
How to Root Zenfone 2
Step 1. Install ADB Fastboot tool
- Run it as administrator.
- Press Y/Yes to install ADB and Fastboot.
- Press Y/Yes to install ADB system-wide or N/No for current user only
- Press Y/Yes to install Drivers
Continue Driver installation
finished!
Step 2. Now Enable USB Debugging from Settings > Developer Options (Note - If no developer options show in setting first go to Settings then About and then Build number tap 7x then developer options will show up in settings.)
Step 3. Download mod boot.img (Download from end of post)
Step 4. Enter fastboot Mode using Power+Volume up button.
Step 5. Connect Zenfone 2 Laser with PC.
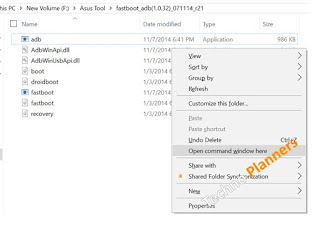
Step 6. at mod_boot.img folder open CMD (Shift+Right Click>Open Command Here)
Step 7. Type this command at CMD:
- fastboot boot mod_boot.img
Download here
ADB Tool - http://bit.ly/1kKaX7f
Mod Boot Image- http://bit.ly/1kKb82k
Done, Now your phone should automatically reboot. Once it reboot you can update SuperSU from play store if it ask for update. You can also check out How to Install Android 6.0 Marshmallow Boot Animation on Zenfone 2.
Go to link download
Sunday, May 7, 2017
Zenfone 2 Marshmallow Android 6 0 1 Beta for Laser ZE500KL
Zenfone 2 Marshmallow Android 6 0 1 Beta for Laser ZE500KL
Hello Guys, In this post I will show you How to update Beta Android 6.0.1 Marshmallow on Zenfone 2 Laser ZE500KL. Recently another developer shared another Official Beta ROM and this is the first edition of ROM so maybe there you will find minor bugs. This method tested, But do it with your own risk.
Once the Reboot process is done, You can taste the Android 6.0 Marshmallow beta on your ASUS Zenfone 2 Laser ZE500KL. May be there is lots of hidden bugs that you find in this ROM, Please share it with us and our other visitors. You can also check out a more tutorial on the ASUS Zenfone Tutorial Page. Please share this tutorial with your friends.
Ingredients for Marshmallow
- Android 6.0.1 ROM
- ADB drivers
- ADB Tool (Download all files from end of post)
Before Serve the Marshmallow ROM
Before Installing the marshmallow to your Zenfone 2 must be running on 12.8.5.222 firmware. You can check your firmware version at Settings > About > Software Version.How to Install ADB Driver on PC for Android
- Download Driver from below link.
- Extract setup on your desktop.
- Connect your device to PC using a data cable.
- Run ADB Setup on your PC.
- On ADB set-up, Your device shows in the list.
- Click on Install button.
- On installation process, it can prompt for windows Security Dialog Box.
- Click on Install this driver software anyway.
- Once its done, It will be shown Installation success with highlighted green check mark.
How to Update Android 6.0.1 Zenfone 2
- Download ADB Tool and install it on your PC.
- Download Android 6.0.1 ROM from below link.
- Once it downloaded on your PC, Extract ADB Tool on your desktop.
- Copy ROM.zip file on your extracted adb tool folder.
- Turn Off Zenfone 2 and reboot recovery by pressing the Power + Volume down button.
- Connect your device to your PC using a data cable.
- Open Windows CMD from ADB Tool folder by pressing and hold shift Key + Right click of mouse.
- Type Below CMD and hit enter.
- It can take more than 5 minutes to complete. Please wait and do not disconnect your device in this task.
- Once its done, Reboot your device normally for first boot it can take more than 5 minutes.
Download here
USB Drivers- http://bit.ly/1mxPlMW
ADB Tool - http://bit.ly/1L59zZg
ROM- http://bit.ly/1rCNOHc
Once the Reboot process is done, You can taste the Android 6.0 Marshmallow beta on your ASUS Zenfone 2 Laser ZE500KL. May be there is lots of hidden bugs that you find in this ROM, Please share it with us and our other visitors. You can also check out a more tutorial on the ASUS Zenfone Tutorial Page. Please share this tutorial with your friends.
Go to link download
Friday, April 14, 2017
Download Lineage OS ROM Zenfone 2 Laser Android Nougat 7 1 1
Download Lineage OS ROM Zenfone 2 Laser Android Nougat 7 1 1
Hello Guys, In this post we are sharing guide about how to install lineage OS ROM nougat on Asus zenfone 2 laser. So As we know as the Lineage OS nougat recipe is ready for Zenfone 2 laser. So, now in this post I will show you how to install Lineage OS on Zenfone 2 Laser. This method is tested by other users, but I am sure it will 100% work for you, but do it at your own risk and I am not responsible for any damage.
Pre-Requirement
Before flash any ROM, Make a full backup of your device using TWRP Recovery. With these backup you can restore your device in previous condition with full internal store data and applications.
Congratulation, After first boot you can use your zenfone 2 laser with Lineage OS Nougat ROM. Please note first, boot can take up to 10 minutes So, Please dont turn off your device. Please share this ROM on your social media sites. You can also check out How to flash CM14.1 Nougat on Zenfone 2 laser. Thank you and have a nice day.
Pre-Requirement
- Custom TWRP Recovery
- Device at least 50% charged
- Lineage OS ROM (Download all files from end of the post)
- GApps for Lineage OS
Before flash any ROM, Make a full backup of your device using TWRP Recovery. With these backup you can restore your device in previous condition with full internal store data and applications.
How to Install Lineage OS on Zenfone 2 Laser
- First Download Lineage OS ROM from the end of the post link given in red color.
- Second Download GApps for Lineage OS.
- Copy both zip files in your device internal storage/external storage.
- Switch Off your device
- Boot your device into TWRP recovery mode using your buttons
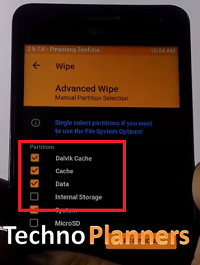
- Once your device successfully boot into TWRP Recovery Mode. Just Select Wipe > Advance Wipe > Check "Dalvik Catch", "Catch", "Data", "System" option and swipe to confirm wipe.

- Go back and Tap on Install option and find ROM file and flash it.
- Once its done, Similarly, flash GApps.
- Go back, Tap on Wipe and select factory reset option
- Reboot your device
- Done.
Download here
ROM- http://bit.ly/2hIFnKp
Congratulation, After first boot you can use your zenfone 2 laser with Lineage OS Nougat ROM. Please note first, boot can take up to 10 minutes So, Please dont turn off your device. Please share this ROM on your social media sites. You can also check out How to flash CM14.1 Nougat on Zenfone 2 laser. Thank you and have a nice day.
Go to link download
Monday, March 27, 2017
How to Root ASUS Zenfone 2 Laser ZE500KG Z00RD Update 2016
How to Root ASUS Zenfone 2 Laser ZE500KG Z00RD Update 2016
Hello Guys, In this tutorial Techno Planners will tech you How to Root ASUS Zenfone 2 Laser ZE500KL/Z00ED with easy steps by steps guide. Thank to XDA developers who create and share requirements documents with us to root this device.
What is Root
With Rooted Zenfone 2 Laser you can install Unapproved Application by Play Store. Root access also helps to change system configurations and help to delete/modify all system files from the device. It also helps to install custom ROM your Zenfone 2.
Void of Warranty
Asus will not cover your Rooted Zenfone under warranty. It is because the client gets framework level access and the client can add, edit or change any part of the product. You wont get OTA air upgrades in the wake of establishing yet you can download new firmware from ASUS official help-desk and redesign your Zenfone by means of adb sideload strategy.
Requirement
ADB Setup on your PC
First, you have to download ADB setup from end of post link given. Once it downloaded, Double click on adb-setup-1.4.2.exe file to install it on your PC. Once the Commend Windows Open on your Screen.
Install ADB system-wide?
Again Type Y and hit enter
Now it will ask - Do you want to install device drivers?
Similarly Type Y and hit enter
Enable USB Debugging mode
Once the above installation process is done. Now Enable USB debugging mode on your Zenfone. From Settings > about > Build number. Hit 7 times on build number to enable developer mode. Once it shows developers mode enabled. Now Go back to settings > Developers Options > Check USB Debugging mode.
What is Root
With Rooted Zenfone 2 Laser you can install Unapproved Application by Play Store. Root access also helps to change system configurations and help to delete/modify all system files from the device. It also helps to install custom ROM your Zenfone 2.
Void of Warranty
Asus will not cover your Rooted Zenfone under warranty. It is because the client gets framework level access and the client can add, edit or change any part of the product. You wont get OTA air upgrades in the wake of establishing yet you can download new firmware from ASUS official help-desk and redesign your Zenfone by means of adb sideload strategy.
Requirement
ADB Setup on your PC
First, you have to download ADB setup from end of post link given. Once it downloaded, Double click on adb-setup-1.4.2.exe file to install it on your PC. Once the Commend Windows Open on your Screen.
It will ask - Do you want to install ADB and fastboot?
Type Y and hit enter button to install it.Install ADB system-wide?
Again Type Y and hit enter
Now it will ask - Do you want to install device drivers?
Similarly Type Y and hit enter
Enable USB Debugging mode
Once the above installation process is done. Now Enable USB debugging mode on your Zenfone. From Settings > about > Build number. Hit 7 times on build number to enable developer mode. Once it shows developers mode enabled. Now Go back to settings > Developers Options > Check USB Debugging mode.
How to Root ASUS Zenfone 2 Laser ZE500KG
- Download fastboot tool and mod_Boot.img from end of post and extract it using WinRAR tool.
- Copy mod_boot.img file to extracted adb fastboot folder.
- Tune off your Zenfone, and open device in fastboot mode using Power + Volume buttons.
- Once your device in fastboot mode. Connect it with PC using data cable.
- From adb fastboot folder Open Commend (CMD) by using the Shift (Keyboard) + right click (mouse) > Open Commend here.
- Type this command in cmd. Fastboot boot mod_boot.img

Download here
ADB Setup - http://bit.ly/17BUI5H
Fastboot - http://bit.ly/1ooj0sh
Mod_Boot img - http://bit.ly/1KoRHs4
Fastboot - http://bit.ly/1ooj0sh
Mod_Boot img - http://bit.ly/1KoRHs4
Now Your phone will be rebooted automatically. You can verify your device is successfully rooted by downloading Root Checker Basic Application from Play Store on your ASUS Zenfone 2 Laser ZE500KG/Z00RD. In Previews post we already shared How to Root Asus Zenfone Selfie without PC
Go to link download
Saturday, March 25, 2017
How to Update Zenfone 2 Laser to Marshmallow firmware Complete Guide
How to Update Zenfone 2 Laser to Marshmallow firmware Complete Guide
Hello Guys ASUS roll out Marshmallow official firmware for ASUS Zenfone 2 Laser ZE550KL. Here is a complete guide to server methods first is ADB and the second is an OTA update. An old post we talk about How to Root Zenfone Max step by step.
Before Update
Before you go to the next step please make sure backup your personal photos, Games, contract and other data. Because after update your internal storage decreases the size of storing it can fail to update or remove some files from your Android phone.
Make sure before update currently your device running on latest Lollipop firmware. Otherwise, it will be failed to update your device. You can also check out More Tutorials on ASUS Zenfones device
Requirements
- Marshmallow Firmware, Download all files from end of the post
- ADB Tool only for Method 1
- Intel USB Drivers [Method 1]
- Device Running on Most latest Lollipop firmware
How to Update Zenfone 2 Laser to Marshmallow [Method 1]
- Download the firmware and ADB Tool from end of post
- Download and Install USB Drivers on your PC
- Extract ADB Tool on your desktop
- Copy Firmware.zip file in adb tool folder
- Turn off your Zenfone 2 Laser
- Go to recovery mode by pressing the Power + Volume down button, it will show android logo now press volume up + down and then release volume up (hold the volume down button until recovery) then select apply updates from ADB.
- Now Connect your Zenfone to PC using a data cable
- Open Command Window by press and hold CTRL Key of a keyboard, then right click from mouse select Open windows Commend here

- Type below command in CMD Window and hit the enter button
- Wait until the process is done and make sure you device not disconnected while this process
- Once its done, it will be rebooted automatically.
adb sideload WW-21.40.1220.zip
How to Update Zenfone 2 Laser to Marshmallow [Method 2]
- Download the_Firmware_from end of the post
- Connect Device with data cable
- Copy firmware.zip file to Internal Storage
- Disconnect device from the PC
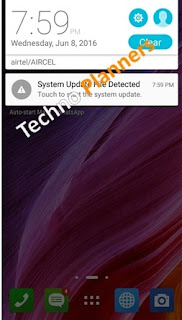
- System update notice will be appearing in the notification area of the zenfone

- Tap on it, hit on OK button
- Wait until the process is done
- Once its done, it will be rebooted automatically.
Download here
USB Drivers- http://bit.do/Drivers
ADB Tool- http://bit.do/ADB-TOOL
Firmware- http://bit.do/6-0-firmware
Once it is done, You can enjoy official update of Android Marshmallow on your ASUS Zenfone 2 Laser ZE550KL. If you fail to update your device with this method, please comment down below, we will reply As soon as possible. Please Share this info with your friends and family and tell him to update their device Lollipop to marshmallow. Before you go also check out Android 7.0 N-IFY module for Zenfones.
Go to link download
Friday, March 10, 2017
ZenFone 2 Laser CM14 1 Nougat 7 1 Official ROM
ZenFone 2 Laser CM14 1 Nougat 7 1 Official ROM
Hello Guys, In this post we are sharing guide about how to install cm14.1 android nougat on Asus zenfone 2 laser. So As we know as nougat recipe ready for Zenfone 2 laser now in this post I will show you how to install Nougat on Zenfone 2 Laser. This method is not tested by me, but I am sure it will work for you 100%, but do it at your own risk and I am not responsible for any damage.
Requirement
ROM Status
This ROM is stable for Laser but if you find anything wrong on this ROM, please drop your comment below and share bugs or any issue with our other visitors.
Congratulation, After first boot you can use your zenfone 2 laser with nougat update. Please note first boot can take up to 10 minutes for making catching files. Please share this ROM on your social media sites. You can also check out How to install xposed on nougat ROM. Thank you and have a nice day.
Requirement
- Device Running with Custom TWRP Recovery
- Device at least 50% charged
- Nougat ROM (Download all files from end of the post)
- GApps for Nougat
ROM Status
This ROM is stable for Laser but if you find anything wrong on this ROM, please drop your comment below and share bugs or any issue with our other visitors.
How to Install Nougat on Zenfone 2 Laser
- First Download Nougat ROM from the end of the post link given.
- Second Download GApps for Nougat.
- Copy both zip files in your device internal storage.
- Power Off your device
- Boot your device into TWRP recovery mode
- Once your device boot into TWRP Recovery Mode. Just Select Wipe > Advance Wipe > Check "Dalvik Catch", "Catch", "Data", "System" option and swipe to confirm wipe.

- Go back and Tap on Install option and find Nougat ROM and flash it.
- Once its done, Similarly, flash GApps.
- Go back, Tap on Wipe and select factory reset option
- Reboot your device
Download here
ROM- http://bit.ly/2ij3UlW
Congratulation, After first boot you can use your zenfone 2 laser with nougat update. Please note first boot can take up to 10 minutes for making catching files. Please share this ROM on your social media sites. You can also check out How to install xposed on nougat ROM. Thank you and have a nice day.
Go to link download
Subscribe to:
Posts (Atom)