Friday, May 19, 2017
How to Connect PC Link on Zenfone Latest Update
How to Connect PC Link on Zenfone Latest Update
The Best think about the PC Link Application. You can operate your Zenfone from your PC, Play any android game on your Computer like Asphalt 8, Temple Run and there is lots of features.
Requirement
- PC Link (Download from End of Post)
- You are using PC Link Updated Version
- Windows Operating System
- USB Data Cable
How To Install and Connect PC Link
Step 1. Install PC Link on you PC (Download from Below Link)Step 2. Launch PC Link on both device
Step 3. Connect your Zenfone with pc using a USB Cable and a dialog will shows up if “Enable USB debugging to us PC Link” Select OK
Step 4. Check “USB Debugging” option the select OK

Step 5. Now, On you PC under device name double click on your device.

Congratulations, Now you can use PC Link on Zenfone. If you are running your device on Android 5.0 version you can using PC Link without data cable. You can also check out How to Connect PC Link using Wifi Connection on Asus Zenfone Device.
Go to link download
Wednesday, May 17, 2017
How To Connect Your Blog To Auto Post To Facebook Group
How To Connect Your Blog To Auto Post To Facebook Group
Lately, a lot of bloggers in Nigeria are using Facebook groups to drive massive traffic to their blogs. They create Facebook groups, add thousands of members, then auto post to the Facebook groups from their blogs.
Auto Posting to Facebook group will save your valuable time so you can concentrate on other things after publishing new posts on your blog. Besides this, it keeps your Facebook group up to date with updates from your blogs and in return, you get traffic to the blogs.
If youre an admin to a Facebook group, you can connect your blog and start posting to it automatically by making use of dlvr.it.
How To Get Started
>> Sign up and Sign in to www.dlvr.it
>> On the "Automate" tab, click on "Add Route"
>> Enter your blog URL or Feed URL in the box and click "Find Feeds" button.
>> Once a feed is detected, click on the "+" icon, then click "Continue"
>> Next is to add the Social network you want to be posting to. Click "Add", select"Facebook Facebook"
>> Follow the steps till you connect to your Facebook group. Configure other settings as desired.
Thats all.
When next you publish a new post on your blog, it will be automatically posted to your Facebook Group.
I hope this helps.

Go to link download
Saturday, May 13, 2017
Connect Mouse and Keyboard with Asus Zenfone and Android Phone Tutorial
Connect Mouse and Keyboard with Asus Zenfone and Android Phone Tutorial
Pre Requirement
- USB OTA Cable
- Wireless mouse and Keyboard Combo
- Android version above Android 3.1
How to Connect Mouse and Keyboard with Phone
Go to link download
Tuesday, March 21, 2017
How to Connect WIFI without Password
How to Connect WIFI without Password
Go to link download
Saturday, March 18, 2017
How to Connect PC Internet to Android Mobile via USB Cable without Root
How to Connect PC Internet to Android Mobile via USB Cable without Root
- Windows/Linux/Mac PC
- Java JRE
- Reverse Tethering [RT] for PC
- Reverse Tethering Apk (That is a free version of RT for Android and it worked for 10minutes in 30minutes)
- Android USB Driver
- ADB Drivers
How to Connect PC Internet to Android Mobile using the USB Cable
- First, you have to download all required files from the end of the post.
- Connect device with PC using a data cable.
- First Install Java JRE on your PC
- Second install the USB Drivers on your PC. If this USB driver does not work for you, Please download USB drivers, according to your Android device model.
- Download ADB driver pack from the end of the post. Now connect your device and Run ADB drive on your PC and click on Install button. Wait it to finish it. Once it is done, Go to the next Step.

- Once both files installed on your PC, Copy Reverse tethering Apk on your Android device internal or external storage.
- Now Install Apk on your device.
- Open Reverse tethering on your device
- Click on Status Option
- Tap on the Connect button from the bottom
- Done
Congratulations, Now you can access internet from PC to Android device without Rooting. Now you can serve on the browser. But when I try to download Applications and Games from the Play Store it will give me a popup error (error code: 927) Google Play is not responding and always it showing downloading or connecting to a server. But when I try to download from the browser it is working. Also Check out How to Install Remix OS for PC Beta.
Go to link download
Wednesday, March 1, 2017
Connect Etisalat Smartpack without IP Using Psiphon
Connect Etisalat Smartpack without IP Using Psiphon
================
What required
================
================
What required
================
================
How to do
================
================
How to do
================
- Enable USB debugging from Developer option (Click on build Number for 7 times for enabling USB debugging on setting menu)
- Install the USB, ADB-VCOM drivers
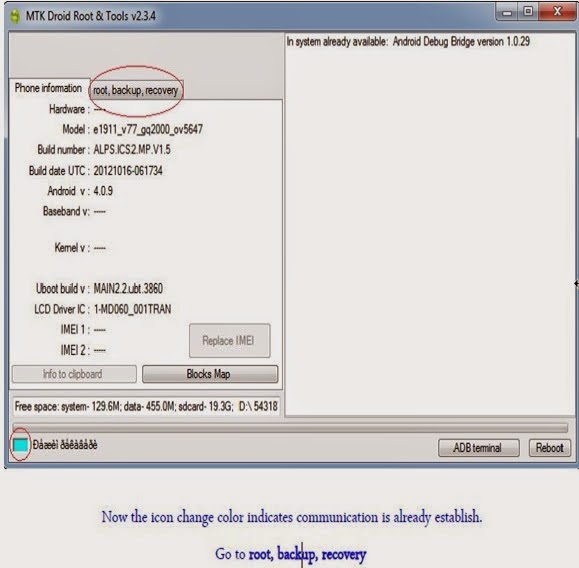
- Download, extract, and run the latest version of MTK Droid Tools.
- Keep your phone on.
- Connect the data USB cable to your phone.
- If Phone is properly connected the icon will be Green as below.
================? How to Restore ?================
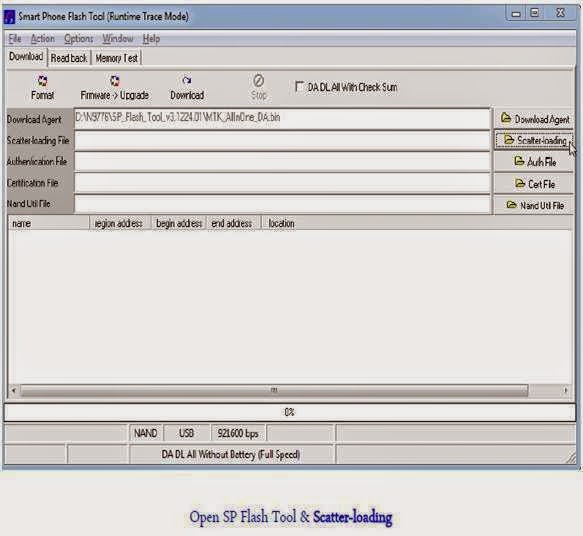
- Open SP Flash tool (Download)
- Make sure that USB, ADB-VCOM drivers are installed
- Click on Scatter-Loading Button
.jpg)
Go to link download