Showing posts with label kitkat. Show all posts
Showing posts with label kitkat. Show all posts
Tuesday, April 25, 2017
How To Install flash TWRP Philz Recovery for Zenfone 5 Kitkat Lollipop
How To Install flash TWRP Philz Recovery for Zenfone 5 Kitkat Lollipop
How to Install TWRP Philz Recovery on Zenfone 5 working with Kitkat and Lollipop Android operating system. Download Required file from end of post. You must check out One Click Root for Zenfone 4, 5, 6 and Zenfone 2.

Step 2. Enable USB Debugging (Settings - Developer Option - Enable USB Debugging Option)
Step 3. Connect Zenfone 5 With PC/Laptop
Step 4. Double click TWRPRecovery-install.bat
Step 2. Enable USB Debugging (Settings - Developer Option - Enable USB Debugging Option)
Step 3. Connect Zenfone 5 With PC/Laptop
Step 4. Double click PhilZ Touch Recovery-installer.bat
Step 2. Enable USB Debugging (Settings - Developer Option - Enable USB Debugging Option)
Step 3. Connect Zenfone 5 With PC/Laptop
Step 4. Double click lockbootloader-forOTA.bat

TWRP Recovery Zenfone 5 (Work at Kitkat/Lollipop)
Step 1. Download File AboveStep 2. Enable USB Debugging (Settings - Developer Option - Enable USB Debugging Option)
Step 3. Connect Zenfone 5 With PC/Laptop
Step 4. Double click TWRPRecovery-install.bat
PhilZ Touch Recovery Zenfone 5 (Work at Kitkat/Lollipop)
Step 1. Download File AboveStep 2. Enable USB Debugging (Settings - Developer Option - Enable USB Debugging Option)
Step 3. Connect Zenfone 5 With PC/Laptop
Step 4. Double click PhilZ Touch Recovery-installer.bat
To Apply OTA Update, you must back to Original Recovery:
Step 1. Download File AboveStep 2. Enable USB Debugging (Settings - Developer Option - Enable USB Debugging Option)
Step 3. Connect Zenfone 5 With PC/Laptop
Step 4. Double click lockbootloader-forOTA.bat
Download here
http://bit.ly/1FxFkAx
In this Post we show Installation Flash TWRP and Philz Recovery for Asus Zenfone 5 Kitkat and Lollipop support. You can also check out How To Get Double Tap (ZenMotion) feature in Asus Zenfone 5.
Go to link download
Thursday, March 30, 2017
Install Dolby Digital Plus Sound on Zenfone 5 Lollipop Kitkat
Install Dolby Digital Plus Sound on Zenfone 5 Lollipop Kitkat
Tutorial - How to Install Dolby Digital Sound on Asus Zenfone 4, Zenfone 5, Zenfone 6, Selfie and you can install it on any zenfone series.. Now you can change sound quality on your device earphone. In preview post we talk about Install Dolby Digital on Zenfone but unfortunately its working with Jelly bean or Kitkat. But now today i share Dolby Digital Application for Lollipop and tested with latest 3.24.40.78 firmware and its working with rooted Zenfone.
Requirement
Requirement
- Dolby Digital Apk (Download All files from End Of Post)
- Disable Application
How to Install Dolby Digital on Zenfone
Step 1. Download and Installation
First of all, you have to download Dolby Digital Apk and Disable App from below link and install it on your phone.
Step 2. Open Disable Application
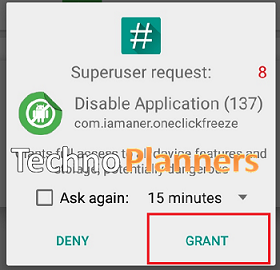
After Installed both applications on your device, Now Open disable app and search musicfx application. Just tap on musicfx and tap on OK button to disable it. If it ask for Super SU permission, Just hit on Grant Button.


Step 3. Open Asus Music App
Now Go to app drawer and open Asus Music App. Now tap three dot button from upper right corner. Just Select Settings then tap on Fine tune audio settings and enable it.
Download here
Disable App- http://bit.ly/1SiMRhc
Dolby Digital Apk- http://bit.ly/1ZDfgk4
Congratulation, Now you can enjoy your favrate music in Dolby digital sound quality. You can also check out How to Install Multi-user Mode on Asus Zenfone 5 and Zenfone 6.
Go to link download
Subscribe to:
Posts (Atom)